Categories
Bakes Mains Recipes

Spicy Veg Strudel

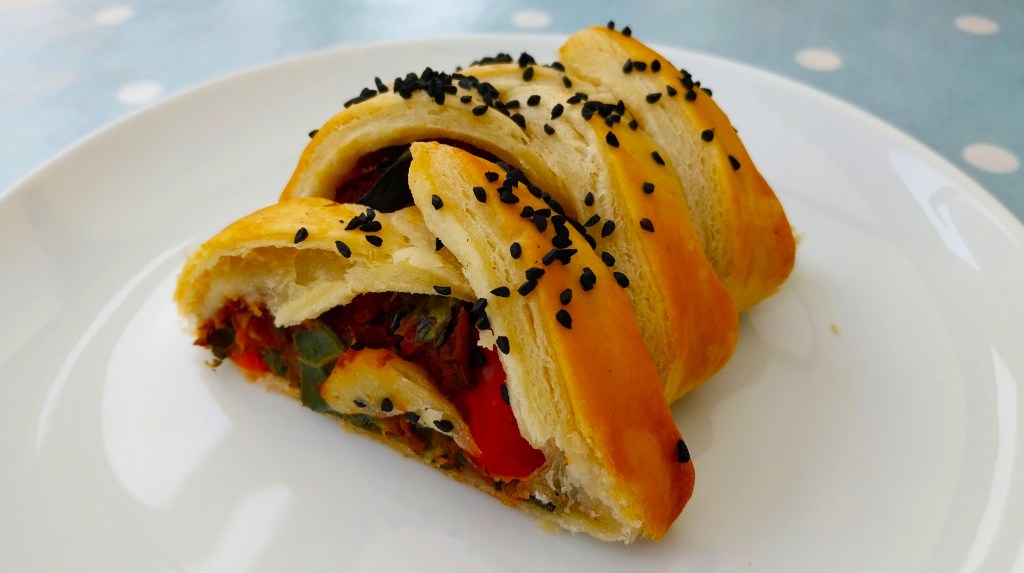
Strudel – isn’t that a German dessert with spiced apple? Well, yes that’s true. However, I had the idea of making a savoury version with a vegetarian filling and, instead of a dusting of icing sugar, topping it with a sprinkling of nigella seeds.

Once you’ve made the filling and let it cool, it is fairly quick to put together, especially as I’ve used a pack of pre-made puff pastry. It’s fun to make, as you’ll see from the photos below, and looks great when it emerges from the oven.

Servings

A tea time meal for 2.

Timings

15 mins to make the filling, and 10 mins to roll it up. About 25 mins in the oven at 180C.

You Will Need

  • drop of oil
  • 1 clove of garlic
  • 1 tsp chilli powder
  • 1 tsp cumin seeds
  • half a red onion
  • 4 – 5 mushrooms
  • 1 celery stick
  • 1 400g tin of kidney beans
  • 1 400g tin of chopped tomatoes
  • a handful of fresh coriander
  • a few leaves of kale or spring greens
  • half a 500g pack of puff pastry (i.e. 250g)
  • a little milk for basting
  • a handful of nigella seeds

Method

  1. Put the onion, celery and mushrooms in a food processor with blade fitted and blitz until finely chopped (but not pureed).
  2. Warm the oil, garlic, chilli powder and cumin seeds in a pan till sizzling. Add the blitzed vegetables and leave for a few minutes to soften.
  3. In the meantime, put the kidney beans, tomatoes, coriander and kale/greens into the food processor and blitz again till finely chopped (but not pureed). Tip into the frying pan.
  4. Give it all a good stir and leave to cook. You want the water to evaporate leaving a thick, mixed vegetable paste that will hold its shape and not be runny. Leave to cool, and turn the oven on to 180C.
  5. Open the pack of puff pastry and cut in half, putting one half back in the fridge to use another time. Roll the other half out with a rolling pin on a lightly floured surface, to make a rectangle approx. 40cm x 20cm.
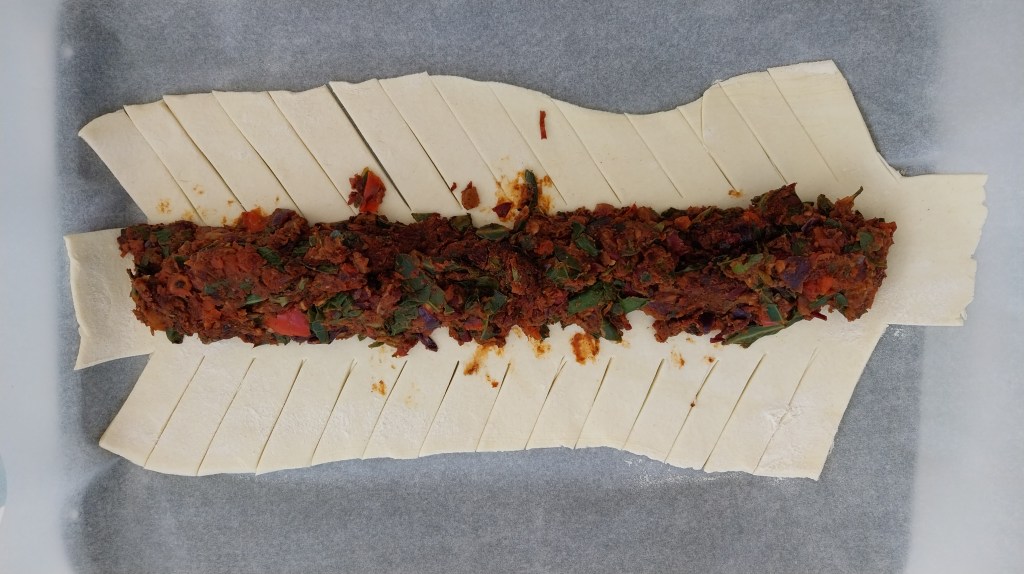
  6. Cut a piece from each of the corners as shown in the first photo below. Make cuts in each side to about one third of the way across, again as shown in the first photo. It should look like a Christmas tree on it’s side, with a top and bottom, and branches about 1 – 2cm thick.
  7. Place the cooled filling along the centre (the trunk of the tree). It is important that it has cooled, otherwise it will start to melt the uncooked pastry.
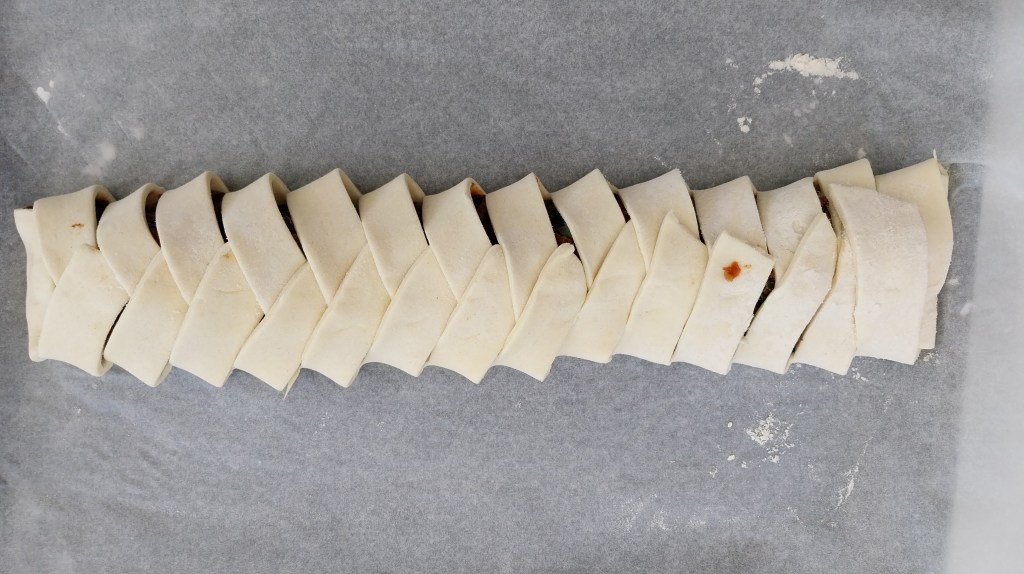
  8. Tuck in the flaps at the top and the bottom, then fold in each of the arms alternately, as shown.
  9. Baste with the milk, sprinkle over the nigella seeds.
  10. Place in the oven for about 25 mins or until golden brown.
  11. Serve by cutting off slices of your preferred size (see my main photo at the top of this post).

Customise It!

A food processor is ideal for making the mix, as it needs to be finely chopped to mesh and bind together to make the filling. However, you could chop the veg finely with a knife and mash it all with a masher while in the pan, if you need to.

Feel free to add or swap in other veg and spices. Peppers add colour, as will chopped or grated carrot, for example.

The pastry and the filling ingredients make this a self-contained, balanced meal in itself, perhaps just accompanied by some red or brown ketchup. You could serve with a salad if you wish.

This went down very well the first time I made it, to the extent that I have made it again with different fillings. It is easy once you’ve mastered the latticing technique shown in the photos. I will feature another of the fillings in my weekend post.

For choice of music, I think it’s time we added something by The Chemical Brothers to the ADK Playlist – here’s Let Forever Be.

Categories
Bakes Desserts Recipes

Cappuccino Cake

Hats off to our friends at Waitrose for this week’s recipe bake, an ideal cake for coffee lovers. With a sponge base made from real coffee, topped with a coffee cream frosting and a sprinkling of cocoa powder, it’s no surprise that this is given the title of Cappuccino Cake.

Servings

About 8 generous slices.

Timings

15 mins to prepare, 40 mins to bake.

You Will Need

  • 100g butter
  • 3 tbsp single cream
  • 2tbsp black coffee (made from ground coffee if poss, but instant will do)
  • 75g caster sugar
  • 50g light brown sugar
  • 2 eggs
  • 1 tsp vanilla extract
  • 100g self-raising flour
  • half tsp salt
  • 100g mascarpone
  • 3 tbsp icing sugar
  • cocoa powder for dusting

Method

  1. Warm the oven to 170C. Grease and line a 450g (1lb) loaf tin.
  2. Heat the cream and coffee in a microwave till mixed, then allow to cool.
  3. In a separate bowl, take 1 tsp of the cooled coffee cream and mix with the mascarpone. Set aside to chill in the fridge for use as frosting.
  4. Cream the butter and sugars with an electric mixer. Gradually beat in the eggs, vanilla and the rest of the coffee cream.
  5. Fold in the flour and salt, and combine to a smooth batter. Scrape into the lined loaf tin and bake for 40 mins.
  6. Transfer to a rack to cool.
  7. While the cake is cooling, finish off the frosting. Combine the chilled coffee mascarpone with the icing sugar and beat together with an electric mixer. Spread over the top of the cooled cake, and dust with the cocoa powder for that cappuccino effect.

Customise it!

If you are ok with nuts, you could add around 75g chopped walnuts to the sponge batter, effectively turning this into a cappuccino-topped coffee and walnut cake.

You can make the black coffee as strong as you wish – why not take the 2 tbsp required from a dark espresso, while you drink the rest.

Turning to choice of music, this week we heard the sad news of the passing of Andy Rourke, bass player in The Smiths. Andy was responsible for many wonderful bass lines in the band’s music, and here is one example – This Charming Man.

Categories
Bakes Recipes Snacks

Choc & Sea Salt Cookies

It’s sensory overload time with a double hit of sheer indulgence. Bite into one of these cookies for a taste of rich, buttery dark chocolate, closely followed by a wave of sea saltiness. Add chopped fruit, nuts, seeds or even white or dark chocolate pieces for even more heavenly pleasure.

The inspiration for these cookies came from a recipe by culinary legend Nigella Lawson, so thank you Nigella. She added pumpkin seeds to hers, which I am sure would also taste divine.

Servings

This makes 12 cookies.

Timings

15 mins to make, 15 mins to bake.

You Will Need

  • 50g butter
  • 70g caster sugar
  • 50g soft light brown sugar
  • 1 egg
  • 1 tsp vanilla extract
  • 80g plain flour
  • 35g cocoa powder
  • 1 tsp bicarb of soda
  • 80g choc chips
  • 80g mixed fruit and chopped nuts
  • a few twists of sea salt from a grinder

Method

  1. Turn the oven on and heat to 180C.
  2. Beat together the butter and sugars in a bowl, with an electric mixer. Add the egg and vanilla and mix again.
  3. In a second bowl, mix together the flour, cocoa powder, bicarb and a few twists of the sea salt.
  4. Combine the contents of the two bowls and stir together with a spatula to mix. Fold in the choc chips, fruit and nuts.
  5. Use a teaspoon to scoop out the mix into 12 lumps, rounding each gently between your palms, roughly into the shape of a ball. Place each on a baking tray lined with baking paper. Don’t crowd them – they will flatten into discs as they bake, so leave a few cm of space around each one. Use a second tray if necessary.
  6. Before placing in the oven, grab that sea salt grinder again and give them all a twist or two over the tops. Place in the oven and cook for 10 – 15 mins. Keep an eye on them so they don’t overcook.
  7. When removed from the oven, allow them to rest on the warm tray for a few minutes, during which time they will start to firm up. Then carefully lift each one with a spatula on to a wire rack to cool.
  8. The cookies can be eaten warm or when cold – they are delicious either way. They will also keep in a sealed box for 2 – 3 days, though I guarantee they will all be eaten before then!

Customise It!

Mix the added fillings to your taste. In place of the fruit and nuts, you could add biscuit pieces and mini marshmallows for a rocky road vibe. The next time I make these, I plan to add chilli flakes and lime zest.

Musical choice this time is a track I really like by Death in Vegas – Scorpio Rising. It features a guest vocal from the unmistakeable Liam Gallagher.

Categories
Bakes Mains Recipes

Kale & Sweet Potato Flan

Now here’s a dish to help tackle the cost of living crisis. Not only will it feed the family on a budget, but the bright, neon-like orange beaming from the roasted sweet potatoes will mean you can switch the lights off for the evening and bask in its glow.

Ok, maybe a slight exaggeration, but the bright, cheerful sunshine colours of this savoury, vegetarian flan, as shown in the photo, are for real.

Timings

40 mins to prepare, and another 40 mins to bake.

Servings

4 generous portions.

You Will Need

  • 225g plain flour
  • pinch of salt
  • 100g margarine or spread
  • 2 – 3 tbsp cold water
  • 3 – 4 sweet potatoes
  • oil
  • 1 leek
  • half a red pepper
  • 8 or 9 leaves of kale
  • 1 egg
  • splash of milk
  • salt and pepper

Method

  1. Warm the oven to 180C.
  2. Pierce the sweet potatoes with a fork and place in a metal dish. Chop the red pepper into pieces, drizzle with oil, and place alongside. Leave to roast in the oven for 30 mins.
  3. Chop the leek and place in a saucepan with a little oil, over a gentle heat. Leave to soften for around 10 – 15 mins.
  4. Steam the kale over a pan of boiling water for 10 mins.
  5. Prepare the pastry base by sieving the flour and salt into a food processor with blade fitted, then adding in the margarine or spread. Blitz till it resembles breadcrumbs. If you prefer, you can complete this stage with an electric mixer instead.
  6. Add in enough water to mix to a smooth dough, then tip out on to a lightly floured surface. Roll out to a size that fits the flan dish you will be using (mine shown is 22cm diameter).
  7. Grease and line the dish with a circle of baking paper, then place the pastry on top. Smooth out to the sides and trim any that is overhanging. Place in the fridge to chill for 10 mins.
  8. Scrunch up another piece of baking paper and then unroll it in the centre of the pastry dish. Fill with ceramic baking beans and place in the oven for 10 mins.
  9. While the pastry base is blind baking, you can combine the filling. Cut the roasted sweet potatoes down the middle and scrape out the soft orange flesh into a bowl. Mash it with a fork, still leaving a few lumps. Add in the roasted red pepper, and leave to cool slightly.
  10. Remove the pan of leek from the heat, and let cool slightly.
  11. Dry the steamed kale leaves between 2 slices of kitchen paper, then spread on a board and cut into shreds.
  12. For the final part of the filling, crack an egg into a jug. Add the splash of milk and season with salt and pepper.
  13. Take the pastry dish from the oven, removing the paper and baking beans. Spread the leek over the base, then top with the sweet potato and red pepper. Dot in the kale and, to finish, gently pour over the beaten egg/milk.
  14. Place back in the oven for 40 mins. Serve!

Customise it!

Stick with the combination of roasted sweet potato and steamed kale, but feel free to swap in other veg around this. I used roasted red pepper because I wanted to enhance the fiery sunshine appearance, but you could use green if you wish. Replace the leek with brown or red onion. Slices of celery would go well. Use your imagination, basically.

A few posts ago, I mentioned I was enjoying the most recent album from dance and electronica pioneers, Leftfield. Here’s another great track from it, which reminds me a little of Kraftwerk – City of Synths.

Categories
Bakes Recipes

Coronation Scones

Today I’m featuring a recipe that is, quite literally, fit for a King!

Across the UK this weekend, people will be watching history in the making, as our new King and Queen are crowned at Westminster Abbey, in London.

On Saturday, the procession route will be lined with Union Jack waving wellwishers, and those that can’t be there are able to watch the whole proceedings live on free to air TV. With all the pageantry on show, events are guaranteed to be quite some spectacle.

Sunday is the day for street parties in local communities, finishing with a major concert at Windsor Castle, also live on TV.

On Monday, we are being given a day’s national holiday so that we can recover from all this partying and excitement. Hey, we haven’t had one of these for 70 years, when most of us (me included) weren’t even alive. Coronations only come around once every few generations, so there’s no surprise it’s getting this much special attention.

Here’s what I’m making for our own local street party – a Coronation take on a Brit classic – the scone with jam and clotted cream. Served with a pot of tea, of course.

Happy and Glorious!

Servings

Makes 8 scones.

Timings

15 mins to prepare, 15 – 20 mins to bake at 180C.

You Will Need

  • 450g self-raising flour
  • 115g soft margarine or spread
  • 85g caster sugar
  • 85g sultanas
  • 1 egg, beaten
  • 200ml milk
  • strawberry jam and clotted cream to serve
  • Union Jack flag to wave (optional)

Method

  1. Put the flour and margarine into a bowl and mix with an electric mixer until it resembles fine breadcrumbs.
  2. Stir in the sugar and sultanas.
  3. Mix in the egg, and gradually add in 150ml of the milk to make a soft dough.
  4. Turn it on to a floured surface and knead slightly. Roll out to a 2cm thickness.
  5. Stamp out circles with a 7cm diameter fluted biscuit cutter, and transfer to a baking sheet covered in a layer of baking paper. Reroll the dough as necessary till you have 8 shapes cut.
  6. Brush the tops with the remaining milk and bake for 15 – 20 mins at 180C.
  7. Serve warm or cold, split and topped with the jam and clotted cream.
  8. Wave a little Union Jack flag as you eat!

Customise It!

If you’re watching your cholesterol, you can replace the clotted cream with low fat spread. Other fruit jams, like raspberry or cherry, will work just as well if you prefer.

What better time than the Coronation to add some joyous Britpop to the ADK Playlist. I am sure Charles and Camilla would approve. Here’s Blur with Parklife.

Categories
Bakes Recipes

Vegan Choc Cupcakes

As the egg shortage in our shops continues, so does my search for alternatives to the use of eggs in baking.

Today I’ve borrowed a great recipe for vegan vanilla cupcakes over on Tulsi’s Vegan Kitchen. Click on the link if you wish to see it – there is also a very helpful You Tube instruction video that I can recommend. Thank you, Tulsi!

So what takes the place of eggs in the recipe? Unsweetened almond milk, curdled with a tablespoon of vinegar (I used cider vinegar). I wondered if this would add sourness to the taste, but it absolutely doesn’t. It just replicates the use of buttermilk in baking, which adds taste and texture through its extra acidity.

The one development that I have made is to add 3 tablespoons of cocoa powder to the dry ingredients, turning mine into chocolate cupcakes, as you can see in my photo above. The mixture rises well and is very moist. An undoubted success!

This recipe, and the one in my previous post using avocado to give texture to a chocolate mousse, have certainly opened my eyes to the possibilities of egg-free baking.

In the music world this week, I’ve been enjoying exploring more of a certain band I’ve admired for some time. As well as listening to music while I cook, I also tune in with my ear pods while at the gym. I’ve discovered that this, the band’s most recent track, has the perfect beat and rhythm to work out to on the elliptical trainer (perfect for me, that is, coming in at 68-69 revolutions per minute). So once you’ve enjoyed the choc cupcakes, burn those calories and get the arms and legs pumping in sync with LCD Soundsystem – this is New Body Rhumba.

Categories
Bakes Desserts

Hot Cross Bun Pudding

The idea for this week’s dish has been sent in to me by keen follower of A Different Kitchen, Pamela (thank you, Pamela). It is a kind of bread and butter pudding made with hot cross buns and fruit. The original recipe that it is based on came from Waitrose, and included rhubarb, which Pamela says prompted her husband to comment that this is one of the nicest puddings you have ever made.

High praise indeed!

In my version, I’ve changed it up a bit to include raspberries and blueberries as another option.

Hot cross buns are plentiful in the shops this time of year, and this is a good way of using up ones that may still be at the back of your cupboard, a day or two old. Their dried fruit, spices and glaze go well in a custard-style pudding.

You may also be able to pick them up in the shops at the moment at reduced price. This happened to me completely by chance – I didn’t get round to shopping for this till a few days after Easter Sunday, by which time Sainsbury’s were selling off yellow stickered packs of six for the princely sum of 15p (which equates to 20 US cents) each. As they say in a cost of living crisis, every little helps!

Timings

10 mins to combine, then 30 mins to chill. Another 30 mins to bake at 180C.

Servings

At least four generous portions.

You Will Need

  • 4 hot cross buns, which can be a day or two old
  • Butter or spread for the buns
  • 50 g caster sugar
  • 3 medium eggs
  • 300ml single cream
  • 100ml milk
  • 1 tsp vanilla extract
  • 15 – 20 raspberries and 15 – 20 blueberries

Method

  1. Slice each bun horizontally into 3, and spread each slice on one side with butter or your choice of spread.
  2. Arrange them in a baking dish so that they overlap at 45 degree angles. This will mean the submerged parts of the buns soak in the custard, while the peaks crisp up and caramelise.
  3. Stud the berries in between the bun slices, to get good coverage all over.
  4. Combine the sugar, eggs, cream, milk and vanilla extract in a bowl with a mixer. Pour all over the buns, and place in the fridge to chill for 30 mins.
  5. Heat an oven to 180C, and put in the dish for around 30 mins. Keep an eye on it for the last 10 mins or so to make sure the tops are crisped, but not burnt.
  6. Serve warm. It is also great cold.

Customise It!

As suggested, you can vary up the fruit to include whatever you like or have to hand. As we know from Pamela, rhubarb will work very well – stew about 400g in 80g sugar with a little orange juice, and spread amongst the buns.

Do you have an idea for a dish that can be featured on A Different Kitchen? And if so, would you like to choose the next track for the Playlist? Drop me a note in the comments below, if so.

This week’s track for the Playlist is one that I know Pamela will appreciate. Here’s Rod with You Wear it Well.

Categories
Bakes

Cherry Almond Traybake

A biscuity pastry crust, spread with a layer of rich cherry fruit jam, topped with eggy, almondy sponge and toasted flaked almonds. Sound good? It certainly tastes good! This indulgence can be yours – read on.

Servings

This will make 16 slices.

Timings

15 mins to make and chill the pastry. Another 10 mins to make the sponge filling while the pastry is baking blind, then 50 mins to bake the full cake.

You Will Need

  • 225g plain flour
  • 100g butter or margarine spread
  • pinch of salt
  • a few drops of cold water
  • 300g cherry jam
  • 150g veg oil
  • 200g caster sugar
  • 100g ground almonds
  • 100g self-raising flour
  • 1 tsp baking powder
  • 1 tsp almond extract
  • 4 medium eggs
  • 25g flaked almonds

Method

  1. Grease a traybake tin and line with baking paper. Mine is approx 22cm square.
  2. Sieve the plain flour into a food processor with blade fitted. Add in the butter or spread and blitz till it has the consistency of breadcrumbs. Add as much water as necessary to make a dough.
  3. Roll out on a floured surface and press in to cover the bottom and sides of the tin. Put in the fridge to chill, and turn on the oven to 180C.
  4. When the oven has reached temperature, take the pastry dish from the fridge, and fill with ceramic baking beans over a piece of crumpled baking paper. This will help stop the pastry rising and burning in this first stage of cooking, where the pastry base is ‘baked blind’. Put in the oven for 10 mins.
  5. While the pastry is baking blind, combine the rest of the ingredients (except the jam and flaked almonds) in a bowl and mix with an electric mixer.
  6. When the pastry base has had its 10 mins, take it from the oven and remove the beans/paper. Spread the cherry jam all over. Then pour on the egg and almond mix, even it out with a spatula and sprinkle the flaked almonds all over. Place back in the oven for 50 mins, or until nicely golden, and when a skewer put into the centre of the cake comes out with no wet mixture sticking to it.
  7. Leave to cool, then turn out of the tin and cut into squares.

Customise It!

Cherry and almond is a classic taste combination, but raspberry jam will also work well.

Posting this traybake gives me a word association-style opening to add this next track to the ADK Playlist. No, not The Jam. Nor Marc Almond. Here’s a beautiful duet between Neneh Cherry and Youssou N’Dour – Seven Seconds.

Categories
Bakes Desserts Recipes

Baked Blueberry, Lemon & Mascarpone Cheesecake

Heard the one about the new Italian toy craze loved by foodies? It’s called My Little Mascarpone.

I recently found myself with a tub of the silky rich cheese left over after making Cherry, Mascarpone & Biscotti Dessert, and wondered what else I could come up with. I spotted some unused blueberries in the fridge and there are usually some lemons in the ADK fruitbowl. Hey presto, the idea for a baked cheesecake was born.

I was introduced to baked cheesecake a few years ago in a New York deli, and loved it. I like how baking makes the taste and texture more intense, while browning and caramelising the top.

Servings

8 good sized slices.

Timings

10 mins to make the pastry, and 10 mins to make the filling, while the pastry base is chilling and the oven is warming up. Up to 50 mins to bake.

You Will Need

  • 225g plain flour
  • 100g butter
  • pinch of salt
  • a few tsp tap water
  • 50g caster sugar
  • 1 egg
  • 250g mascarpone cheese
  • 1 tbsp lemon curd
  • zest and juice of a lemon
  • 1 tsp vanilla extract
  • 125g blueberries

Method

  1. Sieve the flour into a food processor with blade fitted. Add in the butter in chopped cubes and whirl till you have the texture of breadcrumbs. Drop in enough water and swirl again, till it makes a ball of dough.
  2. Roll out on a floured surface and line a pastry dish. Mine shown in the main photo is 21cm diameter. Place in the fridge to chill, and turn on the oven to 180C.
  3. When the oven has reached temperature, line the pastry with scrunched up baking paper filled with ceramic baking beans, and put in the oven for 10mins. This will part bake the pastry base before adding the filling.
  4. While the pastry base is cooking, make the filling by mixing the sugar and egg in a bowl. Add in the mascarpone, lemon curd, zest, juice and vanilla and mix it all with an electric whisk.
  5. Remove the base from the oven, and take out the baking paper and beans, leaving them in another bowl to cool. Pour the filling into the pastry base, and stud all over the surface with the blueberries. Press the blueberries down just enough so that they adhere to the filling but can still be seen from above.
  6. Bake in the oven for around 50 mins. Check on it after 35 mins – if a skewer inserted in the middle is coming out with no wet mixture on it, the cake will be cooked. I like to leave mine for the fuller 50 mins, as I like how this gives the filling a dense and richer texture, and the top to be browned and caramelised.
  7. Leave the baked cake to cool before serving.

Customise It!

I used blueberries as I had a pack unused in the fridge. You could just as easily use raspberries or other berries. Also, if you don’t like making pastry, or don’t have ceramic baking beans, you can use a shop-bought base. You could also use a pack of ready made shortcrust pastry, if you wish.

New York is also the inspiration for the latest track to add to the ADK Spotify Playlist. There really are so many great bands I could choose from here: the Velvet Underground, New York Dolls, Talking Heads, Sonic Youth, Interpol… and of course these lads from Queens. Here are The Ramones, with Rockaway Beach.

Categories
Bakes Blog

Bread Maker Pizza

Bread making machines have had something of a topsy turvy existence. Invented in the ’80s, they became widespread in homes in the ’90s and ’00s, as the smell and taste of freshly baked bread, at little more than the push of a button, became the next domestic ‘must have’ appliance.

Then, they rather fell out of favour. With growing awareness of the need to manage one’s carb intake, I know a few people who placed theirs in car boot sales, or simply gave them away.

There was then something of a resurgence in the pandemic. A combination of boredom in isolation, wish to avoid busy shops and some food shortages prompted people to dig their bread maker out from under the stairs, and bring it back into use.

While the pandemic is now well in decline, today’s cost of living crisis is once again reviving interest in home baking.

My experience is that it is very easy to slip into a rut with bread making – we find one of the pre-programmes that works for us reliably, and make the same loaf over and over again. It’s useful to remind ourselves that they are actually quite versatile and sophisticated machines. Mine is a Panasonic 2500, and the programmes enable dough preparation for ciabatta, focaccia and various fruited and seeded breads.

My photos show how I’ve used it recently to make a pizza base. I have had some mixed results in the past when making yeast dough by hand, as there are a number of variables, and things can easily go wrong. However, I find the bread maker version much more reliable.

Following the instructions in my manual, I tipped some fast action dried yeast powder, strong white bread flour, olive oil, salt and water into the tin. The machine then mixed, swirled and kneaded it all automatically for 45 minutes as per the set programme.

I left it covered in a warm place till ready to use. The soft and pliable dough came away easily from the tin, didn’t stick to my fingers, and was easy to stretch out with my hands on a floured surface.

I added some tomato and onion sauce I’d made, with fresh torn basil leaves, then topped it with soft fried chopped mushrooms, peppers, black olives and grated mozzarella cheese. Here it is ready to go in the oven at 180C.

12 minutes later, it looks like this and tasted delicious! The base had baked evenly from the edges all the way to the centre. It is also a fraction of the cost of a Domino’s. You can vary the ingredients if you wish, to incorporate your favourite toppings.

So if you have a bread maker somewhere gathering dust, why not look it out and try some new styles of bread? Never mind if you’ve lost the instruction manual, they are usually still available online. With fresh ingredients, and some fast action dried yeast you should, like this classy track from Gabrielle, be ready to Rise again.