Categories
Mains Recipes

Asparagus Risotto

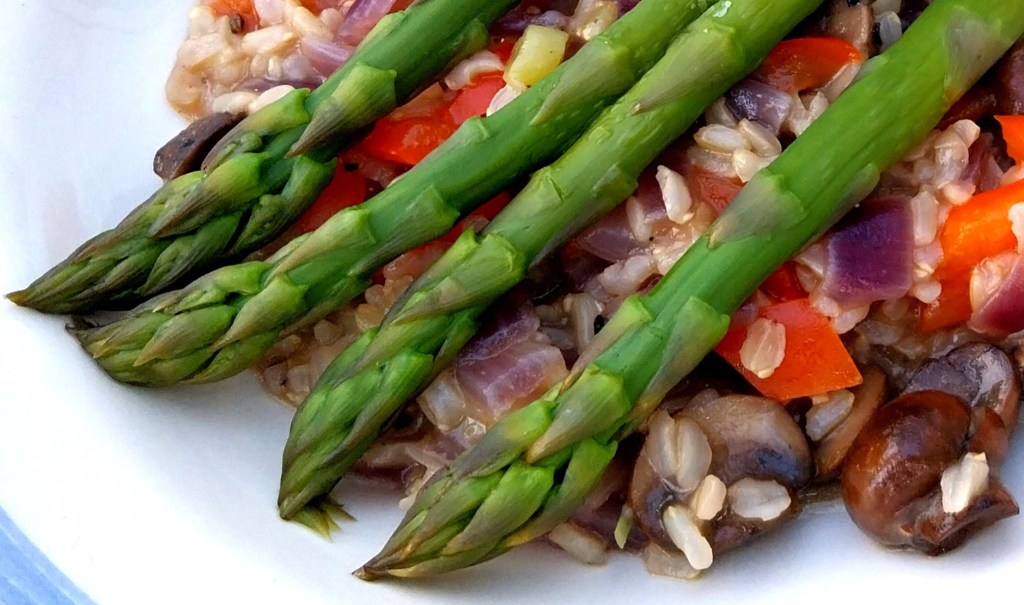
Yay – it’s the time of year when fresh asparagus appears in our shops. I came across the beautiful bundles of spears shown below in a shop on a vineyard this week, while visiting the New Forest.

They were grown just over the Solent on the Isle of Wight, so very few food miles have been travelled in getting them to my plate!

Asparagus has a unique and delicate taste, and is quick and easy to prepare and cook. Nutrition-wise, it has a lot to say for itself, packing high levels of Vitamins A and C, potassium, iron and calcium.

I decided to make it the main feature of this dish, supported by a mild tasting vegetable risotto. You can see the finished article in my main photo at the top of the post.

Servings

A meal for 2.

Timings

15 – 20 mins to prepare and cook.

You Will Need

  • 1 red onion, chopped
  • 1 red pepper, chopped
  • 6 – 7 small chestnut mushrooms, chopped
  • 100g risotto rice
  • 500ml chicken or veg stock
  • 8 fresh asparagus spears
  • 2 – 3 scallions (spring onions) chopped
  • some blue cheese to crumble in

Method

  1. Heat some oil in a saucepan and fry the onion, pepper and mushrooms for a few minutes.
  2. Add the rice and turn the heat down while you stir it in. Then pour in the stock and bring to the boil.
  3. Wash the asparagus, and trim/discard about 1cm from the end of each spear. Place the spears in a steamer basket on top of the saucepan. Reduce the temperature to a simmer and let the risotto cook, and the asparagus steam, for about 10 mins.
  4. Remove the steamer basket and set to one side to stay warm.
  5. Turn up the heat under the saucepan if necessary to reduce the risotto to the right consistency – there should be minimal liquid left and the grains should be a little sticky with the coating.
  6. Stir in the chopped scallions and crumble in the pieces of blue cheese. Stir to combine so that the cheese is just melting in the residual heat.
  7. Spoon the risotto into two bowls and top each with 4 spears. Serve.

Customise it!

Feel free to add in any other fresh veg you have to hand – chopped celery, carrot, peas or green beans will all go well. I didn’t use garlic as I didn’t want to risk drowning out the delicate flavour of the asparagus. Avoid chilli or any strong spices, though some gentle fresh garden herbs torn in should be fine.

Spring is definitely in the air now, and daytime radio is starting to brim with those classic tracks I love to hear in the good weather, played driving along with the windows down, of course.

Lauren Laverne played this one on 6 Music this week, while I was out in the car, and it had my fingers tapping on the steering wheel. I especially like the dreamy guitar track, once famously sampled by Ice Cube. I still prefer the original however. Here it is to share: The Isley Brothers with Footsteps in the Dark, Parts 1 & 2.

Categories
Recipes Sides

Spicy Rhubarb Relish

Over to my wife, Lesley, for a guest post on a tasty, spicy relish made from a batch of the lovely rhubarb that is in season this early in Spring…..

At the community farm I belong to, April, May and even into early June is called the Hungry Gap for good reason. All our winter crops have been harvested, our spring crops are seedlings, and there are precious few fresh fruits and vegetables.

Step up rhubarb. Field rhubarb is plentiful in April and May and I take my share of approx 500g home each week. As ever, a glut like this can be bottled and so I have invested in a book to help me, published by the Dorset-based River Cottage team, headed up by TV chef, Hugh Fearnley-Whittingstall. 

This is one of the recipes, creating a Spicy Rhubarb Relish. It’s easy to do, making 4 jars worth of relish in one regular-sized saucepan. We have enjoyed a dollop on salads, over hot dog sausages and in sandwiches. It’s sweet and spicy, and next time I will experiment with a wider variety of spices in the muslin spice bag.

Servings

Makes 4 x 340g jars.

Timings

Takes about 40 mins to make.

You Will Need

  • 500g granulated sugar
  • 100ml water
  • 1kg rhubarb (untrimmed weight)
  • 100ml cider vinegar
  • 125g raisins

For the spice bag:

  • a piece of muslin about 20cm square
  • a piece of string about 30cm in length
  • 4cm chunk of root ginger bruised with rolling pin
  • 2 cinnamon sticks snapped up
  • 6 or so cloves

Method

  1. Place the spices in the centre of the muslin. Gather the muslin up to create a parcel with the spices inside, and tie it with the string.
  2. Dissolve the sugar in 100ml of water and bring to the boil, with the muslin bag submerged to infuse the spicy mix into the syrup.  
  3. Turn off the heat and leave for 20 mins or so. Take the bag out and discard.
  4. Trim and chunk the rhubarb, add into the syrup with the vinegar and raisins. Bring back to the boil and let the rhubarb soften. Most of the chunks will break down into a soft spoonable relish. 
  5. Pour into pre-sterilised jars. Leave to cool down and store in the fridge. 

The relish is very versatile. You can enjoy it in a number of ways – alongside cheese, ham or cold meats, or as a dollop spooned into a bowl with lettuce, cucumber, tomato, rice or grains, and other salad ingredients.

As a guest author on A Different Kitchen, I get to select the next track for the ADK Playlist. My choice is one of the many great songs we enjoyed hearing recently at the Northern Soul Orchestrated show in London. This is Frankie Valli & the Four Seasons with The Night.

Categories
Bakes Recipes Snacks

Cheddar and Scallion Savoury Muffins

Today’s bake has the look and texture of a muffin with the taste of a savoury scone. If, like me, you adore the heavenly flavour of cheese and onion, you’ll love these savoury muffins made with grated mature cheddar cheese and fresh chopped scallions (spring onions). They contain much less sugar than sweet muffins, and are suitable for vegetarians.

What’s not to like?

Servings

Makes 12 savoury muffins.

Timings

10 mins to prepare, 25 mins to bake at 160C.

You Will Need

  • 255g plain flour
  • 3 tsp baking powder
  • 1/2 tsp salt
  • 3 tbsp caster sugar
  • 60g mature cheddar cheese, grated, plus extra for topping
  • 3 scallions, finely chopped.
  • 1 egg
  • 240ml milk
  • 90ml vegetable oil

Method

  1. Turn the oven on to 160C. Prepare a muffin tin or mould.
  2. Sieve the flour, baking powder, salt and sugar into one bowl, and stir to mix. Add in the cheddar and scallions, stirring again to ensure the scallions are coated in the flour.
  3. In a second bowl, combine the egg, milk and veg oil.
  4. When the oven is up to temp, pour the contents of the second bowl into the first. Stir until fully combined, then spoon the mixture evenly into the tray or mould.
  5. Place in the heated oven. After about 15 mins, take from the oven and sprinkle the grated cheese topping over each muffin. Place back in the oven for a further 10 mins, until risen and the cheese topping is lightly browned.
  6. Place on a wire rack to cool, then enjoy!

Customise it!

Mature cheddar works well as it is strong tasting, but you can experiment with other cheeses if you wish. You could also include some nuts or seeds in the sprinkled topping.

I’ve been quietly pleased with how good these taste, and the fact they can be easily transported for picnics and as snacks on the go. This means I will probably be trying further variations on savoury muffins – I reckon on giving chilli a go, and possibly a vegemite option in honour of my recent Australian travels. Watch this space!

Music this week comes from the recent match-up between Manchester legends Liam Gallagher (Oasis) and John Squire (Stone Roses). I had downloaded their album and listened to it on my travels back from Australia. This is probably my favourite track, with the kind of 60’s British pop-influenced chorus you might expect from these two: Mars to Liverpool.

Categories
Mains Recipes

Eggplant Parmigiana

After several weeks on the road around Australia, the time has come to travel back to the UK. We have had a brilliant time. Thanks to every one of you who has followed my posts along the way – I hope you’ve enjoyed the food, the photos and the fun, along with some great new sounds. As my tagline says: Good Food, Great Music.

One of the things I am looking forward to is getting back in the kitchen and working on some new dishes, fully armed with the ideas and inspiration I’ve taken from the food we’ve enjoyed on our travels. I have actually had a first attempt this week, from the kitchen at our temporary home in Melbourne, to prepare a meal for some guests.

Influenced by our stay in the Blue Mountains, I was keen to create my own version of the Eggplant Parmigiana dish I enjoyed there (and which you can see a photo of by following the above link).

Parmigiana is eaten widely in bars and cafes in Australia. There are various ways in which it is served, probably the most common being as a topping over a fried chicken breast, sometimes flattened as per a schnitzel. Based on an Italian pasta sauce recipe (brought here long ago by some of the many European settlers who have made Australia their home), it isn’t difficult to see why it’s so popular, being tasty and filling.

I’ve made a few changes in mine from the vegetarian version I ate in Leura: rather than serving crusty bread alongside, I have broken the bread down into croutons, mixing these with the parmesan and mozzarella to give it a crispy, toasted cheesy topping. I’ve also added black olives, which I always think go really well with a rich tomato sauce.

I’m respecting the Aussie lingo in this recipe, so stick with me as I talk about eggplant (a.k.a. aubergine) and capsicum (a.k.a. red pepper). No worries, mate.

Timings

20 mins to prepare, 30 mins in the oven at 180C.

Servings

4 adult servings.

You Will Need

  • 2 eggplants (aubergines)
  • 1 large onion
  • 1 capsicum (red pepper)
  • 2 tbsp oil, with more to drizzle
  • 1 garlic clove
  • 500g tomato passata
  • 16 – 18 pitted black olives
  • sprinkling of dried mixed herbs
  • a few twists of black pepper
  • about 1/3 of a crusty baguette
  • 50g grated parmesan cheese
  • 50g grated mozzarella cheese

Method

  1. Switch on the oven to warm up to 180C. Find a shallow casserole dish and set on one side for the moment.
  2. Cut the eggplants into diagonal slices, about 1cm thick. Fry for several minutes on each side in 1 tbsp of the oil, until softened.
  3. While the eggplants are cooking, warm the rest of the oil in another saucepan. Crush the garlic and chop the onion and capsicum, adding it all to the pan.
  4. After a few mins, pour in the passata and sprinkle in the mixed herbs and black pepper. Give it a good stir and let it simmer for about 5 – 10 mins.
  5. The eggplant slices should have softened by now. Scrape them into the tomato and veg sauce where they will continue to cook. Chuck in the olives.
  6. While you are making the sauce, you can also prepare the crouton topping. Cut the baguette into slices, and then cut each slice into roughly 1cm cubes. Put in a large bowl and sprinkle over the grated cheeses. Mix in with your hands so the cheese is nicely imtermingled with the bread.
  7. When the oven is up to temp, and the sauce is looking red and rich, it is time to assemble the parmigiana. Pour the sauce into the casserole dish, and sprinkle over the crouton topping. Drizzle a little oil over, and place in the heated oven for 30 mins.
  8. Remove from the oven. It should be looking something like mine in the photo below, and is ready to serve.

Customise it!

Serve with some boiled or steamed green veg of your choice. Add another cheese if you want – some grated blue cheese would give it another interesting taste. Keep the parmesan though, as that’s what gives the dish its name. As ever, some fresh herbs would go well – I only had dried mixed herbs to hand when I made this.

This is me signing off from Down Under. Thank you Australia, you’ve been great, and left us with lots of wonderful new memories, many of which I have shared through my recent posts. We now have an appointment with a Qantas Boeing jet to Heathrow that will last all of 24 hours! See you in a few days, with a new post from back in Good Old Blighty (jet lag permitting 🙂 ).

I’ve loved discovering many new Aussie bands and adding them to the ADK Spotify Playlist. I’ve been especially impressed with These New South Whales, so here is another from them: Cholesterol Heart (God Bless Ya).

Categories
Blog Desserts Snacks

Peanut Butter Acai Bowl

Is it a peanut butter Christmas tree? A model of Mount Everest sculpted out of chocolate ice cream, perhaps?

Understandable, if that’s what you’re guessing is in my photo above. You’d be wrong, however – it is in fact an Acai Bowl. I bought this at the Drip Bar in Melbourne. The purply-chocolatey coloured acai is topped with fresh banana, crushed cacao, coconut, ground almonds, granola and a drizzle of peanut butter.

Some of you will be very familiar with acai, and some may never have heard of it. Acai (pronounced ah – sa – ee) is a berry that is produced in Brazil. It is rich in antioxidants, fibre and healthy fats, and believed to support heart health and cognitive function, while being low in sugar and calories. It is also suitable for vegetarians and vegans. It therefore ticks all the boxes to be called a surefire superfood.

What’s more, it tastes really good! At the risk of sounding like some sozzled sommelier, I would describe the taste as having dark chocolate tones, with deep red wine and a hint of blueberries. When you hear that description, it’s hard not to at least give it a try.

In the UK, my experience is that acai is still mainly the preserve of specialist juice bars and health food shops. An internet search reveals that there are slightly more outlets than I was aware of, but it is still nowhere near the mainstream in the way it is here in Australia. Most towns have a cafe or takeaway in the high street selling a variety of acai bowls, with chains established for the purpose, such as Oakberry and Yo-Chi.

As far as I understand, the acai is blended with chopped banana and yoghurt (or coconut milk for a non-dairy version), giving it a rich texture with a beautiful purplish colour. It is eaten ice cold, swirled in a bowl, looking like ice cream or sorbet with toppings added. Fresh fruit is most common, while sprinkling over granola or muesli makes it an option for breakfast.

A danger with acai bowls is that the base is topped up with treats high in sugar or non-healthy fats, that cancel out the health benefits of the acai itself. However, this doesn’t need to be a problem as long as the toppings (such as a good quality peanut butter) are added with thought and moderation.

The berries do not travel well, so outside of Brazil they are sold in pulp form or as powder. I have bought a pack of powder from Coles Supermarket, where it was available on the shelf, in several varieties. I will be taking it home to make some acai bowls of my own. I also have an idea to sprinkle some into the mix when baking, to make blueberry and acai muffins. Watch out for future posts!

Due to its health benefits, great look and taste, I feel it is only a matter of time before more of us are eating acai as part of a normal diet. Do let me know, via the comments below, if you have tasted acai, and what you thought of it. I am interested to hear how readily it can be found and eaten in your part of the world.

Here’s a Melbourne band that was recommended to me by the assistant in a cool vinyl records shop and cafe in the Hawthorn district of the city (a big shout-out to Alley Tunes). This band play experimental electronic music, and go by the name of Big Yawn. Here they are with Ragazzo.

Categories
Blog Breakfast

Sunshine Breakfast

Our Australian road trip has now reached the area known as the Sunshine Coast, just over an hour’s drive north of Brisbane.

The name is very apt, there being no shortage of beautiful bays with near-deserted golden sandy beaches and, of course, plenty of surf and warm sunshine. Here’s Alexandria Bay viewed from the coastal headland in Noosa National Park.

The sunshine does wonders for the abundance of fresh fruit growing here. As you can see from my main photo at the top of the post, I just had to put together a fresh fruit salad, with juicy mango, golden kiwi, red grapes, red plums, blueberries, raspberries, apple and banana – all local Queensland produce.

It has helped make what I call my Sunshine Breakfast, shown here over toasted Australian-grown oats and grains, and with thick, creamy Australian yoghurt. The crowning touch is a drizzle of honey from a jar I bought in the Blue Mountains. It is made from beehives in the eucalyptus forests there.

A bowl full of all-Australian Sunshine Breakfast. What a super way to start any day!

From one all-Australian classic to another, with the latest addition to the ADK playlist: this is Icehouse with Hey Little Girl.

Categories
Mains Recipes

Leek & Aubergine Bake

It was the aubergines that caught my eye this week at the local farm shop. The shiny purple skin was irresistible, and it made me realise that I hadn’t cooked with one for some time. I put one in my basket, along with a fresh leek, and this winter casserole dish began to come together.

My favourite way to cook aubergine is in slices on the ridges of a griddle pan. I like seeing the enormously satisfying tiger stripes forming, as I flip them over to cook on the other side. It’s kind of a reminder that spring is soon around the corner, and the barbecuing season is not that far away.

The striped aubergine is then mixed in with cooked, softened leek, tomato passata and cannellini beans to make a tasty filling base. It is all topped off with a crust of wholemeal breadcrumbs, chopped toasted nuts and grated blue stilton cheese.

Servings

4 adult portions.

Timings

15mins to cook and combine, then 20 mins in the oven at 180C, and a final 5 mins under the grill.

You Will Need

  • 1 aubergine
  • oil
  • 1 garlic clove
  • 1 leek
  • 400g can of cannellini beans
  • 500g carton of tomato passata
  • a few twists of black pepper
  • 100g wholemeal breadcrumbs
  • 60g toasted mixed nuts
  • 60g grated stilton cheese

Method

  1. Switch on the oven to warm up to 180C.
  2. Oil a ridged griddle pan and bring it to a moderate heat. Lay slices of aubergine in the pan for 3 – 4 mins, then turn them over. Use your judgment about heat and timing so that you get the nice tiger stripe effect on both sides. Remove to a warm plate.
  3. While the aubergine is frying, crush the garlic clove into a saucepan with some oil, over a moderate heat. Add in the leek, chopped into slices. Stir every so often for 5 – 6 mins until the leek has softened. Pour in the passata and drained cannellini beans, with a few twists of black pepper, and stir. Reduce to a simmer.
  4. Blitz the bread and nuts in a food processor with blade fitted. Tip into a bowl and add the grated cheese. Stir so that the cheese is evenly distributed.
  5. When the oven is up to temperature, transfer the aubergine to a shallow casserole dish. Tip in the leek, bean and tomato mix and gently coat the aubergine slices by turning them over a few times in the dish.
  6. Sprinkle over the breadcrumb, nut and stilton topping and spread it out so that it reaches all four sides. Drizzle some oil over and place in the oven for 20 mins.
  7. For the last 5 mins of cooking, place under a grill so that the topping crisps up.

Customise It!

Lots of opportunity here. Throw in whatever fresh herbs you may have to hand, and mix in a handful of seeds to the topping. Butter beans are a good substitute for the cannellini beans. For a vegan version, omit the stilton cheese or use a suitable vegan cheese, grated.

On the way back from the farm shop, this track came on the car stereo. I love it when a great track that I haven’t heard in a while comes on the radio. Needless to say, I turned the volume up and drummed along with my fingers on the steering wheel. Now we can all enjoy it here! This is Swing Out Sister with Breakout.

Categories
Mains Recipes

Carrot & Parsnip Miso Soup

Warm, filling and comforting, this winter vegetable soup is jazzed up a little with the addition of Japanese miso paste.

I hadn’t used miso before, but wanted to try it after reading about it on some of the other foodblogs here on WordPress. It is made from fermented soya beans, which means that it is rich in protein and good for gut health.

This is the variety that I used, made by Yutaka. I did have a little trouble finding it in Sainsbury’s at first, but eventually came across it in the Far Eastern aisle. Just to clarify, by that I mean the speciality Asian foods section, not that end of the building down by the motorway 🙂

I made a large batch of the soup in a saucepan on the hob, and kept it for a few days. I could then ladle some into a bowl, stir in some miso, and microwave it for around 3 mins for a very quick, tasty and nutritious lunch. It is vegetarian and vegan, so everyone can enjoy what the Japanese call that umami – or rich and savoury – taste.

Servings

About 6 bowlfuls.

Timings

The barley soup mix needs soaking overnight, then boiling for 45 mins. Once that’s ready, the soup takes about 25 mins to make.

You Will Need

  • 100g dried barley/lentils/split peas soup mix
  • oil
  • 1 onion
  • 3 celery sticks
  • 200 – 250g carrots
  • 200 – 250g parsnips
  • 1.5l vegetable stock
  • a few twists of black pepper
  • 1 jar of miso paste

Method

  1. Cover the soup mix with cold water in a bowl and let rest overnight.
  2. The next day, drain the soup mix and rinse in a sieve under cold running water. Place in a large saucepan and cover with boiling water. Let it boil for 10 mins, then reduce to a simmer for another 35 mins. Drain with the sieve, and set aside.
  3. Chop all the veg into chunks and place in the empty saucepan with some oil, over a medium heat. Put on the lid and let it sizzle for around 10 mins, stirring every so often. It should become softened and a little browned at the edges.
  4. Add in the stock and bring to the boil. Then reduce to a simmer for 10 mins.
  5. Remove the pan from the heat for a few moments, and blitz it by plunging in a handheld blender. If you don’t have one, spoon at least half of the soup into a food processor with blade fitted, and blitz it there before returning it to the pan.
  6. Add in the cooked soup mix with 2 tbsp of miso and the black pepper, and stir in. Then simmer for another 5 – 10 mins.
  7. Switch off and let it rest. When it has cooled, transfer to the fridge. It will keep for a few days, during which the texture and flavour will deepen.
  8. To serve, ladle some into a bowl and stir in another tbsp of miso to individual taste. Microwave until hot, and enjoy.

Customise It!

Almost any seasonal winter veg that you have available will go well here. Stick with making the carrot and parsnip prominent, though, as these give it a distinct, sweet flavour. Experiment with the miso, adding as much or as little as necessary to suit your individual taste. The miso already contains salt, which is why I only added black pepper at the seasoning stage.

There probably won’t be a better chance to add Japan to the ADK Playlist, so here they are with the eerie Ghosts.

Categories
Mains Recipes

Beetroot Falafel

First of all – yes, they really are that colour! No filter required here.

I had the idea that roasted beetroot might make an interesting falafel. Having bought a bag at the market, I began looking around at a few recipes online and in books.

This version is a combo derived from various sources. The inclusion of chickpeas, tahini, cumin and coriander stays true to the falafel’s middle eastern origins, while roasting the beetroot first with garlic, and drizzled with balsamic vinegar, gives it a definite European dimension. The pieces of beetroot give a bite to the texture and stop the falafel becoming too dry.

The falafel are served with a dipping sauce simply made from tahini, fresh lemon juice, honey and black pepper.

And they’re both vegetarian and vegan, so everyone is happy 🙂

Servings

This made 10 falafel.

Timings

25 mins to roast the beetroot, then 10 mins to make up the falafel. They then roast in the oven at 180C for 20 mins.

You Will Need:

  • 300g raw beetroot, peeled and cut into chunks
  • 1 garlic clove
  • oil
  • balsamic vinegar to drizzle
  • 250g chickpeas
  • 2 tbsp tahini
  • 1 tbsp ground coriander
  • 1 tbsp ground cumin
  • a twist of sea salt

For the tahini dip:

  • 3 tbsp tahini
  • juice of 1 lemon
  • 2 tbsp honey
  • a twist of black pepper
  • toasted sesame seeds to sprinkle

Method

  1. Scatter the chunks of beetroot on a roasting tray. Crush the garlic clove over the chunks and drizzle with oil. Place in the oven at 180C for 25 mins. Half way through, take the tray out and drizzle the balsamic over.
  2. Let the roasted beetroot cool for 5 mins while you prepare the rest of the mixture.
  3. Put the chickpeas, tahini, coriander and cumin in a food processor with blade fitted. Add in the beetroot and any oil/garlic scrapings from the roasting tray. Blitz to a smooth consistency.
  4. Shape into patties with the palms of both hands. Place on a clean roasting tray and brush with oil. Place in the oven for 20 mins, turning them over with a spatula half way through.
  5. While the falafel are in the oven, combine the ingredients for the dipping sauce with a spoon. Sprinkle over some toasted sesame seeds just before serving.
  6. Serve the cooked falafel with the dipping sauce alongside, as shown in my main photo above.

Customise It!

Good as they are, there are two things I will do differently next time I make these. Firstly, I’ll include some chopped fresh coriander, which I think will enhance further both the taste and the look. Secondly, I would like to try cooking them in an air fryer, which I reckon will give them a crispier shell.

I wouldn’t change the colour though which, as you can see from my photo, is a deep shade of purple. Now that’s what I call a cue for adding the next track to the ADK playlist! Air guitar at the ready everyone, this is Deep Purple with Smoke on the Water.

Categories
Bakes Recipes Snacks

Peanut Butter Boosters

Here’s a wholesome and nutritious, home-made alternative to those commercially-produced cereal bars we often reach for, to cure the hunger pangs between meals. I wanted to see if I could create a version that gave greater control over the ingredients and, in particular, the carb and sugar levels.

The words ‘peanut butter’ are enough to bring a smile to most faces, so I decided to put that centre stage. I used a make that consists of 100% peanuts, with no palm oil (Meridian).

Taking inspiration from a recipe by Hugh Fearnley-Whittingstall, I also cut out all flour and eggs, and brought in oats, seeds and honey. I used muscovado sugar instead of the refined variety, and reduced the amount of it by about a third from what is often found in sweet recipes.

The challenge with removing a number of staple ingredients from a bake is finding a mixture that holds together, and doesn’t descend into crumbs. The consistency of the peanut butter and the stickiness of the honey definitely helped with this, as did letting it cool completely in the tin, before cutting into slices.

The resulting booster bars do hold together – see my main photo above. They’re also vegetarian and vegan. They aren’t completely crumb-free, but that’s a small price to pay for having a box full of these tasty and nutritious boosters to plug that hunger gap.

And if you do get some crumbs – hey, just gather them up and sprinkle them over your breakfast cereal – they’re delicious!

Servings

16 booster bars.

Timings

15 mins to prepare, 30 mins to bake at 180C.

You Will Need:

  • 125g vegetable baking spread
  • 80g light muscovado sugar
  • 125g peanut butter
  • 75g runny honey
  • zest of 1 orange
  • zest of 1 lemon
  • 200g oats
  • 100g dried apricots, finely chopped
  • 120g mixed seeds e.g. pumpkin, sunflower.

Method

  1. Grease and line a traybake tin – mine used is 20 cm square. Switch on the oven to 180C.
  2. Place the spread, brown sugar, peanut butter and honey in a saucepan and warm over a gentle heat. Stir until it melts into a thick mixture.
  3. Add in the other ingredients and stir well to combine.
  4. Tip into the prepared tin and level with a spoon. Place in the oven for 30 mins.
  5. Remove from the oven and let cool completely in the tin. Turn out carefully and cut into 16 squares.

Customise It!

Swap in other dried fruit for the apricot. The real nut fiends can swap in some different varieties of chopped nuts (e.g, pecans) for some of the seeds, if you wish. Do what’s necessary to give you the tasty energy boost you need.

This week in the ADK Kitchen I’ve been playing the new release by The Black Keys, a band from Ohio that I really like and who’ve already provided several tracks for the ADK Playlist. With all that energy from the Peanut Butter Boosters, this new track should have you up on your feet, singing and dancing along with its catchy chorus: Beautiful People (Stay High).