Categories
Recipes Sides

Semmelknödel

‘Tis the season of roast dinner feasts approaching, so why not liven up your dinner plates this winter with some traditional Austrian bread dumplings?

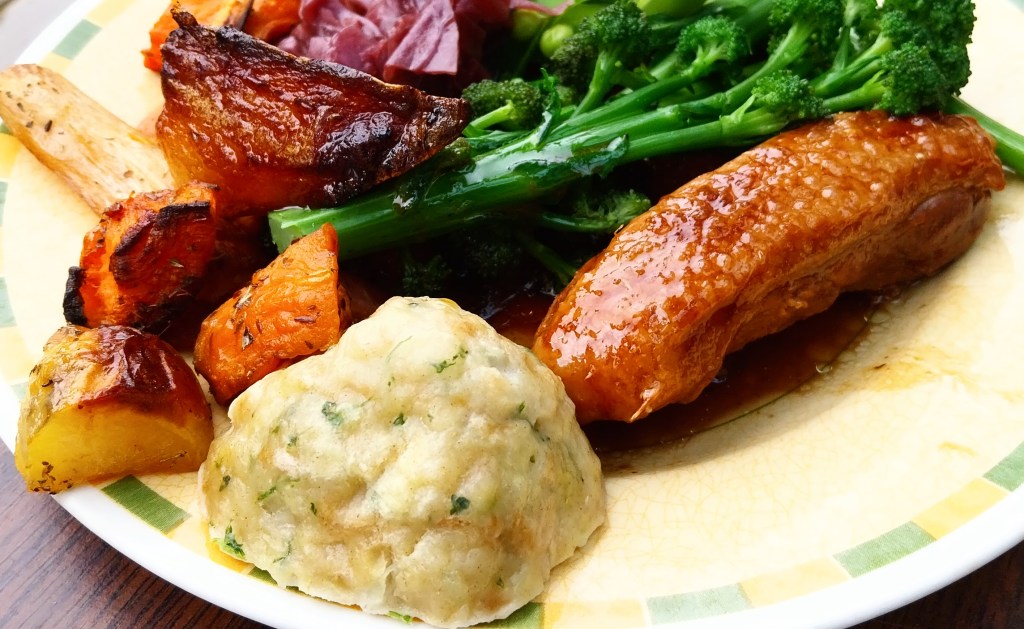
We were treated to a delicious lunch recently, prepared by our good friend Eva, an excellent cook specialising in Austrian cuisine. Home-made dumplings, or Semmelknödel, were served as an accompaniment to a tender roast duck breast, with roast vegetables, braised red cabbage and greens. You can see my filled plate in the main photo at the top of the post.

I especially enjoyed the dumplings – they have a light, succulent consistency with delicate herb flavouring, and absorb the gravy juices from the meat. I’m pleased to say that Eva has agreed to share this old family recipe. Many thanks, Eva and Happy Christmas!

Servings

Makes 18 dumplings.

Timings

15 mins to prepare the mixture, then 1 hour for it to soak. Then about another 30 mins to shape and boil the dumplings.

You Will Need:

  • 500g of dried white bread, which has to be cut into small 1-1.5cm cubes
  • 4 large onions
  • 2 eggs
  • 500-750ml of milk
  • Flour
  • 120-150g of fresh chopped parsley

Method

  1. Put all the bread cube pieces into a very large bowl.
  2. Chop the onions and fry until slightly browned, then add to the bread cubes.
  3. Add the milk, eggs and parsley, mix well together and let it stand for 1 hour so all the milk gets absorbed by the bread. Then cover with self-raising flour (you shouldn’t see any bread through the flour).
  4. Work the flour into the mixture, it should feel firm and not too soggy. You can adjust with either more milk or flour if needed.
  5. Start forming small dumplings (the mixture should make roughly 18 dumplings). Roll each individual one in flour (this will stop them from sticking to your hands or plate) and boil them in salted water, using a large enough pot to give them space for surfacing, after about 20 minutes of boiling.
  6. You can either eat them straight away or freeze the rest (after having been cooked) for another day! They keep very well in the freezer!

Dumplings are served with any type of roast as an alternative to rice or potatoes. They go particularly well with Gulasch.

Eva has chosen the latest track for adding to the ADK playlist, nominating this happy festive song: José Feliciano with Feliz Navidad.

Categories
Mains Recipes

Roasted Winter Veg Curry

For this dish, which is suitable for both vegetarians and vegans, I’ve given a selection of seasonal squash and root veg a long, slow roast in the oven before coating it in a thick curry sauce. The roasting makes the veg soft, sweet and just a little caramelised around the edges.

We’ve just been experiencing our first few snow showers of the winter here, so all that deliciousness and comforting heat has turned out to be very timely!

Servings

4 adult portions.

Timings

1 hr to roast the winter veg, during which time the rest of the dish is prepared.

You Will Need:

  • 1/2 a butternut squash
  • 2 medium sweet potatoes
  • 2 medium parsnips
  • 3 – 4 medium carrots
  • Oil
  • 1 garlic clove
  • 3cm piece of root ginger
  • 1 onion
  • 2 tbsp curry powder
  • 2 celery sticks
  • 1/2 red pepper
  • 1/2 yellow pepper
  • 5 – 6 chestnut mushrooms
  • 1 400ml tin coconut milk
  • 1 400g tin chopped tomatoes
  • 4 – 5 leaves of cavalo nero
  • A handful of unsalted cashew nuts

Method

  1. Switch a fan oven on to 180C.
  2. Peel and roughly chop the squash, sweet potatoes, carrots and parsnips into chunks. Spread them out in a roasting dish and drizzle with oil. Place the dish in the hot oven for about an hour. Check on them every so often just to check they’re not burning, and give them a scatter with a spatula so they get evenly roasted.
  3. Meanwhile, crush the garlic and finely chop the ginger. Put both in a wok with some oil and heat. When the pan is sizzling, add in the onion, celery, mushrooms and peppers, all chopped. Sprinkle over the curry powder and toss with a spatula so all the veg is coated in a mix of the spices and oil.
  4. When the veg has softened, empty in the coconut milk and tomatoes. Give it all a good stir to mix and bring to a bubble, before turning down to a simmer. Let it slowly reduce to make a thick, spicy sauce.
  5. Shred the cavalo nero and wilt in for about 10 mins.
  6. When the tray of veg has finished roasting, take it from the oven and scrape all the lovely contents into the wok. Give it all a stir again, so that the veg chunks get coated in the thick curry sauce.
  7. Chuck in the cashews and mix, a few mins before serving. It should resemble my main photo at the top of the post.
  8. Serve up with rice on the side – see below.

Customise It!

Lots of scope here – substitute other root veg like potatoes or celeriac, or other types of squash, and vary the proportions between them if you wish, as long as you have 1 large roasting pan’s worth of it all.

Use your own favourite spice combo if you wish – I used the ready mixed blend I brought back from the Souq Waqif in Doha, which I really like. Why not chuck in a few nigella seeds? Play around and have fun!

No cavalo nero? Try other greens like spinach or chard.

Time to treat you to my most streamed song of 2024, as confirmed by Spotify Unwrapped, which landed this week. I first came across this indie band while on my travels to Australia earlier this year. They make a terrific sound and, I’m sure you’ll agree, this really is a very good track. Enjoy These New South Whales with Changes.

Categories
Mains Recipes

Nut Roast

Toasted on the outside and packed to the core with creamy, crunchy nuts, red lentils and softened veg. If you’re looking for a vegetarian mains to grace the centre of your table this winter, this delicious, homemade Nut Roast is hard to beat.

Servings

6 adult servings of 2 generous slices each.

Timings

30 mins to prepare and 50 mins to roast in a fan oven at 160C.

You Will Need:

  • 150g chopped mixed nuts
  • 1 onion
  • 2 celery sticks
  • 1/2 a red pepper
  • 1/2 a yellow pepper
  • 6 – 7 chestnut mushrooms
  • oil
  • 1 clove garlic
  • 75g red lentils
  • a good squelch of tomato ketchup
  • 300ml boiling water
  • 1 tbsp vegemite
  • 75g wholemeal breadcrumbs
  • 75g mature cheddar cheese, grated
  • sea salt and black pepper
  • 2 medium eggs

Method

  1. Switch a fan oven on to 160C. Grease a 1 litre loaf dish and line it with baking paper.
  2. Spread the nuts on a baking tray and place in the oven once its reached its temperature.
  3. While the nuts are roasting, place the onion, celery, pepper and mushrooms in a food processor with blade fitted. Blitz to small pieces.
  4. Heat some oil in a large frying pan and crush in the garlic. Add in the blitzed veg and stir. Leave to gently soften.
  5. Once the nuts have roasted for 10 mins, remove from the oven and roughly chop in a food processor with blade fitted. Scrape into a large bowl and set aside.
  6. Chuck the lentils into the frying pan with the veg. Dissolve the vegemite in the boiling water and pour into the pan with the ketchup. Bring to the boil, then reduce to a simmer for about 15mins. The liquid will reduce as the lentils soften.
  7. Add the breadcrumbs and grated cheddar to the nuts and mix in.
  8. Leave the pan of veg and lentils to cool slightly for 5 mins, then add to the bowl with the nuts, breadcrumbs and cheese. Twist in a little sea salt and black pepper to your taste. Crack in the eggs and mix thoroughly.
  9. Spoon the mixture into the prepared loaf dish and compact it down with the back of a spoon. Cover with foil and place in the oven for 30mins. Then remove the foil and leave it in the oven for another 20 mins.
  10. Remove and set aside for 10 – 15 mins before inverting onto a chopping board. The nut loaf should ease out of the upturned dish, and look something like my main photo at the top of the post.
  11. You can cut slices straight away, but it will become progressively easier to cut clean slices as it cools. Slices can be reheated if necessary by microwaving for 30 – 60 seconds.

Customise It!

Try adding in fresh herbs, or shreds of cavalo nero. Swap some or all of the cheddar for crumbled blue cheese.

Serve it with some green veg and a simple sauce made from a can of chopped tomatoes, garlic and chopped onion. If you’d prefer to save on effort, serving with condiments like ketchup or relish is fine.

Exciting musical news this week is that one of my favourite bands has been announced as headliner at next year’s Victorious Festival. I have already seen Queens of the Stone Age live 4 times and am very keen to make it 5. I’ll be hoping a surprise gift ticket may find its way to me under the Christmas Tree this year! I expect they will play this one: Queens of the Stone Age with Sick, Sick, Sick.

Categories
Mains Recipes

Beautiful Borlotti

This harvest of borlotti beans, fresh from the pod (shown in my photo above) has been a very welcome arrival recently in the ADK Kitchen. I always think they are one of the most beautiful foods in their natural uncooked form.

They’re not bad cooked, either. The beans do tend to lose that magical, mottled sheen, but more than make up for it in their creamy, smoky taste. They also provide generous amounts of protein and fibre.

For this dish (shown in my photo below), I have given them a starring role in a chilli suitable for vegetarians, vegans and, indeed, anyone who enjoys a bowl of rich, warm and creamy comfort food this time of year.

Servings

4 adult portions.

Timings

The beans soak overnight, and are then boiled/simmered for at least an hour. Once these stages are complete, the rest will take about 30 mins to cook.

You Will Need:

  • 120g uncooked borlotti beans
  • cold water
  • 1 onion
  • 1 garlic clove
  • 1 tsp chilli powder
  • 1 tsp cumin seeds
  • oil
  • 1/2 a red pepper
  • 1/2 a green pepper
  • 2 celery sticks
  • 1 carrot
  • 6 -7 chestnut mushrooms
  • 1 400g carton of tomato passata

Method

  1. Wash the beans, then place in a bowl with enough cold water to cover them. Leave for 24 – 36 hours.
  2. Drain and rinse the beans under cold running water. You should find that they have doubled their weight through the water they have absorbed. Place the beans in a saucepan with enough fresh water to cover them, and bring to the boil. Reduce and simmer for 50 mins.
  3. Drain the cooked beans and wash again under cold running water. Set aside.
  4. Heat some oil in a wok, and add in the garlic, chilli and cumin. When it sizzles, add in the onion, peppers and celery, chopped into chunks.
  5. About 5 mins later, add in the mushrooms and carrot, also chopped into bitesize chunks.
  6. Stir with a spatula until all the veg is nicely softened, then add in the passata and the cooked borlottis. Top up with about half an empty carton’s worth of fresh water, and turn it up to boil.
  7. Bring to a simmer for about 15 mins, by which time the sauce will have reduced to provide a thick, creamy coating for the beans.
  8. Serve up with a portion of brown rice.

Customise It!

Replace the onion with chopped leeks, and add in some roasted squash if you wish. Shred in some spinach, cavalo nero or chard leaves.

Skip the rice and wrap a few spoonfuls up in a warmed tortilla. Perhaps with some soured cream on the side. This is making me hungry again…

It’s getting to that time of year when I receive messages from Spotify that my Unwrapped Playlist – containing my most played tracks of 2024 – is imminent. Here’s one track that will almost certainly be on it, and which seems to go well with the subject of this post: Leftfield with Pulse.

Categories
Bakes Recipes

Monkey Nut Biscuits

Credit for this latest bake goes to my wife, Lesley, who refined the recipe and patiently shelled a bag of roasted monkey nuts in the process.

Monkey nuts are peanuts still in their shell, which means the nuts have no salt or anything else added. Combine them with a good quality peanut butter (the one we used has one ingredient: peanuts), and you get biscuits with a fresh, nutty taste. They have a soft textured centre and a crisp outer. You’ll find these are best enjoyed warm and eaten within a day or so.

Servings

This will give 3 batches of dough, each batch making 12 biscuits. You can freeze the mixture or keep it in the fridge for a week. That way you can have a biscuits snack ready in about 20 mins after thinking about it. 

Timings

10 mins to prepare and another 10 mins to bake in a fan oven at 180C.

You Will Need:

  • 120g butter or margarine
  • 150g crunchy peanut butter
  • 50g shelled peanuts, roughly chopped
  • 85g soft brown sugar
  • 1 large egg
  • 350g self-raising flour

Method

  1. Preheat your oven to 180°c . Prepare a flat baking tray with some greaseproof paper.
  2. In a large bowl, cream the butter, peanut butter and sugar together until completely combined. 
  3. Add the egg and mix in.
  4. Sift in the flour. Add the chopped peanuts and mix to make a dough, use your hands at the end to combine into a ball.
  5. Roll the dough into balls (about 1 tbsp of dough per ball) and place onto your baking sheets. Press each ball with  a fork to create a cross pattern which flattens the dough.
  6. Bake in your pre-heated oven for 8-10 minutes until golden.
  7. Transfer to a wire rack to cool completely, they slide off the baking paper beautifully.

Here’s a great track from The Specials that is right on theme: Monkey Man.

Categories
Mains Recipes

Roast Butternut & Celeriac Risotto

So, we’ve now had Halloween and Bonfire Night, and the clocks have gone back marking the end of British Summer Time. Yes, we’re well into autumn, a fact well reflected in the fresh veg now making its way into the ADK Kitchen from our local community farm.

All of which has inspired this warming, filling and satisfying vegetarian mains. I peeled, chopped and roasted a butternut squash and a celeriac – each having its own distinct flavour, and together giving the colours and tastes of autumn. I then tipped the softened, caramelised chunks into a pearl barley risotto. Crumbled stilton cheese is melted in at the end of cooking to provide a creamy, slightly salty consistency, with a final garnish of chopped toasted nuts.

Fetch your hat and gloves – here’s a dish to greet you, warming on the hob, at the end of a long, crisp autumnal walk.

Servings

4 adult portions.

Timings

Around 45 mins to make.

You Will Need

  • 1 medium butternut squash
  • 1 medium celeriac
  • oil for roasting
  • 100g pearl barley
  • 1 clove garlic
  • oil to drizzle
  • 1 onion
  • 1 green pepper
  • 3 – 4 chestnut mushrooms
  • 300ml veg stock
  • 50g stilton cheese
  • handful of chopped toasted nuts

Method

  1. Switch on a fan oven to 180C. Chop, peel and chunk the butternut squash and the celeriac. Place the chunks in a roasting dish and drizzle with oil. Place in the hot oven for 30 mins.
  2. Bring the pearl barley to the boil in a saucepan of water. Reduce to a simmer and leave for 30 mins.
  3. Crush the garlic and warm in a drizzle of oil in a wok. Chop and add in the onion, mushrooms and green pepper. Stir and let soften for around 10 mins.
  4. Drain the pearl barley and add to the wok. Tip in the veg stock and bring to the boil. Reduce and leave to simmer. You want the liquid to gradually reduce while finishing cooking the pearl barley, until it is soft but still slightly chewy in texture. Add in a few more drops of hot water from the kettle, if required.
  5. Take the roasting dish from the oven. The roast veg should be soft in the centre and slightly browned on the outside, with caramelised edges. Scrape the veg into the wok and crumble in the stilton, before stirring it all in.
  6. Serve on warmed plates, garnished with the toasted nuts.

Customise It!

I’ve been using pearl barley in risotto recently as I like its taste and bite, while it reduces the carb count. However, you can use arborio rice if you wish – just remember to adjust the cooking time as it takes about half that required by the barley.

Play around with some of the veg in the risotto base to include what you have – yellow or red pepper is fine. Try wilting in some autumn greens, spinach or shredded kale/cavalo nero for the last 5 – 10 mins of cooking.

Musical choice today reflects the fact that there is a rather important election taking place in the world. This track is dedicated to all our American friends, therefore: Muse with Will of the People.

Categories
Bakes Recipes

Pumpkin Spice Traybake

Treat yourself this Halloween! There’s nothing tricky in the making of this traybake – a delicious, sweet and spicy sponge, laced with freshly roasted pumpkin puree and topped with crunchy, honey-coated pumpkin seeds.

These guys were just dying to try it. They’ll tell you – it’s a monster hit 🙂

Servings

Makes 16 slices.

Timings

40 mins to peel, chunk and roast the pumpkin. 15 mins to prepare the traybake and then 30 mins to bake at 180C in a fan oven.

You Will Need

  • 1 medium-sized pumpkin or other squash
  • oil to drizzle for roasting
  • 3 large eggs
  • 200g vegetable oil
  • 140g light muscovado sugar
  • 250g self-raising flour
  • 1tsp bicarb of soda
  • 2 tsp ground cinnamon
  • 1tsp ground ginger
  • 1tsp grated nutmeg
  • runny honey to drizzle
  • a handful of pumpkin seeds

Method

  1. Turn a fan oven on to 180C. Cut and peel the pumpkin into chunks – you will need around 200g. Place on a baking tray and drizzle with oil. Put in the oven for 30 mins until softened and a little caramelised at the edges.
  2. Grease and line a traybake tin – mine used is 22cm square.
  3. Crack the eggs into a bowl, and add in the oil and sugar. Mix with an electric whisk until thickened.
  4. Sieve in the flour, bicarb and spices, and fold in with a spatula to incorporate.
  5. Once the pumpkin chunks are roasted, tip them into a food processor with blade fitted, and blitz to a puree. This will also help the pumpkin to cool. Add the puree to the bowl and stir to mix in.
  6. Tip the mixture into the lined traybake tin and level with a spoon. Place in the oven for 30 mins or until nicely browned, and a skewer inserted in the centre comes out clean.
  7. For the last 5 mins of baking, sprinkle the pumpkin seeds over and drizzle with honey.
  8. Remove from the oven and leave to cool in the tray. Transfer to a board and cut into slices.

Customise It!

Don’t just save the pumpkin seeds for the topping – chuck another handful into the mixture along with some chopped nuts.

Have fun this Halloween, eat well and don’t let the boogeyman get you! Here’s Echo & the Bunnymen with People Are Strange.

Categories
Mains Recipes

Butternut, Goat’s Cheese & Walnut Tartlets

Out at a restaurant recently, I spotted rosary goat’s cheese tartlet on the menu, and thought it sounded interesting. It was delicious – mixing the soft, slightly acidic creaminess of goat’s cheese with caramelised onion in a short, biscuity pastry base. I came away inspired to try making my own – always a sign that I’ve enjoyed a good meal.

For my version, I decided to pair the creamy goat’s cheese with toasted walnuts, over an autumnal-coloured base of wholemeal shortcrust pastry and sweet, roasted butternut squash.

I was pleased with the result, in particular how well the tastes of the goat’s cheese and toasted walnuts complement each other, so am sharing it here. I’ll say more below on options for sides, to serve it up as an attractive vegetarian mains.

You’ll need 4 tartlet or shallow mini-pie dishes – the ones I used are each about 11cm diameter.

Servings

Enough here for 4 tartlets.

Timings

30 mins initially to roast the butternut and prepare the pastry. 10 mins to assemble the tartlets, and another 25 mins to bake them.

You Will Need:

  • half a large butternut squash, peeled and cut into small chunks
  • olive oil to drizzle
  • 125g plain flour
  • 100g plain wholemeal flour
  • pinch of salt
  • 100g butter
  • several drops of cold water
  • 1 rosary goat’s cheese
  • 60g walnuts

Method

  1. Turn on a fan oven to 180C. Spread the butternut squash chunks on a baking tray and drizzle with olive oil. Add to the oven once it’s up to temp, and leave for 30 mins.
  2. Next, make the pastry. Sieve the flours and salt into a food processor bowl, with blade fitted. Cut the butter into chunks and add in, pulsing the mix a few times till it resembles breadcrumbs.
  3. Pour in a few drops of water and pulse again. Repeat until the pastry comes together and is whirling round the bowl in one large ball, with the blade.
  4. Remove to a floured surface and finalise shaping it into a roundish ball. Wrap in cling film and put in the fridge for 10 mins.
  5. Take the tartlet dishes and spread with oil or butter, so that they won’t stick. Remove the pastry from the fridge and roll out to about 1/2cm thickness on a floured surface. Cut off a round or square that will cover one of the tartlet dishes. Drape over the dish, then press down and trim the edge for a neat finish. Repeat with the other 3 tartlet dishes.
  6. Remove the butternut from the oven. It should be soft and a little charred at the edges. Press down all over with a fork to make it into a soft, orange mash.
  7. Scoop forkfuls of butternut mash into the tartlet pastry bases, and spread it out towards the edges. Arrange 2 – 3 discs of rosary goat’s cheese on top. Place in the oven for 20 – 25 mins.
  8. For the final 5 mins of baking, remove the tray from the oven and sprinkle the walnut pieces on top. Press down gently into the soft cheese so that they hold in place.
  9. Remove from the oven when they’re looking like mine in the main photo above – you want the butternut and goat’s cheese discs to be browning and caramelising at the edges, but not burning.

Customise It!

I served the tartlets warm on a bed of celeriac mash, with steamed purple sprouting broccoli on the side. Any seasonal veg will work well as an accompaniment. You could also drizzle some baby potatoes with oil and add a few twists of seasalt, putting them on a roasting tray in the oven alongside the tartlets. You can also enjoy them cold with a salad, and maybe some leaves scattered over.

Music-wise, I’ve been very encouraged recently by the comments Robert Smith’s been making in the media about playing some gigs again next year. I’m a long time fan of The Cure since seeing them in their very early days supporting Siouxsie & the Banshees. There is also a new album fully due out next month, which I’m looking forward to. For now, here’s a classic from their early days: The Cure with Jumping Someone Else’s Train.

Categories
Blog Snacks

Cornish Cream Tea

A cream tea is a must when visiting Cornwall. There are plenty of cafes offering it, wherever you go. This one we enjoyed while visiting the town of St. Ives.

It’s a very simple and delicious meal: freshly baked scones, halved and spread with Cornish clotted cream and fruit jam. Served up, of course, with a pot of tea.

A debate rages about whether the jam or the clotted cream should be spread first – I’m a firm fan of the clotted cream providing the under layer, and then topping off with the jam, as my photo above shows.

For this meal, we actually bought a bag of scones that were fresh from the oven, in the St. Ives Bakery (the just baked aroma in the shop was heavenly). We also bought a tub of Rodda’s clotted cream, and took these back to our motorhome pitch, on a site perched up on the edge of St. Ives, with views over the bay.

We already had a jar of locally made mixed fruit jam that we’d bought earlier on our travels, in Boscastle.

St. Ives is a beautiful coastal town. At low tide you can walk into the main port across the expansive golden beaches.

At high tide also, there are many vantage points for enjoying the views.

As you can see, the sun was shining, so we sat al fresco and enjoyed this classic lunch. With Cornish Tea, naturally.

Talking about clotted cream gives me a natural link to this track by the original supergroup, for adding to the ADK Playlist. This is Cream with Badge. Take it away, Eric!

Categories
Blog Mains

Return to Eden

Cornwall’s Eden Project really is a modern day wonder. Not only is it a great day out – it really makes you think.

Walking around this vast green and floral park on a sunny September day, it is difficult to believe that, until just a few years ago, this was an abandoned mining quarry, grey and ugly, ravaged by decades of underground metal extraction.

The transformation began in the 1990s, with an ambitious vision to turn it into a vast green oasis, showcasing plant life from all around the world, over a 30 acre site. I visited it soon after it opened in 2001, and found it very impressive.

On my current travels around Cornwall I was keen to return, to see how it was progressing. I’m pleased to report it is thriving and continues to be a very popular destination for visitors to Cornwall.

The central attraction is the Biomes – the huge, golf ball-shaped structures nestled in the centre of the valley. The first maintains a warm temperate, Mediterranean climate all year round. The second contains a fully grown rainforest, no less. Both are big enough to lose oneself in, and host mature, fully grown trees.

I enjoyed climbing the steps to the Lookout high up in the Rainforest Biome. It was very humid up there, and the steps did swing around a bit, but the views were great looking down over the whole of the rainforest.

These are more than just large scale greenhouses. The Eden Project is on a mission to highlight the modern day challenges to the natural world through climate change and human behaviour. They do a great job of taking complex subjects and explaining them in terms that are easy to understand.

Amongst the cacao and coffee trees in the Rainforest Biome, I learned how deforestation simultaneously reduces carbon safely stored in trees and underground, and increases the carbon in our atmosphere, thereby contributing to global warming. Deforestation is largely driven by economic pressures on producers, and countries like Costa Rica come in for praise for their efforts to combat these through sustainable reforestation. I learned that we can all do our bit to support them by choosing to buy Fair Trade coffee and chocolate, which I will now try to do.

I like the art that is scattered around the landscape, such as the Rites of Dionysus, Greek god of wine, in the Mediterranean Biome.

We came across this mirrored tree goddess high up in the outdoor gardens, just inside what used to be the rim of the quarry, now known as the Wild Edge.

The art carries a loose theme that cultural diversity is important, and that resource management is better led by local communities than big corporations.

We had lunch in the Biome Kitchen. All the ingredients used are seasonal and locally grown. Suppliers are all Cornwall-based businesses, like soft drinks from Jolly’s, and ice cream from Roskilly’s. Even the catering promotes a sustainable local economy.

My choice for lunch was this griddled flatbread, topped with white bean pate, leaves, marinated roasted vegetables, tomatoes, balsamic drizzle, herbs and toasted seeds.

The overall message from the Eden Project is one of hope. If a team of people can successfully transform a disused quarry into a beautiful, green paragon of sustainability, then most things are possible. We learn that every one of us can do our bit – small changes made locally can contribute to wider scale positive change. It is never too late.

Time to add Coldplay to the ADK Playlist, with Paradise.