Categories
Mains Recipes

Smokey Puy Lentil Roast

Ready for some autumn evening comfort food? If that’s a yes, you’ll love this rich, smokey, spicy stew with seasonal roasted vegetables and puy lentils. It’s vegetarian and vegan, while the puy lentils are a great source of protein.

Servings

4 adult servings.

Timings

40 mins to make and cook.

You Will Need

  • 1 roasting tray’s worth of chopped root veg (mine comprised sweet potato, swede, carrot, parsnip and celeriac)
  • 1 red pepper, chopped
  • oil
  • 1 clove garlic
  • 2 medium chillis
  • 1 tsp ground cumin
  • 1 onion
  • 8 – 9 mushrooms
  • 1 tbsp gojuchang paste
  • 1 500g carton of tomato passata
  • water
  • 100g puy lentils
  • 4 – 5 leaves of cavolo nero

Method

  1. Warm the oven to 180C. Fill a roasting tray with the chopped root veg and red pepper, and drizzle to coat with the oil. Place in the oven for 30 mins, once it is up to temp.
  2. Drizzle some oil in a wok. When it is warm, add in the crushed garlic, chopped chillis and cumin, and stir.
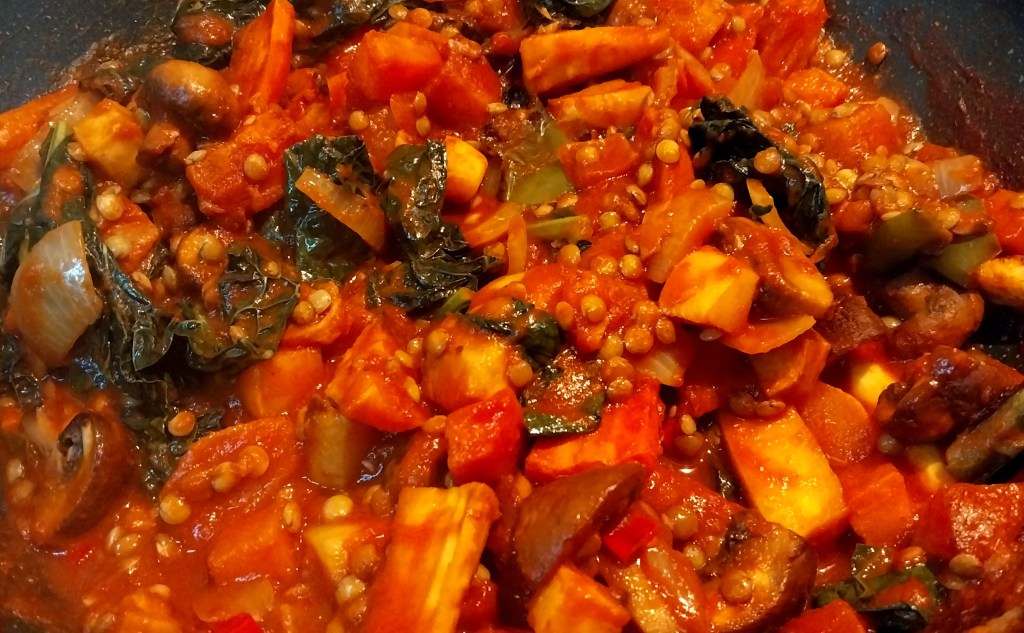
  3. Tip in the chopped onion and mushrooms, and stir again. When the onion is softening, add in the gojuchang paste and stir.
  4. Pour in the passata. Fill the carton with cold water and add in also. Put in the puy lentils and turn up the heat to boil, then reduce to a simmer. Leave for about 10 mins, while the sauce reduces and the lentils cook.
  5. Chop the cavalo nero into strips and wilt in for the last 5 mins.
  6. Take the roasting tray from the oven – the veg should be softened and a little charred around the edges. Scrape the roasted veg into the wok. Stir to combine.
  7. Spoon into bowls to serve.

Customise It!

Feel free to swap in any veg you like or have to hand. Butternut squash or celery will work well. Boil or steam some brussels sprouts and add in if you wish. For the second serving of this dish I mixed in some new potatoes that were already cooked and in the fridge – see below.

The key ingredients you should keep are the passata, garlic, chillis and the gojuchang paste – which combine to create the delicious smokey background sauce – and the lentils, which give texture and protein.

Talking of Smokey, here’s a classic track to add to the ADK Playlist. I actually prefer this ska version to his original, however: The Beat with The Tears of a Clown.

Categories
Mains Recipes Snacks

Veg Chilli Sausage Rolls

What to make for a meal when you’ve just returned from holiday and haven’t yet done the weekly shop?

That was this week’s challenge following arrival back from our motorhome trip to Scotland. This vegetarian chilli version of sausage rolls came together using a few pieces of fresh veg we still had in the van, and some store cupboard ingredients. Served up with a choice of tomato ketchup, brown and bbq sauce, they make a great fun and filling meal that you can eat with your fingers.

My photo above shows the rolls having just been taken out of the oven, cooling on a wire rack. The residual heat of the oven gives the house a comforting warmth, now the autumn nights are starting to draw in.

Servings

Makes 14 sausage rolls, so 3 – 4 servings.

Timings

About 40 mins in total to prepare, and 25 mins to bake at 180C.

You Will Need

  • veg oil
  • 1 red onion
  • 1 red pepper
  • 1 yellow pepper
  • 1 carrot
  • 2 medium red chillis
  • 1 tsp ground cumin
  • 1 400g tin of kidney beans
  • 1 400g tin of tomatoes
  • 225g plain flour
  • pinch of salt
  • 100g spread for baking
  • a few tsps of cold water
  • nigella seeds to sprinkle
  • 1 egg, beaten

Method

  1. Peel the onion, chop roughly into chunks, and put in a food processor with blade fitted.
  2. Cut the flesh from the peppers, and add to the food processor. Cut the top off the chillis and add the spicy flesh to the processor also. Blitz it all for a few pulses until it is all finely chopped.
  3. Add a little oil to a wide-based frying pan and warm on the hob. Add in the cumin and then the finely chopped veg. Stir and let it all soften in the heat.
  4. Without cleaning the processor bowl, put in the kidney beans and tomatoes, and blitz again. Add to the frying pan and stir in to mix.
  5. Stir every so often, letting the moisture steam away, leaving the mix to gradually thicken over about 10 mins. You are aiming for a thickish consistency that can hold its own as a sausage roll filling.
  6. Switch off and transfer the mix to a cold plate, spreading it out so that it cools. Place the plate in a cool place.
  7. Having washed and dried the food processor bowl and blade, you can now use it to make the pastry. Sieve in the flour and salt. Add in the spread cut into chunks, and pulse a few times till it resembles breadcrumbs. Pour in a few drops of water and pulse again. Repeat until the pastry comes together and is whirling round the bowl in one large ball, with the blade.
  8. Remove to a floured surface and finalise shaping it into a roundish ball. Wrap in cling film and put in the fridge for 10 mins. Turn on the oven to warm to 180C.
  9. Remove the pastry from the fridge and roll out on a floured surface into a long rectangular strip. Take the cooled filling mix and spoon it in a line down the centre. Try to make it a consistent width all along, so that the rolls will be evenly filled.
  10. Brush one long edge with the beaten egg. Lift up the other long edge, so that the pastry folds over the filling and tucks in under its other side. Roll the whole length over so that it sits on top of the egg-brushed edge. Gravity will then help the rolls seal, and no one will be able to see the join!
  11. Cut into individual rolls and place on a metal tray lined with baking paper. Prick with a fork, brush the tops and sides with the beaten egg, and sprinkle over the nigella seeds. Place in the oven for up to 25 mins. Keep an eye on them and remove earlier if they are looking browned to your taste.
  12. Serve up with your favourite ketchups and table sauces for dipping, and absolutely no cutlery. Your guests have full permission to eat and dip with their fingers.

Customise It!

This dish is about using up what you have, so switch up the veg to include a brown onion, garlic, celery, mushrooms etc. Herbs and coriander would go well. Stick with the kidney beans and tomatoes, though, as these give the texture the filling needs to hold its shape. You could add a line of grated cheese alongside the filling, before you roll it up, and the cheese will then melt as they cook. Be daring – if it seems a good idea for you to include it, go for it!

For the ADK playlist, here’s a track from another Scottish band we played a lot when we were away, but I didn’t quite get to feature on any of my travel-related posts. They have also just announced a tour next year, which I am hoping I can get tickets for – I saw them live the last time they toured and enjoyed them very much. This is Texas with In Our Lifetime.

Categories
Mains Recipes

Kale & Puy Lentil Curry

Here’s a medium curry that is both vegetarian and vegan. While the base comprises a number of fresh vegetables and spices, the undoubted stars of the show are two particularly healthy ingredients.

Kale grows in our garden and seems to keep on producing new crops as the seasons progress. It is a source of fibre, calcium, vitamins and antioxidants, which help us stay well by removing toxins from the body.

Lentils are a good source of protein for anyone following a meat- or dairy-free diet. Puy Lentils are the variety that pack the most protein per calorie.

Servings

A meal for 4.

Timings

25 mins to prepare and cook.

You Will Need

  • a little oil
  • 1 onion
  • 1 garlic clove, crushed
  • half a red chilli
  • 2 cm piece of root ginger
  • 2 – 3 mushrooms
  • 2 tbsp curry powder (I’m still using my Qatari Spices)
  • 8 – 10 tomatoes (I used fresh as we have lots growing in the garden)
  • 1 400g can of coconut milk
  • 8 leaves of kale
  • 60g Puy lentils
  • a handful of nigella seeds
  • 6 – 7 cardamom pods
  • 1 tbsp garam masala
  • basmati rice

Method

  1. Heat the oil in a wok, and add the crushed garlic. Chop the onions, chilli, ginger and mushrooms and add to the wok. Chuck in the curry powder and give it all a stir.
  2. Let it sizzle for a few minutes, then quarter the tomatoes and add in. Let them squash down in the heat, then add the coconut milk.
  3. Fill the empty coconut milk can with water and pour in to the wok. Chop the kale leaves into 3 or 4 strips, and add in with the lentils. Check the liquid level at this stage, and top up with more water if necessary – there should be just enough liquid to cover the veg. It will reduce down to a creamy consistency as the kale and lentils cook.
  4. After about 10 mins, add in the nigella seeds, cardamom pods and garam masala, giving it all another stir.
  5. After another 10 mins, spoon out a lentil to check it is cooked. You should just be able to bite through without it becoming too soft or mushy.
  6. Switch off and serve with steamed or boiled basmati rice.

Customise It!

It’s a vegetable curry, so add in whatever veg you have to hand or like to use. Peppers, cauliflower, broccoli, carrots – all will go well.

I’m going to be off on my travels again soon, this time exploring Scotland. More of this in upcoming posts, but for now I’ve been getting in the mood and listening to some great tracks from Scottish bands. Here’s one of the best, Glasgow’s Franz Ferdinand with Do You Want To.

Categories
Recipes Sides

Tahini Dressing

The garden is now chock-full of sun-warmed tomatoes on the vine and cucumbers that seem to grow bigger by the day – see my photos below.

There’s enough to provide sides to meals for a little while to come, so I’ve been looking out ideas for tasty dressings to vary things up a little.

I’m a big fan of tahini – the spread that is made from ground roasted sesame seeds. In fact, tahini on a slice of wholemeal toast is one of my favourite snacks. Its taste is reminiscent of peanut butter, but without the sugar. It is said to have a number of health benefits in a diet, being a good source of fibre, protein and healthy fats.

I’ve used it in a stir fry sauce before, and wanted to incorporate it in a salad dressing. Following some research, I settled on a recipe by Hugh Fearnley-Whittingstall. A tablespoon of tahini is added to core ingredients of olive oil, runny honey and cider vinegar. Shake it up in a jar till it’s rich and creamy, then drizzle over your salad, with a sprinkling of sesame seeds to top it off.

Servings

This should be enough to go with a couple of week night meals for 2 – keep the screw top jar in the fridge and use as you wish.

Timings

10 mins to prepare.

You Will Need

  • a clean screw top jar or container
  • 1 tbsp tahini
  • 4 tsp cider (or white wine) vinegar
  • 2tbsp extra virgin olive oil
  • 1 tbsp runny honey
  • a couple of twists of sea salt and ground black pepper
  • half a clove of garlic, crushed (optional)
  • sesame seeds to sprinkle

Method

  1. Put all the ingredients (other than the sesame seeds) in the screw top jar and shake well to combine. Pour over your choice of salad and sprinkle the sesame seeds on top.
  2. Er, that’s it.

Customise it!

Add more black pepper if you wish. A squidge of lemon juice might be nice. If the consistency is too thick, just add a few more drops of olive oil. Why stop at salad – drizzle it on a baked potato, or use as a dip for fries.

Here’s a song I heard on the radio this week, which I hadn’t heard in a long time. The band who recorded it are now in their 45th year, no less, with a hectic tour schedule this summer. I very much liked UB40 in their early years, and went to see them live in their home town of Birmingham. I remember the thudding bass and drums of their reggae beat, and that they did extended dub versions of some of their tracks. I do feel they lost their edge a little when they started doing cover versions of older songs, though it clearly brought them commercial success.

This is one track from those early years – One in Ten.

Categories
Mains Recipes

Summer Squash Roasted Peppers

Summertime patty pan squashes are now starting to arrive in our farm shops and market stalls. They rarely feature on supermarket shelves, however, and consequently many of us are unsure how to prepare and cook with them.

My favourite method is to chop them into a roasting pan drizzled with olive oil, and place in the oven at 180C for about 20 mins. The chopped squash pieces sweeten and caramelise, and can then be used in a variety of dishes.

In this recipe, I have blended them with mashed kidney beans, tomatoes, onions and chilli in a stuffing for roasted peppers. The squash adds texture and sweetness. With the stuffed peppers emerging lightly charred from the oven, it all makes for a splendid looking vegetarian, and vegan, main, served with side veg of your choice.

Servings

4 adult servings.

Timings

20 mins to roast the squash before adding it to the rest of the stuffing mix. Then a further 25 mins to roast the filled peppers.

You Will Need

  • 1 patty pan squash
  • 2 peppers, red, orange or yellow
  • 1 garlic clove
  • half an onion
  • 1 medium red chilli
  • 1 tsp ground cumin
  • half of 1 onion
  • 1 400g can of kidney beans, drained and washed
  • 1 440g can of chopped tomatoes
  • oil
  • seasalt and black pepper
  • a few handfuls of pumpkin seeds

Method

  1. Peel the patty pan squash and chop roughly into pieces. Place on a roasting tray and drizzle with oil, then roast for 20 mins at 180C.
  2. Heat a little oil in a frying pan, and add the garlic clove, crushed. Chop the chilli and onion and, as the oil begins to sizzle, add it to the pan with the ground cumin. Give it a stir and let it cook for a few minutes.
  3. Roughly blitz the kidney beans in a food processor with blade fitted. Add to the pan with the chopped tomatoes. Give it all a few good twists of seasalt and ground black pepper. Stir to mix, and let it cook for 4 – 5 mins to reduce.
  4. Chop the peppers down the middle to give four halves, and carefully trim out the seeds and white membrane from each, using a sharp knife. Brush the inside and outside of each half with a little oil.
  5. When the patty pan squash is roasted and nicely caramelised, scrape the pieces in to the food processor and lightly blitz. Add to the kidney bean mixture and stir in.
  6. Spoon the mixture into each half pepper, and press down with the back of the spoon to make sure the cavity is filled. Sprinkle a few pumpkin seeds on the top, and place back in the oven, still at 180C, for 25 mins.
  7. Remove and serve with accompaniment of your choice.

Customise It!

As shown in the photo, mine are served with seasonal baby potatoes and sprouting broccoli, but feel free to serve up with other favourite veg or whatever veg you have to hand. Couscous or rice would also make a good side.

I must admit to having a bit of a laugh when I saw the photo I’d taken, at the top of the post. Due to a combination of the background and the lighting, it looks like the stuffed peppers are about to travel off into deep space. However, that isn’t the milky way behind them – it is a roasting tray, and the only place they are about to travel to is a hot oven in the ADK KItchen.

It has given me an idea for the next track for the Playlist, however. It’s a song from the great R.E.M., whose music I have enjoyed for many years, including seeing them play live twice. Here they are with Man on the Moon.

Categories
Recipes Sides

Scallion, Celeriac and Cucumber Slaw

Slaws are very useful dishes this time of year. They’re quick to throw together, and can be made well in advance of mealtime. They can be left to rest in the fridge, their flavours infusing while you take it easy enjoying the sun with an aperitif. Using fresh ingredients means minimal processing and little, if any, cooking.

I like experimenting with different combinations of raw ingredients. This is one I made recently, that delivers a good tasty crunch with sticks of celeriac, chopped scallions (or spring onions, from the garden) and roasted wholemeal croutons. The mayo and white wine vinegar dressing is spiced up with a little Dijon mustard and fresh dill. This is complemented with fine silky slivers of cucumber that bring some cool respite on the tongue.

Fancy giving it a go?

Servings

Served as a side salad alongside a main (such as a quiche) and other side salads, this will be enough for 4 adults.

Timings

10 – 15 mins to prepare.

You Will Need

  • half a cucumber
  • 1tbsp white wine vinegar
  • 3 scallions
  • 200g celeriac
  • 100g slices of wholemeal bread
  • a handful of fresh dill
  • some olive or rapeseed oil
  • 2 good tbsp mayonnaise
  • 1 tsp Dijon mustard
  • seasalt and ground black pepper

Method

  1. Cut the cucumber lengthwise into cylinder shapes about 10 – 12 cm long, and then cut each into quarters lengthwise. Scrape out and discard the soft, squishy middle. Then, using a veg peeler, shave each piece of cucumber into long, thin ribbons. Place into a serving bowl.
  2. Next, cut the rough, outer edges from the celeriac and discard. Cut the remaining flesh into matchstick size pieces about 3cm long. Add to the cucumber.
  3. Cut the scallions into pieces the same length as the celeriac sticks, and add to the bowl.
  4. Add the wine vinegar and chopped dill, giving it all a good stir to coat the salad ingredients.
  5. Mix the mayo and mustard and add to the bowl. Add a few twists of salt and pepper. Give it another good stir to combine, and then place in the fridge till mealtime.
  6. Finally, cut the slices of bread into cubes, drizzle with oil and roast, spread out on a tray for 5 mins at 180C. Allow to cool.
  7. Just before serving, take the salad from the fridge and arrange the wholemeal croutons on top. Then serve.

Customise it!

Try to keep to the 3 core ingredients but, beyond this, feel free to experiment e.g. cider vinegar if you prefer, or different fresh herbs to replace the dill. Melt parmesan over the croutons while roasting, or add garlic to the dressing. The possibilities are nearly endless!

Next track for the ADK Playlist is a very catchy tune that’s been playing this week in the ADK Kitchen. It will get your toes tapping as you chop those scallions and celeriac sticks. This is The Wiseguys with Ooh La La.

Categories
Bakes Mains

Leek, Bacon & Stilton Flan

It’s the time of year for quiche, eaten warm or cold while sitting on the patio in the summer sun. Perhaps enjoying a glass of fresh Elderflower over ice, or maybe even something stronger.

For me, leek, bacon and Stilton cheese is always a winning blend in a dish. The deep oniony taste of the silky, buttery leeks complements the saltiness of the bacon and the creaminess of the cheese. As my photo above (taken in the back garden sun) shows, the greeny blue hues of the toasted topped flan just make you want to tuck into a slice.

Serve this as a main accompanied by some side salads. If you need some ideas, check out Beetroot, Feta and Walnut Salad with Bulgar and Quinoa, Crunchy Fruit and Nut Pilaff, or Royal Blood Orange Salad.

Servings

4 adult portions.

Timings

The whole process takes around an hour: 10 mins to make the pastry, 10 mins to chill, another 10 mins to blind bake the pastry base, and then 25 mins to bake the flan.

You Will Need

  • 225g plain flour
  • pinch of salt
  • 100g spread or margarine
  • 2 – 3 tbsp cold water
  • 2 leeks
  • a knob of butter
  • 3 slices of bacon
  • 100g Stilton cheese
  • 2 eggs
  • 50g milk
  • a few twists of black pepper

Method

  1. Turn the oven to 180C. Grease and line a flan dish – the one I used (in the photo) is 22cm diameter.
  2. Sieve the flour and salt into a food processor with blade fitted, and add in the spread. Blitz until it resembles the texture of breadcrumbs. Add a few drops of the water until it binds into a lump of soft pastry.
  3. Tip out and wrap in cling film. Place in the fridge to chill for 10 mins.
  4. Meanwhile, wash the leeks and chop into a saucepan with the butter. Place over a gentle heat so that they soften in the melted butter.
  5. Chop the bacon into pieces and fry till browned and crispy.
  6. Take the pastry from the fridge and roll out on a floured surface to a size that fits your flan dish. Fit it into the dish and trim off any overhanging excess. Place a crumpled piece of baking paper inside and fill with ceramic baking beans. Place in the oven for 10 mins.
  7. Remove from the oven and discard the paper/ beans, taking care as they will be hot. Spread the softened leeks and bacon over the base, then crumble over the Stilton cheese.
  8. Mix the beaten eggs, milk and pepper in a jug, and pour carefully into the flan. Place in the oven for 25mins until cooked.
  9. Remove and serve hot, if you wish, or let it go cold. Serve it al fresco, with salads and cold drinks.

Customise it!

As I’ve said, I regard leek, bacon and Stilton as a classic taste combo, so wouldn’t change it. However, you could add other green veg for the leeks if you wish – broccoli would go well. You could also add grated cheddar or another favourite cheese, in place of the Stilton.

Music time. Here’s a song I really like from a new artist for the Playlist – Ladyhawke, with Black White and Blue. Maybe not quite the colours of my Leek, Bacon and Stilton Flan, but still a great track nonetheless!

Categories
Bakes Recipes

Carrot & Orange Traybake

Give the humble carrot a whole new taste twist in this delicious traybake!

Coarsely grated, carrot helps the cake mixture to stay moist, and adds texture. Together with soft brown sugar and a dusting of cinnamon, the cake is firmly on the brown/orange/cream colour spectrum, which I find very pleasing, and very 1970s.

What’s more, flavouring the soft cheese frosting with orange gives me a basis for adding one of my favourite ever bands to the ADK Playlist.

More of the music in a moment. First of all, here’s how to make Carrot & Orange Traybake.

Servings

How many individual portions this makes depends on how small (or large!) you decide to cut the slices. Mine made around 20 slices, each about 6cm x 4cm, to fill two tins, one of which is shown below.

Timings

10 – 15 mins to prepare the mixture, and 25 mins to bake in the oven at 180C. Add 10 mins for the orange frosting.

You Will Need

  • 225g butter or spread
  • 225g soft brown sugar
  • 4 eggs
  • 225g self-raising flour
  • half tsp salt
  • 3 tsps mixed spice
  • 300g carrots

For the orange frosting:

  • 100g butter, softened
  • 100g icing sugar
  • 200g soft cream cheese
  • 1 tsp orange extract
  • cinnamon for dusting

Method

  1. Turn the oven on at 180C. Grease and line a baking tin (the one I used is 23cm square).
  2. Put the softened butter and sugar together in a bowl and mix with an electric whisk until light and fluffy.
  3. Add in the eggs, one at a time, with a spoonful of the flour after each one. Mix in each time, using the whisk.
  4. Add in the rest of the flour, the salt and mixed spice, and fold in with a spatula to incorporate.
  5. Grate the carrots – I used an electric food processor with grating tool fitted. Add the grated carrot into the mix and fold in again with the spatula. Make sure that all the grated carrot is wet with a coating of the mixture.
  6. Scrape the mixture into the baking tin and level the surface. Put in the oven for around 25 mins, until it is golden all over and a skewer put into the middle of the cake comes out dry.
  7. Let it cool in the tin for about 30 mins, then transfer to a wire rack to complete the cooling.
  8. Make the orange frosting by putting all the ingredients in a bowl and mixing together with an electric whisk.
  9. When the cake has completely cooled, transfer to a chopping board. Spread the frosting evenly over the top, and dust with a little cinnamon. Cut into slices and keep in a box or tin till they’re all eaten. That won’t be long, however.

Customise it!

If you wish, you could use chopped walnuts to sprinkle over, in place of the cinnamon. I used orange extract as it gives an intense flavour, but if you like you could use a little orange juice, and/or zest in the frosting, instead.

Did someone say Orange Juice? Here’s Edwyn and the lads with Felicity.

Categories
Mains

Spicy Parsnip Soup

Time for another guest post on A Different Kitchen! Over to my wife, Lesley to show us how to make this tasty, hearty and warming soup.

I belong to a community allotment and we plan to have lovely fresh things to eat. Recently we have had a glut of winter parsnips. Everyone should eat more parsnips!  

I took home 6 of them all large and gnarly, grown organically and fattened up over our winter. With vegetables that have imperfections like this, soup is a great option as it doesn’t matter what bits you might have to cut out.

I love the scent of the crushed spices that are used in this recipe. I used a pestle and mortar but you can crush them on a cutting board with a bottle or rolling pin.

You Will Need

  • 6 parsnips, peeled and roughly chunked
  • 1 onion, chopped
  • a knob of butter
  • 1 litre of stock (after roasting a chicken we always boil up the carcass with some water for half an hour, then put the stock in tubs in the freezer until needed).  
  • A spice mix, here’s what I used, but any spices you like will do:
  • 1 teaspoon of cumin seeds
  • 1 teaspoon of coriander seeds
  • 1 teaspoon of ground ginger
  • a few cardamon pods

Method

  1. Melt butter in a pan and add the crushed spices.
  2. Add the parsnip  and onion, and heat until all the chunks are warm and coated – this will take about 10 mins. 
  3. Pour in the stock, and bring to the boil, then simmer for 30 minutes.
  4. Blitz to a smooth consistency, then serve.

Customise It!

This soup is great served with crusty bread, as shown in the main photo above. However, you could also make croutons by cutting bread into cubes and baking them on a tray in the oven. Keep your eye on them as they brown very quickly. Chuck the crispy croutons on to the top of your bowl of soup.

You could also swirl in a few table spoonfuls of double cream for an ultra-posh version.

The contributor of a guest post gets to choose the next track for the ADK Spotify Playlist. Lesley has chosen Goodbye Yellow Brick Road by Elton John, who we have just seen on his farewell tour in London. More on this in my weekend post!

Categories
Sides

Chargrilled Sweet Veg with Feta & Balsamic

Christmas in Australia feels very different from the UK, coming in the middle of the summer. With temperature in the mid-20s C, the only ice you’ll need to deal with is the type that clinks in your martini glass as you relax on the sun deck. It’s more a case of barefoot on warm sand, than Jack Frost nipping at your toes. One definite advantage is having the barbecue as a cooking option while entertaining over the holiday period.

This dish is intended to be served as a vegetable side to a seasonal main, like turkey, fish or ham, and alongside roast potatoes. My photo below shows my prepped and skewered veg from the first time I made this. Since then, as you will see from the ingredients list below, I have added a few further types of veg.

My next photo shows the skewers cooking, alongside some meaty mains. The veg will soften and caramelise on the grill, the edges gently charring over the flame.

Once chargrilled, the sharpness of the feta cheese will complement the sweetness of the veg, with the balsamic vinegar giving just the right amount of sourness in the dressing. See my main photo above for the end result.

Servings

Alongside a seasonal roasted main like turkey, fish or ham, and roasted potatoes, this will serve as an extra side veg dish for up to 8 people.

Timings

15 mins prep, 20 mins grilling time.

You Will Need

  • 1 red, 1 green and 1 yellow pepper
  • 1 aubergine
  • 2 red onions
  • 2 courgettes
  • 1 butternut squash
  • oil to drizzle
  • 400g feta cheese
  • a good sprinkle of balsamic vinegar
  • 9 – 10 barbecue skewers
  • a bottle of craft beer to drink while bbq-ing (of course!)

Method

  1. Soak the skewers in cold water for about 10 mins. This will help stop them burning while cooking.
  2. While the skewers are soaking, cut the peppers and aubergine into pieces roughly 1-2cm square.
  3. Cut the courgettes into discs around 0.5 – 1 cm thick.
  4. Cut each of the red onions into 8 segments, so that each segment is still joined to the root end. This will help the onion layers hold together while cooking on the skewer.
  5. Peel the squash and discard the seeds and pith. Cut into cubes with sides roughly 1 – 2cm in size.
  6. Thread all the veg pieces on to wooden skewers and drizzle the oil over.
  7. Cut the feta into 1cm sided cubes, and set aside till the veg has cooked.
  8. Fire up the barbecue and, when it’s nice and hot, lay the skewers on the grill. Turn every so often until the veg has softened and the edges are nicely charred – likely to be around 20 mins.
  9. Remove from the grill. Scrape all the veg off into a warmed bowl, using a fork.
  10. Add the feta cubes and the balsamic, and give it a good stir so the ingredients are mixed well. See my main photo above for the end result.
  11. Serve alongside the rest of your meal.

Customise it!

Don’t have access to a barbecue? Or is it just a UK summer and too cold outside? Understood – I’ve been there lots of times! Not to worry – roast the veg in the oven at 180c for 30 mins, then mix with the feta and balsamic.

Talking of the weather, this post seems an appropriate time to add this Aussie classic to the ADK Playlist: Crowded House with Weather With You.

Whatever you’re cooking and wherever you are, have a great Christmas!