Categories
Mains Recipes

Beautiful Borlotti

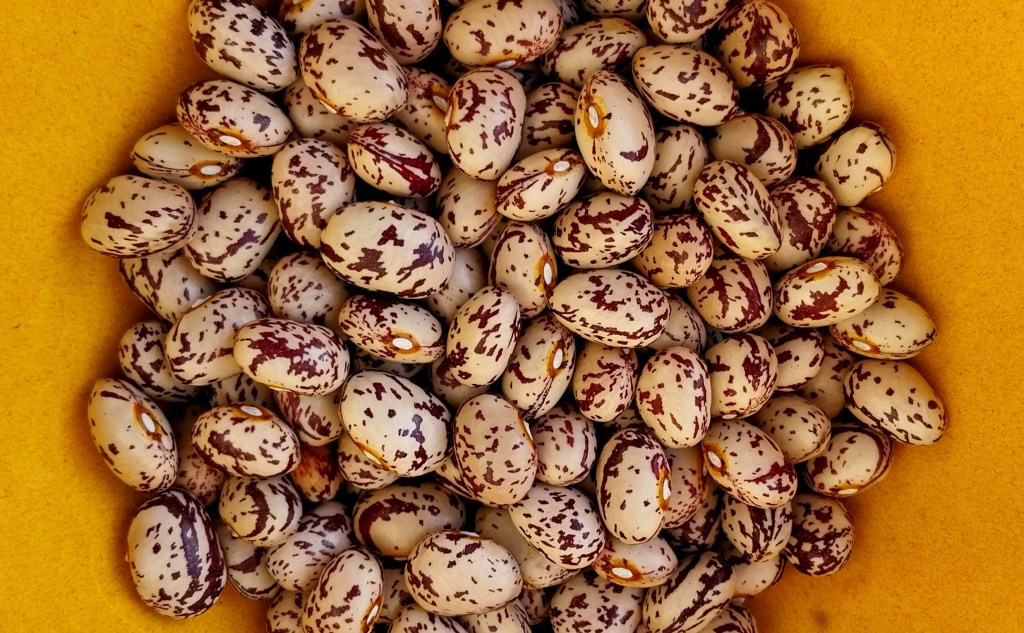
This harvest of borlotti beans, fresh from the pod (shown in my photo above) has been a very welcome arrival recently in the ADK Kitchen. I always think they are one of the most beautiful foods in their natural uncooked form.

They’re not bad cooked, either. The beans do tend to lose that magical, mottled sheen, but more than make up for it in their creamy, smoky taste. They also provide generous amounts of protein and fibre.

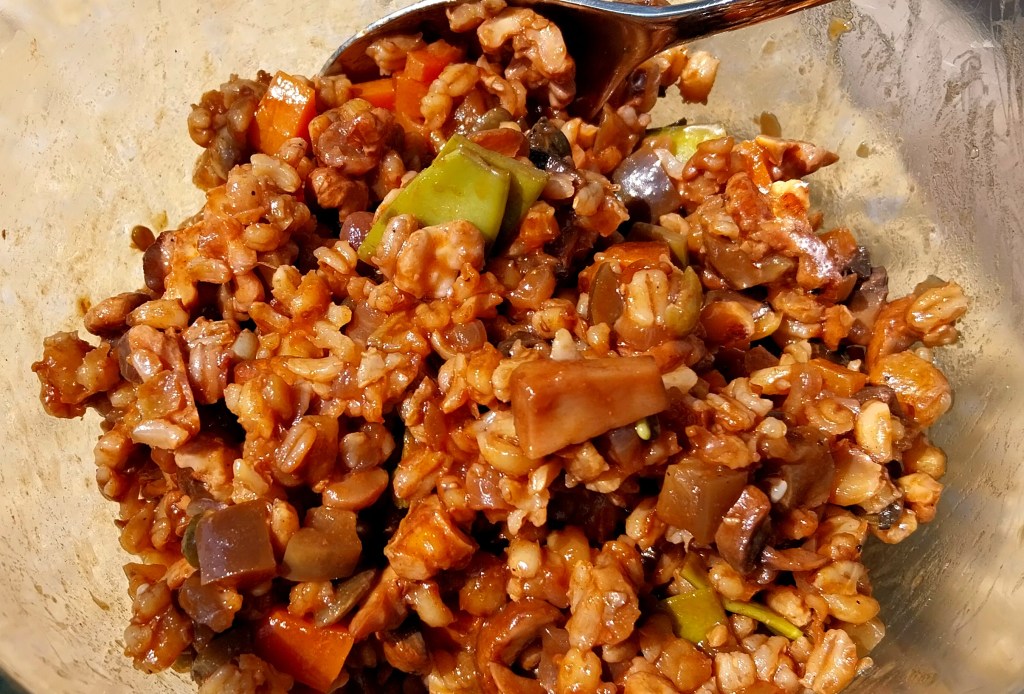
For this dish (shown in my photo below), I have given them a starring role in a chilli suitable for vegetarians, vegans and, indeed, anyone who enjoys a bowl of rich, warm and creamy comfort food this time of year.

Servings

4 adult portions.

Timings

The beans soak overnight, and are then boiled/simmered for at least an hour. Once these stages are complete, the rest will take about 30 mins to cook.

You Will Need:

  • 120g uncooked borlotti beans
  • cold water
  • 1 onion
  • 1 garlic clove
  • 1 tsp chilli powder
  • 1 tsp cumin seeds
  • oil
  • 1/2 a red pepper
  • 1/2 a green pepper
  • 2 celery sticks
  • 1 carrot
  • 6 -7 chestnut mushrooms
  • 1 400g carton of tomato passata

Method

  1. Wash the beans, then place in a bowl with enough cold water to cover them. Leave for 24 – 36 hours.
  2. Drain and rinse the beans under cold running water. You should find that they have doubled their weight through the water they have absorbed. Place the beans in a saucepan with enough fresh water to cover them, and bring to the boil. Reduce and simmer for 50 mins.
  3. Drain the cooked beans and wash again under cold running water. Set aside.
  4. Heat some oil in a wok, and add in the garlic, chilli and cumin. When it sizzles, add in the onion, peppers and celery, chopped into chunks.
  5. About 5 mins later, add in the mushrooms and carrot, also chopped into bitesize chunks.
  6. Stir with a spatula until all the veg is nicely softened, then add in the passata and the cooked borlottis. Top up with about half an empty carton’s worth of fresh water, and turn it up to boil.
  7. Bring to a simmer for about 15 mins, by which time the sauce will have reduced to provide a thick, creamy coating for the beans.
  8. Serve up with a portion of brown rice.

Customise It!

Replace the onion with chopped leeks, and add in some roasted squash if you wish. Shred in some spinach, cavalo nero or chard leaves.

Skip the rice and wrap a few spoonfuls up in a warmed tortilla. Perhaps with some soured cream on the side. This is making me hungry again…

It’s getting to that time of year when I receive messages from Spotify that my Unwrapped Playlist – containing my most played tracks of 2024 – is imminent. Here’s one track that will almost certainly be on it, and which seems to go well with the subject of this post: Leftfield with Pulse.

Categories
Recipes Snacks

Sweet & Sour Vegan Wraps

This week I’ve made a healthy and tasty filling mix for wraps comprising salad grains, vegetables, nuts and seeds, all in a sweet and sour dressing.

I was looking for a mix that I could keep in the fridge to speed up the making of lunchtime snacks over a few days. The grains, mushrooms and aubergine all have a succulence, and the walnuts a crunch, making a pleasant texture to bite into. The miso and sweet and sour dressing give it that umami flavour.

And it is suitable for vegetarians and vegans, so everyone is happy 🙂 !

Timings

About 30 mins to make.

Servings

Enough for about 6 wraps. The mix will keep in the fridge in a sealed box for a few days.

You Will Need

For the mix:

  • 120g grains – I used 40g brown rice, 40g pearl barley and 40 lentil soup/stew mix
  • half a carrot, finely chopped
  • 5 – 6 green beans, finely chopped
  • drizzle of oil
  • 1 clove garlic, crushed
  • 1 onion, finely chopped
  • 3 – 4 chestnut mushrooms, finely chopped
  • half an aubergine, finely chopped
  • 60g walnuts, roughly chopped
  • a handful of seeds – I used a mixture of pumpkin, sunflower and sesame seeds

For the dressing:

  • 30ml tomato passata
  • drizzle of oil
  • 2 tbsp soy sauce
  • 2 tbsp rice vinegar
  • 2 tbsp honey
  • 1 tsp sesame seeds

To serve:

  • Tortilla wraps

Method

  1. Put the grains in a saucepan of boiling water. Reduce and simmer. After about 20 mins, add the chopped green beans and carrot. Briefly bring the water back to the boil, then reduce to simmer for another 10 mins.
  2. While the grains and veg are cooking, put a wok or frying pan over a moderate heat. Pour in a drizzle of oil and add the crushed garlic. Add in the onion, mushrooms, and aubergine and stir for 5 – 10 mins. Add the miso and stir in. Leave a few mins more, then switch off.
  3. Drain the water from the saucepan, leaving the cooked veg and grains. Add in the onion, mushroom and aubergine, and finally the chopped walnuts and seeds. Stir to combine.
  4. Put the dressing ingredients in a screwtop jar. Shake and pour over the mix. Stir to combine, then leave to cool. It should look something like my photo below.
  5. Place the cooled mix in a sealed box in the fridge.
  6. Place a tortilla wrap on a plate and place a line of mix along the middle. Add in any other salad ingredients you wish, roll up and enjoy.

Customise it!

For the wrap in my photo at the top of the post, I combined the mix with chopped tomato, cucumber, scallion, grated carrot and white cabbage. Chopped celery, lettuce, rocket or other leaves would all go well. Use whatever is in season and/or what you have to hand.

On my recent visit to Belfast, I was pleased to see a mural on Great Victoria Street remembering Terri Hooley, the inspirational force behind Good Vibrations record label and shop. Good Vibes played an important role in Northern Ireland’s musical heritage, giving a platform to local punk and new wave talent, one of which I’m adding to the ADK Playlist. This is Rudi with Big Time.

Categories
Breakfast Recipes

Summer Fruit & Nut Acai Bowl

I’m home from my trip to France, to find that a spell of warm sunny weather may have finally arrived in the UK.

Reminded of the climate we enjoyed on our trip to Australia in the spring, I decided it was time to bring out the Acai powder I brought back in my suitcase, to make an Aussie-style smoothie bowl. Here it is, shown in my photo above, glinting in the British breakfast time summer sun.

We found Acai Bowls to be a popular choice in cafes and takeaway joints wherever we went in Australia. The Acai is usually served with combinations of cereal, fresh fruit and nuts (check out my earlier post on the crazy, yet delicious, peanut butter-infused option I enjoyed in Melbourne).

Acai (pronounced ah – sa – ee) is a dark purple berry grown in Brazil. It is rich in antioxidants, fibre and healthy fats, and believed to support heart health and cognitive function, while being low in sugar and calories. It tastes great, with a flavour reminiscent of dark chocolate, berries and red wine. It is suitable for vegetarians and vegans.

The berries do not travel well, so outside of Brazil they are sold in pulp form or as powder. I bought a pack of powder from Coles Supermarket in Melbourne, where it was available on the shelf, in several varieties. I have seen it in specialist health food shops here in the UK, but it is nowhere near as mainstream as it is Down Under.

For my Acai Bowl, I blended a tablespoon of Acai powder with two bananas and 3 tablespoons of Greek natural yoghurt. After a minute or so in the blitzer, it forms a thick purple cream that can then be poured on to cereal and topped with fresh fruit. This made enough for 2 Acai Bowls.

I poured it on to muesli and added some fresh strawberry that is grown locally. Just like Cristiano Ronaldo, the blueberries and kiwi are from Portugal. The crowning touch is some toasted brazil nuts, with a sprinkling of pumpkin and sunflower seeds.

It is the time of year to relax outside in the sun listening to good music on my ear buds. This week I’ve been revisiting an old playlist featuring The White Stripes, having forgotten how good they sound. Here they are with The Hardest Button to Button.

Categories
Blog Desserts Snacks

Peanut Butter Acai Bowl

Is it a peanut butter Christmas tree? A model of Mount Everest sculpted out of chocolate ice cream, perhaps?

Understandable, if that’s what you’re guessing is in my photo above. You’d be wrong, however – it is in fact an Acai Bowl. I bought this at the Drip Bar in Melbourne. The purply-chocolatey coloured acai is topped with fresh banana, crushed cacao, coconut, ground almonds, granola and a drizzle of peanut butter.

Some of you will be very familiar with acai, and some may never have heard of it. Acai (pronounced ah – sa – ee) is a berry that is produced in Brazil. It is rich in antioxidants, fibre and healthy fats, and believed to support heart health and cognitive function, while being low in sugar and calories. It is also suitable for vegetarians and vegans. It therefore ticks all the boxes to be called a surefire superfood.

What’s more, it tastes really good! At the risk of sounding like some sozzled sommelier, I would describe the taste as having dark chocolate tones, with deep red wine and a hint of blueberries. When you hear that description, it’s hard not to at least give it a try.

In the UK, my experience is that acai is still mainly the preserve of specialist juice bars and health food shops. An internet search reveals that there are slightly more outlets than I was aware of, but it is still nowhere near the mainstream in the way it is here in Australia. Most towns have a cafe or takeaway in the high street selling a variety of acai bowls, with chains established for the purpose, such as Oakberry and Yo-Chi.

As far as I understand, the acai is blended with chopped banana and yoghurt (or coconut milk for a non-dairy version), giving it a rich texture with a beautiful purplish colour. It is eaten ice cold, swirled in a bowl, looking like ice cream or sorbet with toppings added. Fresh fruit is most common, while sprinkling over granola or muesli makes it an option for breakfast.

A danger with acai bowls is that the base is topped up with treats high in sugar or non-healthy fats, that cancel out the health benefits of the acai itself. However, this doesn’t need to be a problem as long as the toppings (such as a good quality peanut butter) are added with thought and moderation.

The berries do not travel well, so outside of Brazil they are sold in pulp form or as powder. I have bought a pack of powder from Coles Supermarket, where it was available on the shelf, in several varieties. I will be taking it home to make some acai bowls of my own. I also have an idea to sprinkle some into the mix when baking, to make blueberry and acai muffins. Watch out for future posts!

Due to its health benefits, great look and taste, I feel it is only a matter of time before more of us are eating acai as part of a normal diet. Do let me know, via the comments below, if you have tasted acai, and what you thought of it. I am interested to hear how readily it can be found and eaten in your part of the world.

Here’s a Melbourne band that was recommended to me by the assistant in a cool vinyl records shop and cafe in the Hawthorn district of the city (a big shout-out to Alley Tunes). This band play experimental electronic music, and go by the name of Big Yawn. Here they are with Ragazzo.

Categories
Mains Recipes

Leek & Aubergine Bake

It was the aubergines that caught my eye this week at the local farm shop. The shiny purple skin was irresistible, and it made me realise that I hadn’t cooked with one for some time. I put one in my basket, along with a fresh leek, and this winter casserole dish began to come together.

My favourite way to cook aubergine is in slices on the ridges of a griddle pan. I like seeing the enormously satisfying tiger stripes forming, as I flip them over to cook on the other side. It’s kind of a reminder that spring is soon around the corner, and the barbecuing season is not that far away.

The striped aubergine is then mixed in with cooked, softened leek, tomato passata and cannellini beans to make a tasty filling base. It is all topped off with a crust of wholemeal breadcrumbs, chopped toasted nuts and grated blue stilton cheese.

Servings

4 adult portions.

Timings

15mins to cook and combine, then 20 mins in the oven at 180C, and a final 5 mins under the grill.

You Will Need

  • 1 aubergine
  • oil
  • 1 garlic clove
  • 1 leek
  • 400g can of cannellini beans
  • 500g carton of tomato passata
  • a few twists of black pepper
  • 100g wholemeal breadcrumbs
  • 60g toasted mixed nuts
  • 60g grated stilton cheese

Method

  1. Switch on the oven to warm up to 180C.
  2. Oil a ridged griddle pan and bring it to a moderate heat. Lay slices of aubergine in the pan for 3 – 4 mins, then turn them over. Use your judgment about heat and timing so that you get the nice tiger stripe effect on both sides. Remove to a warm plate.
  3. While the aubergine is frying, crush the garlic clove into a saucepan with some oil, over a moderate heat. Add in the leek, chopped into slices. Stir every so often for 5 – 6 mins until the leek has softened. Pour in the passata and drained cannellini beans, with a few twists of black pepper, and stir. Reduce to a simmer.
  4. Blitz the bread and nuts in a food processor with blade fitted. Tip into a bowl and add the grated cheese. Stir so that the cheese is evenly distributed.
  5. When the oven is up to temperature, transfer the aubergine to a shallow casserole dish. Tip in the leek, bean and tomato mix and gently coat the aubergine slices by turning them over a few times in the dish.
  6. Sprinkle over the breadcrumb, nut and stilton topping and spread it out so that it reaches all four sides. Drizzle some oil over and place in the oven for 20 mins.
  7. For the last 5 mins of cooking, place under a grill so that the topping crisps up.

Customise It!

Lots of opportunity here. Throw in whatever fresh herbs you may have to hand, and mix in a handful of seeds to the topping. Butter beans are a good substitute for the cannellini beans. For a vegan version, omit the stilton cheese or use a suitable vegan cheese, grated.

On the way back from the farm shop, this track came on the car stereo. I love it when a great track that I haven’t heard in a while comes on the radio. Needless to say, I turned the volume up and drummed along with my fingers on the steering wheel. Now we can all enjoy it here! This is Swing Out Sister with Breakout.

Categories
Mains Recipes

Carrot & Parsnip Miso Soup

Warm, filling and comforting, this winter vegetable soup is jazzed up a little with the addition of Japanese miso paste.

I hadn’t used miso before, but wanted to try it after reading about it on some of the other foodblogs here on WordPress. It is made from fermented soya beans, which means that it is rich in protein and good for gut health.

This is the variety that I used, made by Yutaka. I did have a little trouble finding it in Sainsbury’s at first, but eventually came across it in the Far Eastern aisle. Just to clarify, by that I mean the speciality Asian foods section, not that end of the building down by the motorway 🙂

I made a large batch of the soup in a saucepan on the hob, and kept it for a few days. I could then ladle some into a bowl, stir in some miso, and microwave it for around 3 mins for a very quick, tasty and nutritious lunch. It is vegetarian and vegan, so everyone can enjoy what the Japanese call that umami – or rich and savoury – taste.

Servings

About 6 bowlfuls.

Timings

The barley soup mix needs soaking overnight, then boiling for 45 mins. Once that’s ready, the soup takes about 25 mins to make.

You Will Need

  • 100g dried barley/lentils/split peas soup mix
  • oil
  • 1 onion
  • 3 celery sticks
  • 200 – 250g carrots
  • 200 – 250g parsnips
  • 1.5l vegetable stock
  • a few twists of black pepper
  • 1 jar of miso paste

Method

  1. Cover the soup mix with cold water in a bowl and let rest overnight.
  2. The next day, drain the soup mix and rinse in a sieve under cold running water. Place in a large saucepan and cover with boiling water. Let it boil for 10 mins, then reduce to a simmer for another 35 mins. Drain with the sieve, and set aside.
  3. Chop all the veg into chunks and place in the empty saucepan with some oil, over a medium heat. Put on the lid and let it sizzle for around 10 mins, stirring every so often. It should become softened and a little browned at the edges.
  4. Add in the stock and bring to the boil. Then reduce to a simmer for 10 mins.
  5. Remove the pan from the heat for a few moments, and blitz it by plunging in a handheld blender. If you don’t have one, spoon at least half of the soup into a food processor with blade fitted, and blitz it there before returning it to the pan.
  6. Add in the cooked soup mix with 2 tbsp of miso and the black pepper, and stir in. Then simmer for another 5 – 10 mins.
  7. Switch off and let it rest. When it has cooled, transfer to the fridge. It will keep for a few days, during which the texture and flavour will deepen.
  8. To serve, ladle some into a bowl and stir in another tbsp of miso to individual taste. Microwave until hot, and enjoy.

Customise It!

Almost any seasonal winter veg that you have available will go well here. Stick with making the carrot and parsnip prominent, though, as these give it a distinct, sweet flavour. Experiment with the miso, adding as much or as little as necessary to suit your individual taste. The miso already contains salt, which is why I only added black pepper at the seasoning stage.

There probably won’t be a better chance to add Japan to the ADK Playlist, so here they are with the eerie Ghosts.

Categories
Mains Recipes

Beetroot Falafel

First of all – yes, they really are that colour! No filter required here.

I had the idea that roasted beetroot might make an interesting falafel. Having bought a bag at the market, I began looking around at a few recipes online and in books.

This version is a combo derived from various sources. The inclusion of chickpeas, tahini, cumin and coriander stays true to the falafel’s middle eastern origins, while roasting the beetroot first with garlic, and drizzled with balsamic vinegar, gives it a definite European dimension. The pieces of beetroot give a bite to the texture and stop the falafel becoming too dry.

The falafel are served with a dipping sauce simply made from tahini, fresh lemon juice, honey and black pepper.

And they’re both vegetarian and vegan, so everyone is happy 🙂

Servings

This made 10 falafel.

Timings

25 mins to roast the beetroot, then 10 mins to make up the falafel. They then roast in the oven at 180C for 20 mins.

You Will Need:

  • 300g raw beetroot, peeled and cut into chunks
  • 1 garlic clove
  • oil
  • balsamic vinegar to drizzle
  • 250g chickpeas
  • 2 tbsp tahini
  • 1 tbsp ground coriander
  • 1 tbsp ground cumin
  • a twist of sea salt

For the tahini dip:

  • 3 tbsp tahini
  • juice of 1 lemon
  • 2 tbsp honey
  • a twist of black pepper
  • toasted sesame seeds to sprinkle

Method

  1. Scatter the chunks of beetroot on a roasting tray. Crush the garlic clove over the chunks and drizzle with oil. Place in the oven at 180C for 25 mins. Half way through, take the tray out and drizzle the balsamic over.
  2. Let the roasted beetroot cool for 5 mins while you prepare the rest of the mixture.
  3. Put the chickpeas, tahini, coriander and cumin in a food processor with blade fitted. Add in the beetroot and any oil/garlic scrapings from the roasting tray. Blitz to a smooth consistency.
  4. Shape into patties with the palms of both hands. Place on a clean roasting tray and brush with oil. Place in the oven for 20 mins, turning them over with a spatula half way through.
  5. While the falafel are in the oven, combine the ingredients for the dipping sauce with a spoon. Sprinkle over some toasted sesame seeds just before serving.
  6. Serve the cooked falafel with the dipping sauce alongside, as shown in my main photo above.

Customise It!

Good as they are, there are two things I will do differently next time I make these. Firstly, I’ll include some chopped fresh coriander, which I think will enhance further both the taste and the look. Secondly, I would like to try cooking them in an air fryer, which I reckon will give them a crispier shell.

I wouldn’t change the colour though which, as you can see from my photo, is a deep shade of purple. Now that’s what I call a cue for adding the next track to the ADK playlist! Air guitar at the ready everyone, this is Deep Purple with Smoke on the Water.

Categories
Bakes Recipes Snacks

Peanut Butter Boosters

Here’s a wholesome and nutritious, home-made alternative to those commercially-produced cereal bars we often reach for, to cure the hunger pangs between meals. I wanted to see if I could create a version that gave greater control over the ingredients and, in particular, the carb and sugar levels.

The words ‘peanut butter’ are enough to bring a smile to most faces, so I decided to put that centre stage. I used a make that consists of 100% peanuts, with no palm oil (Meridian).

Taking inspiration from a recipe by Hugh Fearnley-Whittingstall, I also cut out all flour and eggs, and brought in oats, seeds and honey. I used muscovado sugar instead of the refined variety, and reduced the amount of it by about a third from what is often found in sweet recipes.

The challenge with removing a number of staple ingredients from a bake is finding a mixture that holds together, and doesn’t descend into crumbs. The consistency of the peanut butter and the stickiness of the honey definitely helped with this, as did letting it cool completely in the tin, before cutting into slices.

The resulting booster bars do hold together – see my main photo above. They’re also vegetarian and vegan. They aren’t completely crumb-free, but that’s a small price to pay for having a box full of these tasty and nutritious boosters to plug that hunger gap.

And if you do get some crumbs – hey, just gather them up and sprinkle them over your breakfast cereal – they’re delicious!

Servings

16 booster bars.

Timings

15 mins to prepare, 30 mins to bake at 180C.

You Will Need:

  • 125g vegetable baking spread
  • 80g light muscovado sugar
  • 125g peanut butter
  • 75g runny honey
  • zest of 1 orange
  • zest of 1 lemon
  • 200g oats
  • 100g dried apricots, finely chopped
  • 120g mixed seeds e.g. pumpkin, sunflower.

Method

  1. Grease and line a traybake tin – mine used is 20 cm square. Switch on the oven to 180C.
  2. Place the spread, brown sugar, peanut butter and honey in a saucepan and warm over a gentle heat. Stir until it melts into a thick mixture.
  3. Add in the other ingredients and stir well to combine.
  4. Tip into the prepared tin and level with a spoon. Place in the oven for 30 mins.
  5. Remove from the oven and let cool completely in the tin. Turn out carefully and cut into 16 squares.

Customise It!

Swap in other dried fruit for the apricot. The real nut fiends can swap in some different varieties of chopped nuts (e.g, pecans) for some of the seeds, if you wish. Do what’s necessary to give you the tasty energy boost you need.

This week in the ADK Kitchen I’ve been playing the new release by The Black Keys, a band from Ohio that I really like and who’ve already provided several tracks for the ADK Playlist. With all that energy from the Peanut Butter Boosters, this new track should have you up on your feet, singing and dancing along with its catchy chorus: Beautiful People (Stay High).

Categories
Mains Recipes

Soup-erbowl

This weekend’s incoming batch of seasonal veg from our local community farm had winter soup written all over it. I’m talking hearty and wholesome here, with pearl barley and lentils, giving a good portion of protein and fibre. Included in the box was even a handful of fresh herbs – parsley, sage, rosemary and thyme, would you believe. Well, hey – I feel a song coming on!

For the benefit of any millennials, that’s a reference to a line in a Simon & Garfunkel song, Scarborough Fair – check it out.

Which brings me to another great American institution that’s been around for over half a century. Yes, it’s Superbowl weekend – Superbowl LVIII to be precise (that’s 58 to you and me – why does the NFL insist on using roman numerals?).

The pinnacle of the American Football season is a match-up between the Kansas City Chiefs and the San Francisco 49ers. It’s a repeat of the 2020 game, when the Chiefs emerged victorious. My prediction is that the Chiefs will be taking home the trophy once again – Patrick Mahomes and co just seem to have the experience and the ability to do what it takes when it comes to the postseason play-offs.

Food is always a key part of enjoying the Superbowl, and each year I aim to come up with a healthy(ish) snack to have with the game. There will definitely be some Smoked Paprika Popcorn on the table, when the game kicks off at around 11.30pm UK time.

It’s always fun seeing what extravaganza they have lined up for the Half Time Show. This year the game is taking place in Las Vegas, which is where U2 have been performing their residency at the Sphere. Seeing as Bono and the lads are in town, I did hope they might be popping down to the stadium to treat the audience to a few numbers. Usher is this year’s headliner, however. I understand he’s trailed that he may bring along a special guest, so….you never know?

Anyway, where was I? Back to the homemade soup, which I shall be enjoying this Soup-erbowl weekend.

Servings

4 adult servings.

Timings

The pearl barley/lentil mix needs soaking overnight, then boiling/simmering for 45 mins. Making the soup is then about another 30 mins.

You Will Need

  • 100g pearl barley/lentil/split pea mix
  • 500ml water
  • 1 onion
  • 2 celery sticks
  • 2-3 carrots
  • 1 parsnip
  • 500ml veg stock
  • handful of parsley, sage, rosemary and thyme (or whatever fresh herbs you have!)

Method

  1. Soak the pearl barley mix overnight in the cold water.
  2. The next morning, pour the water away and rinse the pearl barley mix under cold running water. Place in a saucepan and cover with water, Bring to the boil for around 10 mins, then reduce to a simmer for another 35 mins. Switch off and drain.
  3. Using the same, empty saucepan, heat a little oil and throw in the chopped onion, celery, carrots and parsnip. Stir and let the veg soften in the heat.
  4. Pour in the veg stock and bring to the boil. Reduce to a simmer, and tear in the herbs. Season with salt and pepper.
  5. After 10 mins, blitz about half of the soup with a handheld blender. Alternatively, transfer half to a food processor with blade fitted, blitz and return it to the pan. This will give the soup a nice consistency, while still having chunks of veg in there.
  6. Add in the cooked pearl barley mix and simmer for another 10 mins. Switch off, and the soup is ready to serve.

Customise It!

Any other winter root veg will go well – swede, celeriac, potatoes for example. Add in a leek or two. Just make sure you don’t mess with the parsley, sage, rosemary and thyme (only kidding, use whatever fresh herbs are to hand).

Just imagine what a brilliant Half Time Show Simon & Garfunkel could have put on. As far as I know, they never did one, however, and it’s unlikely to happen now. Unless they do an Abba, and have avatars, perhaps? All that classic Americana would go down a storm with the Superbowl audience. We can but dream. Here they are with one of their best: Mrs Robinson.

Enjoy Usher; enjoy the Superbowl, everyone.

Categories
Mains Recipes

Roasted Cauli Stacks

Inspiration for this delicious vegan dish came from playing a game of Jenga. Just as in the game, it’s essential to check carefully that each layer is securely in place before moving on to the next layer in the stack.

The difference here is that your building blocks are cooked, irregular shaped, seasonal winter veg, rather than geometrically identical little pieces of wood.

The foundation is steamed, shredded Savoy cabbage….

….on top of which is placed a roasted cauliflower steak…

The crowning glory is a rich tomato and black olive sauce, as shown in my main photo at the top of the post. When you’ve built your stack, it’s time to tuck in, before it all comes tumbling down!

Haha, fun and filling, the way fabulous food should be. Here’s your architect’s plan for construction….

Servings

Mains for two adults.

Timings

30 mins to make, including roasting the cauli steaks at 180C.

You Will Need

  • 1 cauliflower
  • half a Savoy cabbage
  • 1 clove of garlic, crushed
  • oil
  • half an onion
  • 2 sticks of celery
  • half a red pepper
  • 500g carton of tomato passata
  • a handful of fresh herbs, torn
  • 12 – 15 black olives

Method

  1. Prepare the cauliflower steaks. Remove all the outer leaves and any woody bits at the base of the cauli, while keeping the stalks and florets intact and held together.
  2. With a large, sharp knife, cut the head of the cauli into 2 halves, or hemispheres. Then take each and, at the largest side, cut a slice, or ‘steak’ about 2cm thick. Keep the remaining, unused florets in a bag in the fridge, to use another time.
  3. Switch the oven on to 180C.
  4. Bring a pan of water to the boil, and immerse the 2 cauli steaks for about 3 mins. Remove, place on a plate or board, and pat dry with kitchen paper. Take care as they will be hot!
  5. Brush both sides of each steak with oil and place on a greased baking tray. Place in the oven for 20 mins, turning each over, half-way through roasting.
  6. Cut the Savoy into shreds and place in a steamer basket. Place on top of the saucepan, still with the cauli water inside, and bring back to the boil. Let the Savoy steam for about 12 mins.
  7. While the Savoy and cauli steaks are cooking, make the sauce. In a new saucepan, sizzle the garlic in oil, and then add in the onion, celery and red pepper, all chopped. After a few mins, tip in the passata and herbs, and stir.
  8. Finally, chop the black olives in half, and chuck in. Leave the sauce to simmer and reduce to a rich consistency. Switch off when the caulis come out of the oven.
  9. Serve up a layer of Savoy, topped with one of the steaks, and finally a few spoonfuls of the sauce.

Customise it!

Ok, here’s a challenge for you: can you add a 4th layer? It doesn’t have to be that hard – perhaps some grated parmesan, a sprinkling of nuts and seeds, or a handful of rocket. Whatever you fancy. Give it a try, but go carefully – or it may all come tumbling down! Just like in this classic track by the Stones, from the album Exile on Main Street: Tumbling Dice.