Categories
Bakes Recipes

Blueberry & Coconut Crumble Squares

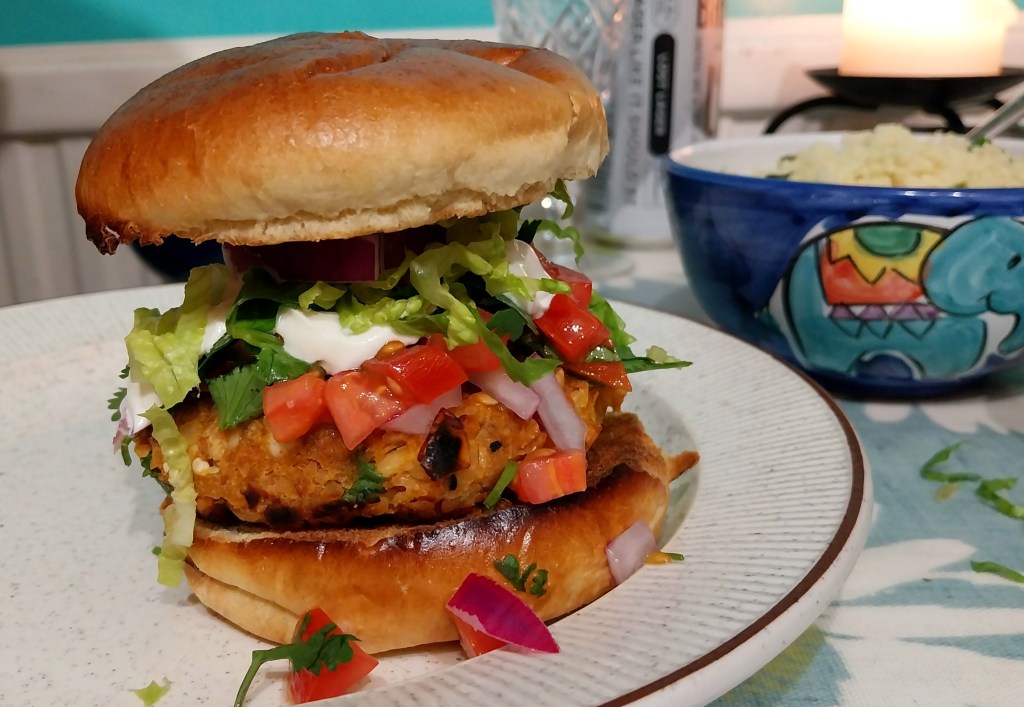
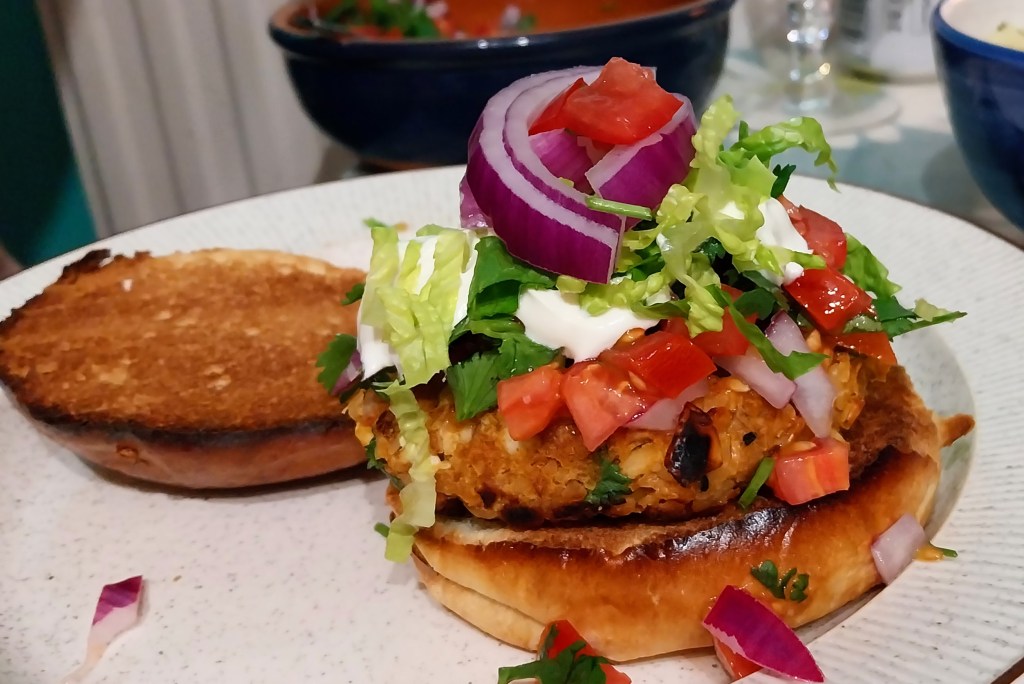
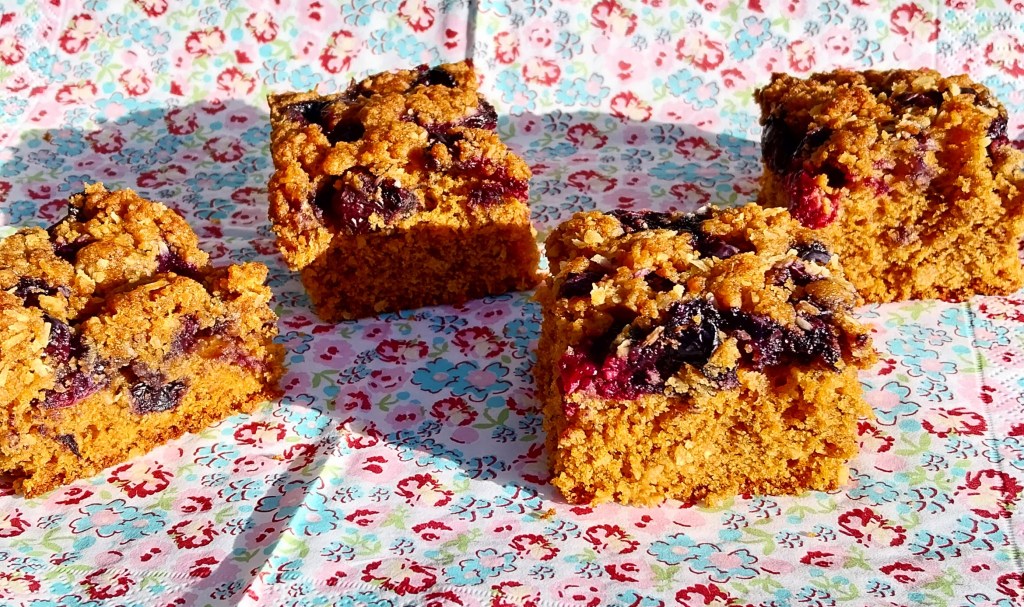
Here’s a delicious tray bake that thinks it’s a fruit crumble. A cup full of the oaty, dark sugary, coconutty cake mix is removed before the eggs are added, and then spread over a top layer of juicy blueberries before baking. The result is a cake base with a fruit crumble topping.

Enjoy it warm or cold, on its own or with a dollop of custard or greek yoghurt alongside.

Inspiration for this post has come from BBC Good Food. It’s another variation on a favourite traybake of mine that I posted previously on A Different Kitchen. In this version I’ve changed the sugar from light brown to dark brown, and swapped in blueberries for blackberries. It demonstrates again how easy it is to play around with recipes, rather than feeling we have to strictly follow them to the letter!

Servings

Makes 16 squares.

Timings

15 mins to prepare, 25 mins to bake at 180C.

You Will Need

  • 250g self-raising flour
  • 25g oats
  • 250g dark brown sugar
  • 200g butter or spread
  • 75g desiccated coconut
  • 2 eggs
  • 300g fresh blueberries

Method

  1. Grease a baking tin and line with baking paper. The one I used is 22cm square.
  2. Sieve the flour into a large bowl. Stir in the oats and sugar.
  3. Add the baking spread and mix in with an electric whisk, until you have a crumbly mixture.
  4. Take a teacup or sugar bowl and fill it with some of the mix. Set aside.
  5. Add the eggs to the large bowl and whisk in once more until it is all combined.
  6. Spread over the bottom of the baking tin, and smooth out towards all four corners. Scatter the blueberries on top, then sprinkle over the reserved teacup/sugar bowl of crumble mixture.
  7. Place in the oven for 25 mins, or until a skewer inserted in the middle comes out with no mixture sticking. Leave to cool.
  8. When cool, remove from the tin and cut into 16 squares.

Customise It!

Other fruit like raspberries will work well if you wish. Swap in light brown sugar for the dark if you want a lighter cake. Chuck a few chopped nuts or seeds in with the reserved mixture to add further texture to the crumble topping.

This week I’ve been following developments about the current musical collaboration between two legends of the Manchester music scene – John Squire (The Stone Roses) and Liam Gallagher (Oasis). So far they have only released a couple of tracks for streaming, and I am looking forward to hearing the whole album when it comes out next month. John Squire’s distinctive swiping guitar sound and Liam’s rasping vocals have the potential to make this something special.

It’s prompted me to listen to tracks by The Stone Roses this week. Their sound is an engaging mash-up of 60’s-era vocals and late-80’s dance. This is probably my favourite track of theirs, so I’m adding it to the ADK Playlist. It showcases the Roses at their best: choppy lead guitar, bouncy drums and percussion, steady bass and understated vocals: The Stone Roses with What the World is Waiting For.

Categories
Recipes Sides

Mango Salsa

This is a side dish to truly wake up the senses. Juicy mango combines with crisp cucumber, crunchy red onion, fiery chilli, fragrant coriander and tangy lime to make a real treat for your taste buds, that’s visually enticing! It’s also suitable for vegetarians and vegans.

I served it spooned over my Jerk Chicken with Roast Peppers, all wrapped up in a warm tortilla. You can just as easily serve it alongside a spicy mains or as part of a salad.

Thanks to the guys at Sunday Brunch for the inspiration with this one.

Totally tropical!

Servings

A side dish for 4 adult mains.

Timings

10mins to throw together.

You Will Need

  • 1 red onion, chopped
  • 1 mango, chopped
  • half a cucumber, chopped
  • 1 red chilli, chopped
  • 1 clove garlic, crushed
  • 30g fresh coriander, chopped
  • zest and juice of 2 limes

Method

  1. Combine all the ingredients in a bowl and stir to combine. Place in the fridge until mealtime.

Customise It!

Feel free to chuck in a few nuts, seeds or dried fruit. Pomegranate seeds would look good and, in my experience, have never been known to detract from a dish such as this. Try not to over-complicate it though – part of the attraction is that it is so quick and easy to prepare.

Here’s La Roux, keeping up the fun, tropical theme with the catchy Tropical Chancer. Be mindful that the chorus of this track can lodge in the brain, resulting in in it being hummed and sung on repeat for the rest of the day. Don’t say I didn’t warn you!

Categories
Mains Recipes

Jerk Chicken with Roast Peppers

Here’s a really tasty and spicy way to jazz up some chicken and peppers. It’s based on a recipe I obtained from Simon and Tim on TV’s Sunday Brunch programme, which I’ve developed in my usual manner. Once the pieces are cooked, you can enjoy them in various ways: hot with rice, cold with salad or – my favourite – as a filling in a tortilla wrap.

I reported a few posts back that I had opened a new channel for A Different Kitchen on Instagram. I decided to teach myself some reel making skills with this dish, which was enormous fun. I’ll say more about that shortly. First of all, let’s focus on the food!

Servings

This depends on how you intend to serve it, but you will get 4 chicken breasts worth of spicy, meaty goodness to eat as you please.

Timings

15 mins to make the marinade, 12 hours to rest in the fridge, then 25 mins to cook.

You Will Need

  • 4 chicken breasts, cut into chunks
  • 1 red and 1 yellow pepper, also cut into pieces
  • olive oil

For the Marinade:

  • 1 onion, chopped
  • 3 scallions, chopped
  • 1 chilli, chopped
  • 1 garlic clove, crushed
  • 1 tbsp 5 Spice powder
  • 1 tbsp allspice berries
  • 1 tsp ground nutmeg
  • 1 tsp dried thyme
  • 100ml dark soy sauce
  • 50ml veg oil
  • a few twists of sea salt and black pepper

Method

  1. Combine all the marinade ingredients in a bowl. Tip in the chicken chunks and coat all over. Leave in the fridge for 12 hours, then take out.
  2. Place the chopped peppers in a dish. Drizzle the oil over and roast in the oven at 180C for 25 mins.
  3. While the peppers are roasting, tip the chicken pieces and all the marinade into a large frying pan and place on a high heat. Turn the pieces until they are cooked through and the marinade has become a sticky, saucy coating.
  4. When the peppers are done, tip them into the pan and stir in with the chicken so that they are also coated in the spicy sauce. Serve hot or cold.

Customise It!

There are various ways you can cook and serve this. Come the summertime, I fancy threading the marinaded chicken and pepper pieces on skewers for roasting on the BBQ.

On this occasion, I opted to roll some of the cooked chicken and peppers up in a soft, warmed tortilla wrap along with a mango salsa (that I will show you how to make in my next post!)

As I say, I made this the subject of a reel over on my new Instagram channel – you can find it on @differentkitch. I had great fun, and learned a lot in the process – probably the main lesson being to shoot in portrait mode on my camera phone for Instagram, rather than the landscape that I am more accustomed to using over here. I’ve since corrected this in my subsequent reels.

Although jerk chicken is Caribbean-inspired, I felt wrapping it in a flour tortilla gave it a Tex Mex kind of feel. So, when it came to choosing an audio track for my reel, I opted for ZZ Top and Gimme All Your Lovin’. Someone commented that the guys in the band would be pleased the chicken, peppers and other bits were wrapped up in the tortilla, as it meant no stray pieces of food would get tangled up in their trademark long beards. I hadn’t really thought of that, tbh, but you have to say – fair point.

Here’s ZZ Top with Gimme All Your Lovin’.

Categories
Breakfast Recipes

Seville Orange Marmalade

For these past few days, the ADK Kitchen has been passed over to my wife, Lesley, for the making of some Seville Orange Marmalade. I do, of course, have a vested interest in this, as I shall be scoffing a fair amount of it spread on toast for breakfast over the coming months (starting today, in fact – see my main photo above). Over to Lesley to explain…….

This time of year we have Seville oranges in our shops – the only time in the year when they are in season. Grown in Spain, their bitter taste and high pectin content makes the ideal marmalade – a traditional and uniquely tangy breakfast treat. I have vivid memories of my parents making jars and jars of this when I was little. It involved a major kitchen takeover at the time.

I set out to recreate it in the modern day, based on a recipe from Riverford. I was interested to see if the kitchen equipment available in the 2020s made the process any different from how it was in the 1970s. I found that using an electric slow cooker and a normal saucepan, I didn’t have to patiently keep watch over a large, boiling preserving pan for several hours, as my parents had done!

To ease on storage, I wanted to make just a couple of 1lb jars, rather than enough to last a full year – see the photo below.

The remaining oranges in the pack have been prepped and stored in the freezer, so that I can make another batch during the year, as a special treat when the oranges are no longer in season.

Servings

This makes 2 1lb jars (or 400 – 450ml each jar).

Timings

The first stage, in the slow cooker, takes 8 hours. The second stage takes 1 hour on the hob. Then allow 24 hours to cool and set.

You Will Need

  • a slow cooker with bowl of 3l capacity
  • 7 or 8 seville oranges (750g)
  • 1 lemon
  • 900ml cold water
  • 1kg granulated sugar
  • muslin cloth and string
  • 2 sterilised marmalade or jam jars to reuse

Method

Here are some photos I took as I went along. Instructions follow, below.

  1. Wash the oranges, and peel with a veg peeler. Chop the peel into shreds of the width that you like to have in your marmalade, whether fine or thick.
  2. Chop all the oranges and the lemon in half. Squeeze the juice from each into a bowl.
  3. Once the juice has been extracted, wrap the squeezed halves in the muslin cloth (I had a clean muslin curtain I had cut up) and scoop it up to make a bag of a size that will fit into your slow cooker bowl. Tie it around the neck with string.
  4. Put the juice, shreds and water into the slow cooker bowl. Place the muslin bag of fruit in the bowl with the neck of it draped over the side of it, held down by the lid (see photo).
  5. Cook for at least 8 hours on the high setting.
  6. 8 hours later, switch the slow cooker off and let it cool. Once cool, squeeze the rich pulpy residue, that has formed in the muslin bag, into the slow cooker bowl getting out all the lovely sticky juices formed from the pith, pips and pulp.
  7. Transfer the lovely orange scented juice to a normal saucepan, via a measuring jug, and place on the hob for the final high heat stage. I don’t think the slow cooker can achieve the fast boil you need for this. Add 450g of sugar for every 500ml of liquid. Begin with a low heat under the saucepan, and stir with a wooden spoon to dissolve the sugar so it doesn’t catch. You then increase the heat to a rolling boil once the sugar is dissolved – mine needed about 10 mins.
  8. Take a teaspoonful of the liquid and set it on a cold plate, gently pushing on it with the back of the spoon. If it wrinkles, it means the marmalade is at its setting point, which is what you are aiming for. If it isn’t wrinkling, test again (and again if necessary) every few minutes, until the wrinkling point is reached – this means it will set and be spreadable.
  9. Immediately remove from the heat and leave to stand for 15 mins. This short cooling time will mean the shreds will be evenly distributed in the jar and not all rise to the top.
  10. Taking care, spoon or pour the hot liquid into the sterilised jars, and screw on the lids (if you don’t have lids, use a piece of greaseproof paper cut into a circle on the surface of the marmalade, and another piece held on by an elastic band). Leave to cool until the next day.
  11. Open the jar at breakfast time, spreading the marmalade on toast with some butter and take in that orangey scent.

Thank you Lesley. I’ve just made a fresh pot of tea and popped another slice of harvest grain in the toaster. Lesley’s choice of track for the ADK playlist is very apt – Labelle with Lady Marmalade.

Categories
Mains Recipes

Brazil Nut Roast

Nut roast is one of my favourite dishes this time of year. I love the taste and the texture, with the contrast between the crunch of the nuts, the crispy toasted shell, and the soft, richness of the roast veg incorporated in the mix.

I didn’t make one over the recent holiday period though – traditional roast turkey and ham took centre stage on the ADK Christmas dinner table. I’ve been keen to make one, therefore, to start the New Year.

I was reading an article about the various health benefits of brazil nuts, and then discovered a special offer in Lidl for packs of them at a very reasonable price. Gradually, the idea for this dish began to form. I found a BBC Good Food recipe as a starting point and developed it from there. Don’t you just love it when a plan comes together?

It’s important to think about the blend of colours you want in the mix, to make it visually interesting and get the tastebuds tingling. You can see from my photos that I’ve included shreds of cavalo nero, fresh herbs and grated carrot – all seasonal and locally grown, by the way. Their green and orange stands out amongst the creamy chopped brazils, and the golden wholemeal breadcrumbs. In some places you will also spot a rich brown which comes from a secret ingredient – the Vegemite I brought back from my trip to Australia this time last year!

In a moment I’ll deal with some options to mix up the ingredients and customise it to your liking. Firstly though, here’s how I made it.

Servings

This will make about 12 generous slices, like the ones in my photo above i.e. 6 adult portions of 2 slices each.

Timings

30 mins to prepare, 30 mins to roast at 180C.

You Will Need

  • a 1.5l loaf dish
  • 1 onion
  • 1 red pepper
  • 200g chestnut mushrooms
  • 1 tbsp olive or rapeseed oil
  • 1 carrot
  • a handful of fresh herbs e.g. thyme, sage, rosemary
  • 100g red lentils
  • 300ml vegetable stock
  • 1 tbsp vegemite (or other yeast extract)
  • 5 – 6 leaves of cavalo nero
  • 100g wholemeal breadcrumbs
  • 150g brazil nuts
  • 2 eggs
  • sea salt and black pepper
  • 400g tin chopped tomatoes
  • a handful of basil leaves

Method

  1. Grease and line the loaf dish. I find that using baking paper for this really helps with removing the cooked nut roast from the dish, at the end.
  2. Finely chop the onion, red pepper and mushrooms. I find that doing this in a food processor, with blade fitted, gets the veg to the right size pieces to meld together in a nut roast.
  3. Put the oil in a wok on the hob. When the oil is hot, crush in the garlic clove, followed by the finely chopped onions, pepper and mushrooms. Let it sweat for a few minutes, stirring from time to time (leave the food processor bowl and blade to one side, with no need to wash it out – you will be using it again in a moment).
  4. Grate in the carrot and tear in the herbs.
  5. Pour in the stock and tip in the lentils. Bring to the boil, then reduce to a simmer for 15 mins so that the lentils soften and the mix thickens. Dip in the spoon of vegemite, so that it slips off the spoon into the hot liquid and dissolves into the mix.
  6. For the last few mins of simmering, add in the cavalo nero, cut into fine shreds.
  7. After 15 mins, switch off and transfer the mix to a plate. Set aside to cool for 10 mins.
  8. Switch the oven on at 180C. Spread the brazil nuts on a tray and place them in the oven to toast while it’s heating up.
  9. Put the slices of wholemeal bread into the food processor, still with blade fitted, and blitz to breadcrumbs. Transfer to a large mixing bowl.
  10. After 5 mins, remove the nuts from the oven and blitz to small pieces in the food processor. Don’t obliterate them to a powder, however – you want to retain an element of crunch!
  11. Add the nuts to the breadcrumbs. Then add in the slightly cooled veg and lentil mix. Finally, crack in the eggs. Give it all a really good stir so that it is fully combined. Give it a good seasoning with a grinding of sea salt and black pepper.
  12. Spoon the mix into the loaf dish and level the top by pressing down with the back of a spoon. Place in the oven for 30 mins.
  13. Remove and leave to cool for 5 mins, then invert it on to a chopping board to cool completely. It should look like my photo at the top of the post. When cool, it can be sliced with a bread knife, as shown in my other photo.
  14. Serve with a very simple tomato sauce, made by heating the chopped tomatoes in a saucepan, with the basil leaves torn in, until the tomatoes reduce and thicken. Grind in a few twists of black pepper.

Customise It!

Feel free to swap in other veg that is in season and/or that you have to hand. A couple of celery sticks chopped will go well, for example. You can add a combination of mixed nuts, instead of the brazils, if you wish. I’m a big fan of Vegemite, and think it adds a lot to the taste of a nut roast. I recognise, however, it’s not everyone’s cup of tea, so leave it out if you wish. A few shakes of Worcester Sauce would not go amiss in its place.

According to my Spotify Unwrapped for 2023, one of my most played bands in the last year has been Leftfield. I was not terribly surprised about that, as their This Is What We Do album, that came out in late 2022, has been played a lot in the ADK Kitchen. I’ve already featured a couple of tracks from it in other posts, and here is another. This is Leftfield with Pulse.

Categories
Mains Recipes Sides

Spicy Bean Burger and Salsa

Whenever I look at the above photograph, I just want to place the fingers of both hands on the top of the roll, my thumbs underneath, scrunch it all together and take a large bite.

Which is a pretty good clue to what happened next, the moment I’d set my camera phone to one side.

I love the taste of a good veggie burger, and many times will choose one over a meat version. So when a bag of freshly harvested pulse beans arrived from our local farm, I had little doubt what to make them into.

I soaked the beans overnight and then boiled them for around 45 mins, before draining, cooling and mashing. However, you can just as easily use a can of beans that are ready to use.

Mixing the mashed beans with breadcrumbs and an egg gives a good texture that ensures the burgers, once shaped into patties by hand, stay together during the cooking process.

A fun part of the exercise is deciding what spices to add, and you can really go to town on tailoring it to your tastes. I opted for chopped red chilli, ground cumin, freshly chopped coriander and nigella seeds. Hey, you want garlic? Crush it in!

Here’s another shot just before the lid was positioned, showing the toppings including raw red onion, chopped lettuce, sour cream and my home made tomato salsa. Don’t worry if some pieces topple over the side while building it – this is real food. The scrunching down of the brioche roll between your hands will hold everything in, as you go to take that first bite….

Getting hungry, yet?

Servings

This mixture made 6 burgers, each the size of a brioche bun.

Timings

If cooking the beans from raw, they need to soak overnight, then be boiled for around 45 mins before draining and cooling. You can save time on this by opening a can of beans instead. Otherwise, prepping the burger mixture and salsa takes about 20 mins, with another 20 mins to fry/keep warm.

You Will Need

For the bean burgers:

  • 400g cooked beans e.g. kidney beans, butterbeans
  • 100g wholemeal breadcrumbs
  • 1 egg
  • 2 red chillis, finely chopped
  • 1 tsp ground cumin
  • small bunch of coriander leaves, chopped
  • 1 tbsp nigella seeds

For the tomato salsa:

  • 4 – 5 ripe tomatoes, finely chopped
  • half a red onion, finely chopped
  • small bunch of coriander, chopped
  • 1 garlic clove, crushed
  • juice of half a lime
  • a splash of white wine vinegar

To serve:

  • 6 brioche buns
  • chopped lettuce
  • soured cream
  • chopped raw red onion

Method

  1. Mash the beans on a plate with a potato masher, and scrape into a bowl. Add in the breadcrumbs, egg and all the spices.
  2. Roll up your sleeves and get your hands in there, squidging the mixture between your fingers till it is all well combined.
  3. Pull out just enough of the mixture to make one burger, and flatten it down between the palms of your hands. Set aside on a tray. Repeat to make 6 burgers in all. Place the tray in the fridge to chill while you make the salsa.
  4. In a separate bowl, combine all the salsa ingredients and give them a stir. Set the bowl in the fridge.
  5. Switch on the oven to 140C. Fry each burger on the hob for 4 – 5 mins on each side, then transfer to a tray and place in the oven. This will keep the burgers warm until serving time, and also round off the cooking process, making them browned and crisped all over.
  6. Serve each burger in a toasted brioche roll, on a bed of chopped lettuce, and topped with a dollop of the salsa. Add raw chopped red onion and sour cream.

Customise It!

The sky really is the limit here. Add slices of avocado to the bed of chopped lettuce if you want. Top it off with your favourite cheese, grated, and slam it back in the warm oven for a few mins to melt, before adding the salsa. Engage imagination!

The next band to feature on the ADK Playlist has been around for over 20 years, and is finally enjoying some well-deserved public attention, following a collaboration with Taylor Swift. Two critically acclaimed albums released in 2023 have also helped their cause. Their sound reminds me of Nick Cave and the Bad Seeds, and Arcade Fire, so they are definitely worth a listen if you haven’t heard their stuff. Here’s a good one to start with, included on 2023’s Laugh Track. From Cincinnati, Ohio, this is The National (featuring Bon Iver), with Weird Goodbyes.

Categories
Bakes Recipes

Cranberry, Orange and Pecan Muffins

Just as I thought the UK season of imported fresh cranberries was coming to a close, what should I find? Only that a whole new batch of them has just appeared in Morrisons. North American friends – you have answered my prayers!

Time then for another round of muffins, obvs. This time I have blended the cranberries with the zest of an orange and chopped toasted pecan nuts, finished off with a whole pecan garnish. They can be enjoyed as a breakfast, a dessert or, erm, a naughty snack.

The pecan on the top gets a nice, deep roast as the muffins bake. Sometimes I save that whole to the last bite, to savour its rich smoky and nutty taste.

What better way to start 2024! Here we go, then…

Servings

Makes 12 muffins.

Timings

15 mins to make, 20 mins to bake in the oven at 180C.

You Will Need

  • 280g plain flour
  • 3 tsp baking powder
  • half tsp salt
  • 120g caster sugar
  • 1 egg
  • 110g fresh cranberries, coarsely chopped in a food processor
  • zest of 1 orange
  • 240ml milk
  • 90ml veg oil
  • 60g chopped, toasted pecan nuts
  • 12 pecan nuts to garnish

Method

  1. Prepare a muffin tin or mould. Switch on the oven to 180C.
  2. Sieve the flour, baking powder and salt into a bowl, and stir in the sugar.
  3. In a separate bowl, combine the egg, chopped cranberries, orange zest, milk and oil, and stir to combine.
  4. Pour the wet ingredients into the dry, and stir so that no dry ingredients are visible. Add in the chopped pecan nuts with the last few strokes.
  5. Spoon the mixture into the tin/mould, and top each muffin with a pecan. Bake for 20 mins.
  6. Remove to a wire rack to cool.

Customise It!

Omit the nuts if they are not your thing – the mix of juicy cranberry and orange will still taste great.

Fresh cranberries aren’t the only great American export featuring in the ADK Kitchen in these first few days of 2024. I’ve been playing a lot from Interpol, the group that the NME once described as the most important band to come out of New York. Hmm sorry, they’re not – just pause for a moment to think of some of the competition to that claim: The Velvet Underground, The Ramones, Talking Heads, The Strokes to name a few.

They are very good, though. I went to see them live a few years ago at London’s Kentish Town Forum. It was on a weeknight, and I remember telling my boss that I had to leave work early that day to get to London to see Interpol. A look of fear and intrigue flashed across her face, worried that I had become entangled in a mysterious web of international crime.

At least I was able to see them play this track, which is one of my faves. Here are Interpol with C’mere.

PS. Happy New Year!

Categories
Mains Recipes

Slow Cooked Beef and Stilton

I first tasted the combination of beef and stilton cheese some years ago, as a hot filling in a Cornish Pasty. I thought the taste was divine and have been a fan ever since, enjoying it in casseroles as well as pies. Stilton adds a salty sharpness to the beef juices, making a rich and creamy gravy to coat and complement the tender and succulent beef.

What better dish to make, therefore, as the next in my slow cooker season.

Servings

6 adult servings, alongside your choice of veg.

Timings

20 mins to prepare, and 4 – 5 hours bubbling away in an electric slow cooker.

You Will Need

  • 700g braising beef, cut into chunks
  • a few spoonfuls of plain flour
  • salt and pepper
  • oil
  • 1 large onion
  • 1 clove garlic
  • 1 litre of beef stock
  • 1 large glass of red wine
  • 200g stilton cheese
  • some cornflour and tap water

Method

  1. Turn on the electric slow cooker to the high setting.
  2. Sprinkle the flour, salt and pepper on a dish, then roll the pieces of beef in it till they are coated all over.
  3. Warm some oil in a frying pan and fry the beef until the pieces are seared all over. Transfer to the slow cooker bowl.
  4. Crush the garlic clove and add to the remaining hot oil in the pan. Chop the onion and add also. Stir until softened, then add to the slow cooker bowl.
  5. Pour the stock and wine into the hot pan, and heat until it is bubbling. Pour over the beef and onions in the slow cooker bowl.
  6. Leave the slow cooker on high for around 30 mins, then reduce to the medium setting. Let it bubble away for 4 – 5 hours.
  7. Using a fork, pull out a piece of beef to check that it is cooked. It should be tender and flake apart when pressed with the fork.
  8. Cut the stilton into pieces and then crumble with your fingers into the slow cooker. Stir gently so that the pieces begin to melt into the gravy, thickening it as they go.
  9. If you wish to make the gravy thicker, mix up a couple of teaspoons of cornflour with the same amount of tap water, and stir to dissolve. Add into the gravy. You can repeat this again if necessary, to reach the thickness you desire.
  10. Serve with your choice of roasted, boiled or steamed veg. Mine in the photo is served with roast potatoes, boiled brussels sprouts and carrots.

Customise It!

If you wish, you can add veg directly into the slow cooker, and they will take on the flavours of the beef gravy as they cook. Root veg, such as carrots, swede, parsnips and celeriac will work well. You could also serve the dish with rice instead of roast potatoes, to soak up all that rich, stilton sauce.

Don’t worry if you do not have an electric slow cooker. You can use a casserole dish instead, and cook it in the oven. Start off with the oven at 180C, then reduce it to 160C at step 6 above.

It’s getting to that time when I receive my playlist from Spotify with all my most-played tracks of the year. This is one that will almost certainly feature, as I’ve listened to it many times. It’s by New York band Yeah Yeah Yeahs: Heads Will Roll.

Categories
Bakes Recipes

Fruity Coconut Flapjack

I enjoy the flavour of toasted oats in baking. I brought a bag of medium oatmeal back from my recent trip to Scotland, and used it to make the flapjacks shown in my photo above.

They are based on a recipe by Paul Hollywood, of Great British Bake-Off fame, and combine the oatmeal, which is quite finely ground, with rolled oats. The theory is that the two different thicknesses of oat adds chewiness. It also helps the flapjack mixture meld together, rather than descending into a collection of crumbly clusters, as flapjacks sometimes have a tendency to do.

Most importantly, they taste great, the golden brown oats mixing in with coconut, ground almonds, raisins and cranberries.

Servings

Makes 16 square flapjacks.

Timings

15 mins to prepare, 25 mins to bake at 180C.

You Will Need

  • 150g medium oatmeal
  • 150g rolled oats
  • 50g desiccated coconut
  • 50g ground almonds
  • 50g dried raisins and cranberries
  • 200g baking spread
  • 75g caster sugar
  • 160g golden syrup

Method

  1. Grease and line a baking tin – the one I used is 20 cm square. Turn on the oven to 180C.
  2. In a bowl, mix together both varieties of oats with the almonds, coconut and dried fruit.
  3. Put the spread, sugar and syrup in a saucepan and warm on the hob until it has dissolved into a sweet, sticky sludge. Pour into the bowl of oats and mix well, till there are no dry ingredients showing.
  4. Scrape into the prepared tin and level the surface. Bake in the oven for 25 mins.
  5. Remove from the oven – the top should be golden and there should be signs of toasting at the edges. Leave to cool in the tin.
  6. While it is cooling, cut with a sharp knife into 16 squares, while still in the tin. When completely cool, you can then lift out each square to serve.

Customise It!

Add other dried fruit, like chopped apricots, in place of some of the raisins and cranberries, or possibly also some ground toasted nuts or seeds. Don’t add more than the overall quantity of 50g however, otherwise the mixture will be more prone to crumble apart.

I said I’d feature a track by The Chats, the Australian punk trio I saw supporting Queens of the Stone Age last week. They are a lot of fun and don’t take themselves that seriously – a cartoon-like Aussie punk version of The Monkees. Check out some of their videos on You Tube. Here they are with Smoko.

Categories
Mains Recipes

Butternut Chilli Soup

This autumn warmer of a soup combines seasonal sweet, silky smooth, roasted butternut squash with fiery red chillis. Energy prices being so high these days, a bowl may also save you some money – it gives all the central heating your body needs!

Servings

3 – 4 bowls.

Timings

40 mins – 10 mins to prepare the butternut, and 30 mins for it to roast. The rest of the soup can be made while the veg is roasting.

You Will Need

  • 1 butternut squash, peeled, seeds and pith removed, and cut into chunks
  • 1 red pepper, cut into 7 – 8 pieces
  • oil
  • 1 clove of garlic, crushed
  • 2tsp grund cumin
  • 1 tsp turmeric, fresh or powdered
  • 1 onion, chopped
  • 2 medium red chillis, chopped
  • 2 sticks celery, chopped
  • 3 – 4 potatoes, peeled and chopped
  • 700ml veg or chicken stock
  • salt and pepper

Method

  1. Switch the oven on to 180C. Spread the butternut and red pepper pieces on a roasting tray, and drizzle with oil. Place in the oven when up to temp, and leave for 30 mins.
  2. Pour some more oil into a large saucepan and warm on the hob. When the oil is hot, put in the garlic, cumin, turmeric, chillis and onion. Stir and let it cook for a few mins, before adding the celery and potatoes.
  3. Let it all cook for another few mins – the onion should soften, and the celery/potatoes brown a little at the edges.
  4. Pour in the stock and bring to the boil. Reduce and simmer until the butternut and pepper have had their full 30 mins in the oven.
  5. Take the butternut and pepper from the oven – it should all have softened and become a little charred at the edges. Scrape it all into the soup and stir.
  6. Finally, grind it all smooth with a hand blender. The soup should take on a creamy consistency, and orange colour, with red specks, as in my photo above.
  7. Ladle into bowls and serve with freshly baked bread.

Customise It!

If you want to increase the creaminess you could add a swirl of single cream when serving.

Adjust the strength of the chillis to your personal taste – I used medium, but you can revert to mild, or fire up to hot!

A bit like changing their intensity from low to high, I suppose – a cue for me to add Ohio’s the Black Keys to the ADK Playlist. Here’s Lo/Hi.