Categories
Bakes Recipes

Dorset Apple Squares

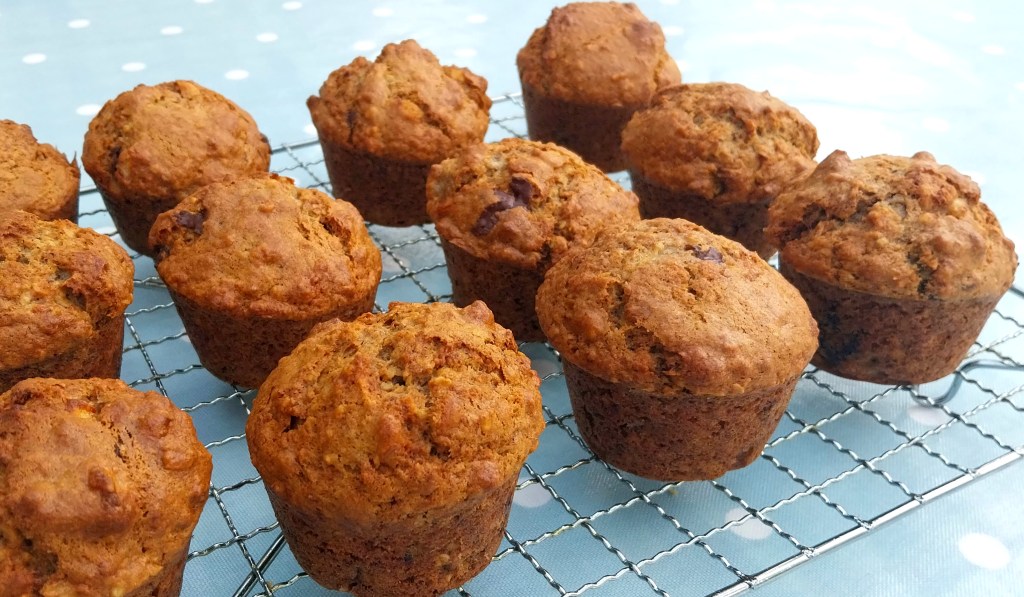
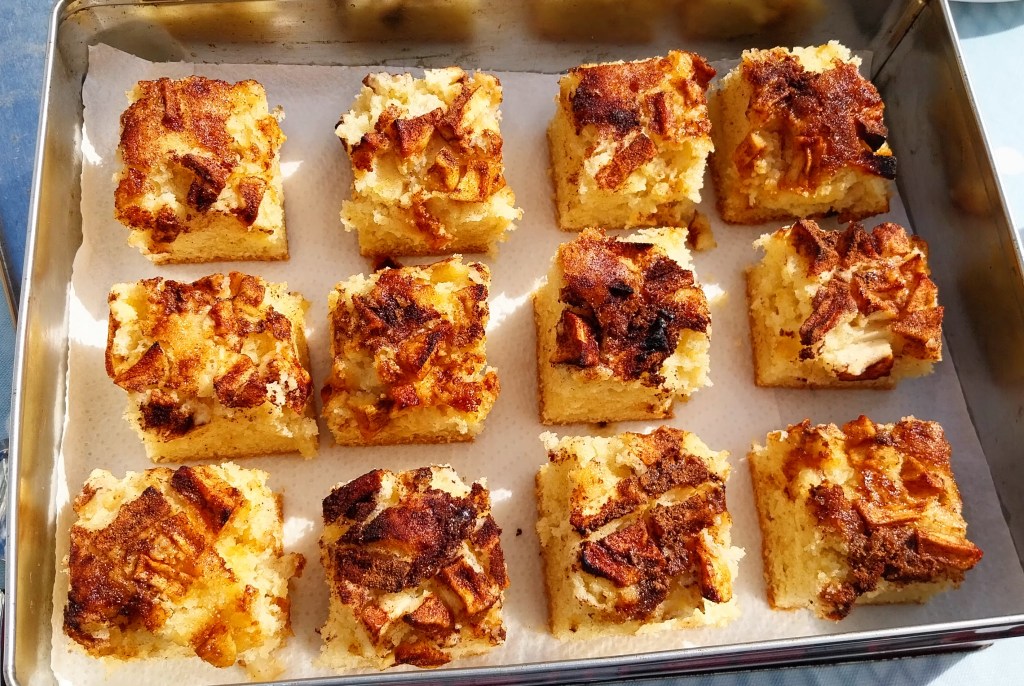
Having invited friends over this week for coffee and cake in the garden, I was keen to bake something tasty and seasonal for us all to enjoy. The previous few days had been spent down in Dorset (home of the famous Dorset Apple Cake), which started me thinking, as the apple trees in the ADK garden are now laden with fruit (see below). With a bit of help from a recipe on BBC Good Food, the idea for this traybake slowly came together.

Servings

Makes at least 16 squares.

Timings

15 mins to prepare, 45 mins in a fan oven at 160C.

You Will Need

  • 400g apple
  • half a lemon
  • 220g butter, softened
  • 250g caster sugar
  • 4 eggs
  • 350g self-raising flour
  • 2 tsp baking powder
  • ground cinnamon and dark brown sugar, to sprinkle

Method

  1. Grease a baking tray and line with baking paper. The one I used is 22cm square. Switch the oven on to 160C.
  2. Peel and finely chop the apple. Place in a bowl and squeeze the lemon over. Stir so that the apple is coated in the lemony juice.
  3. Place the butter and caster sugar in a separate bowl and cream with an electric mixer. Crack in the eggs and mix.
  4. Sieve in the flour and baking powder, and fold in with a spatula, so that there are no dry ingredients.
  5. Tip in about 75% of the chopped apple and stir to incorporate.
  6. Spoon the mixture into the prepared baking tray and level with the back of a metal spoon. Sprinkle over a dusting of ground cinnamon, and then crumble over the dark brown sugar. Gently press in the remaining pieces of apple.
  7. Place in the oven at 160C for 45 mins, by which time a skewer inserted in the middle should come out dry.
  8. Remove and leave in the tin for 10 mins, before transferring to a wire rack to cool. Cut into 16 squares.

Customise It!

Use mixed spice or grated nutmeg in place of the cinnamon if you wish. Enjoy a square on its own to accompany a tea or coffee, or with a few dollops of cream or natural yoghurt alongside.

I heard this track on the radio recently, and was impressed by its fresh and distinctive sound. This is Sub Focus with Off the Ground.

Categories
Mains Recipes

Courgette & Feta Fritters with Mint Raita

Here’s a dish that really does make the best of all the seasonal summer produce around at the moment. It’s a great way to use up some of the Jenga-like pile of organic courgettes that builds up on the ADK Kitchen table around this time of year – 3 medium-sized ones went into this batch of fritters, and the taste works really well with the chunks of creamy feta.

The scallions are also fresh from the garden, as are the cucumber and mint leaves in the cooling raita served alongside.

An excellent choice for a summer evening meal on the patio – maybe to celebrate the second birthday of A Different Kitchen! More of that in a moment…

Servings

This will make 4 fritters.

Timings

15 mins to make and about 10 mins to fry.

You Will Need

  • 350g courgettes (around 3 medium-sized ones)
  • 100g feta cheese
  • 3 – 4 scallions (spring onions)
  • 50g plain flour
  • 1 egg
  • oil for frying

For the raita:

  • 4 – 5 dessert spoonfuls of natural yoghurt
  • 3 – 4 slices of cucumber, finely chopped
  • 4 – 5 leaves of fresh garden mint, finely chopped

Method

  1. Wash the courgettes and trim off the ends. Grate coarsely, either by hand or (as I did) using the speed grating tool on the food processor. Tip into a large mixing bowl.
  2. Chop the feta into cubes and add to the grated courgette. Chop the scallions into little rounds and add also.
  3. Sieve in the plain flour and crack in the egg. Now the fun begins – having washed and dried your hands, plunge them into the bowl and squish all the ingredients together between your fingers to make a well-mixed courgette batter.
  4. Next, make the raita by combining the yoghurt, cucumber and mint in a small bowl. Stir and place in the fridge until it is time to serve (for the avoidance of doubt, no plunging of fingers is required for this bit 🙂 )
  5. Warm a drizzle of oil in a frying pan. When sizzling, lift in a handful of the courgette batter. Put in another alongside and let them cook.
  6. After a minute or so, give them a gentle push around the pan with a spatula, to make sure they are not sticking. After 3 – 4 minutes, lift each fritter carefully with the spatula and flip them over, to cook on the other side.
  7. After another 3 – 4 mins, remove each fritter to a plate and keep warm. Repeat the process with the rest of the batter, to make another 2 fritters.
  8. Plate up the fritters and serve with the bowl of raita as a side.

Customise it!

Some recipes for courgette fritters advise to squeeze the water from the veg at the outset. I didn’t do this and it didn’t cause any problems, however – just sayin’.

If you wish, you could add some lemon zest, crushed garlic and ground black pepper to the batter, before cooking. Additional salt shouldn’t be necessary as there is some already in the feta.

The height of summer brings a second birthday for A Different Kitchen: that’s 2 years, 222 posts, and 3.5k followers from all around the world, now over 3 online platforms. Sadly, WordPress stats can’t tell me how much self-raising flour, caster sugar, extra virgin olive oil, garlic cloves etc have been consumed in that time, but I reckon it’s enough to fill a small branch of Tesco Express.

Maybe that’s something the WordPress engineers could get on to before next year’s anniversary? Cool – always happy to give feedback 🙂 .

Here’s Depeche Mode with World in My Eyes.

Categories
Mains Recipes

Summer Greens over Chorizo Hash

It’s the time of year when freshly picked, green summer veg is coming into the ADK Kitchen on a daily basis. French beans, mange tout, cavalo nero, cabbage leaves – they’re all tasty and nutritious, needing just the lightest touch in cooking, usually no more than a few minutes in the steamer basket.

In a continuous challenge to find new, tasty ways to serve up this delightful produce, this dish sees it generously topped over sweet potato and chorizo hash. The spicy, saltiness of the hash complements the natural simplicity of the veg, while the scent, and the bright orange and red underneath that summer garden green, ensures this is a feast for all the senses.

Servings

A main meal for 2.

Timings

20 mins to prepare/cook.

You Will Need

  • 1 medium to large sweet potato
  • around 20 French beans, ends trimmed, and cut into 3cm pieces
  • 4- 5 cabbage leaves, cut into shreds
  • a knob of butter
  • 225g spanish chorizo ring, sliced
  • 1 onion, chopped
  • 1 red pepper, chopped
  • a few splashes of tomato passata

Method

  1. Peel the sweet potato and cut into 1 – 2cm chunks. Place in a saucepan of water and bring to the boil. Reduce to a simmer.
  2. After 5 mins, place the beans and cabbage in a steamer basket and put it on top of the saucepan. Bring the water back to the boil then reduce to a simmer again. Cover with a lid and leave to simmer for 10 more mins.
  3. Meanwhile, put the chorizo, onion and pepper in a frying pan and stir over a medium heat. There is no need to add oil, garlic or spices as the chorizo already contains everything required!
  4. When the sweet potato has boiled, drain it and mash with the butter. Tip into the frying pan with the passata. Turn up the heat and stir in – you want the liquid to begin to evaporate and get some of the underside pieces crispy and charred.
  5. When cooked to your desired texture, mound the hash up on 2 plates. Take the greens from the steamer and plonk them on top. It should all look as in my photo at the top of the post.

Customise it!

Basically, anything green and seasonal goes here – broad beans, runner beans, garden peas, mange tout, cavalo nero etc will all look and taste great.

Staying on theme for the next track on the ADK Playlist, I did toy momentarily with the New Order track Everything’s Gone Green (it being an apt description of the ADK Kitchen table these past few days). However, I’ve plumped in the end for one of many tracks I love by Scritti Politti (the lead singer being the very talented Green Gartside 🙂 ). Here they are with Boom! There She Was.

Categories
Recipes Snacks

Blueberry Cream Cheese

Our current heatwave here in the UK, with temperatures beyond 30C in some places, has prompted memories of the last time I enjoyed (or endured?) such temperatures – earlier this year, in Australia.

It was in the hot climate of Queensland that we came across blueberry cream cheese, served with freshly made bagels at a cafe called O Bagel. The food tasted so good we visited their branches in both Gold Coast and Brisbane on our travels. Check out my post from Surfer’s Paradise to read more.

So this week, we’ve been inspired to have a go at making our own. The result has been a surefire hit in the ADK household, served on corn cakes, shown below.

It can also be enjoyed on rice cakes, oatcakes, as a dip with crudites and, of course, spread on a toasted bagel.

Want to know how to make it? It’s dead easy, so read on.

Servings

Around 450g of blueberry cream cheese.

Timings

15 mins to make.

You Will Need

  • 300g full fat soft cheese
  • 150g blueberries

Method

  1. Tip the blueberries into a saucepan. Heat until the juices are boiling then reduce to a simmer for about 10 mins, or until they take on a jammy consistency. Leave to cool.
  2. Stir in with the cream cheese until combined, making a vivid shade of purple.
  3. Place in the fridge, where it will keep for up to a week.

Customise it!

If you wish, you can add in a sprinkling of caster sugar to the blueberries as they cook. Also, as an alternative to serving on corn cakes, oat cakes, bagels etc, you can use this as a frosting for a cake.

My wife Lesley has been the creative force behind this recipe, so she gets to choose the next track for the ADK Playlist. She’s very much enjoying the Olympics from Paris à ce moment, so has opted for Vanessa Paradis with La Seine.

Categories
Recipes Snacks

Sweet & Sour Vegan Wraps

This week I’ve made a healthy and tasty filling mix for wraps comprising salad grains, vegetables, nuts and seeds, all in a sweet and sour dressing.

I was looking for a mix that I could keep in the fridge to speed up the making of lunchtime snacks over a few days. The grains, mushrooms and aubergine all have a succulence, and the walnuts a crunch, making a pleasant texture to bite into. The miso and sweet and sour dressing give it that umami flavour.

And it is suitable for vegetarians and vegans, so everyone is happy 🙂 !

Timings

About 30 mins to make.

Servings

Enough for about 6 wraps. The mix will keep in the fridge in a sealed box for a few days.

You Will Need

For the mix:

  • 120g grains – I used 40g brown rice, 40g pearl barley and 40 lentil soup/stew mix
  • half a carrot, finely chopped
  • 5 – 6 green beans, finely chopped
  • drizzle of oil
  • 1 clove garlic, crushed
  • 1 onion, finely chopped
  • 3 – 4 chestnut mushrooms, finely chopped
  • half an aubergine, finely chopped
  • 60g walnuts, roughly chopped
  • a handful of seeds – I used a mixture of pumpkin, sunflower and sesame seeds

For the dressing:

  • 30ml tomato passata
  • drizzle of oil
  • 2 tbsp soy sauce
  • 2 tbsp rice vinegar
  • 2 tbsp honey
  • 1 tsp sesame seeds

To serve:

  • Tortilla wraps

Method

  1. Put the grains in a saucepan of boiling water. Reduce and simmer. After about 20 mins, add the chopped green beans and carrot. Briefly bring the water back to the boil, then reduce to simmer for another 10 mins.
  2. While the grains and veg are cooking, put a wok or frying pan over a moderate heat. Pour in a drizzle of oil and add the crushed garlic. Add in the onion, mushrooms, and aubergine and stir for 5 – 10 mins. Add the miso and stir in. Leave a few mins more, then switch off.
  3. Drain the water from the saucepan, leaving the cooked veg and grains. Add in the onion, mushroom and aubergine, and finally the chopped walnuts and seeds. Stir to combine.
  4. Put the dressing ingredients in a screwtop jar. Shake and pour over the mix. Stir to combine, then leave to cool. It should look something like my photo below.
  5. Place the cooled mix in a sealed box in the fridge.
  6. Place a tortilla wrap on a plate and place a line of mix along the middle. Add in any other salad ingredients you wish, roll up and enjoy.

Customise it!

For the wrap in my photo at the top of the post, I combined the mix with chopped tomato, cucumber, scallion, grated carrot and white cabbage. Chopped celery, lettuce, rocket or other leaves would all go well. Use whatever is in season and/or what you have to hand.

On my recent visit to Belfast, I was pleased to see a mural on Great Victoria Street remembering Terri Hooley, the inspirational force behind Good Vibrations record label and shop. Good Vibes played an important role in Northern Ireland’s musical heritage, giving a platform to local punk and new wave talent, one of which I’m adding to the ADK Playlist. This is Rudi with Big Time.

Categories
Mains Recipes

Pearl Barley Risotto

Risotto is a classic Italian dish made with arborio rice – the Italian word for rice is riso and there is a rather large clue in the title of the dish that rice is, er, supposed to be the key ingredient.

However, in this dish I’ve decided to swap in pearl barley instead of the rice. Pearl barley is a nutritious grain making this a healthy, lower carb alternative to the Italian classic. Like a risotto, it is still cooked by simmering it with veg in a broth of chicken or veg stock.

Servings

2 adult portions.

Timings

20 mins to pre-cook the pearl barley, then a further 20 mins.

You Will Need:

  • 70g pearl barley
  • enough boiling water to cover the pearl barley
  • half a red onion
  • 6 – 7 mushrooms
  • half a sweet potato
  • 2 celery sticks
  • half a sweet pepper
  • about 500ml chicken or veg stock
  • a handful of mixed nuts
  • about 30g cheddar, grated
  • a handful of fresh coriander leaves
  • 1 chopped scallion
  • a spoonful of miso (optional)

Method

  1. Place the pearl barley in a saucepan and cover it with boiling water. Bring back to the boil, then simmer for 20 mins.
  2. In the meantme, chop all the veg and place in a wok with some oil, over a reasonable heat. Stir fry all the veg until it is softened and nicely charred.
  3. Drain the pearl barley in a sieve, and tip in to the wok. Stir in alongside the veg, then add the stock and bring to the boil. Reduce to a simmer and let the stock reduce for about 20 mins, while the pearl barley continues to cook and soften.
  4. When there is little liquid left, and the pearl barley has softened, add in the nuts, cheese, coriander and scallion. Add in the miso if you wish.
  5. Let the additional flavours soak in for a few minutes, then serve.

Customise it!

Lots of scope to swap in other veg here – mangetout, peas, broad beans and shredded greens all go brilliantly. Grated blue cheese will also be excellent. Use your imagination!

A risotto that doesn’t contain any rice? It’s crazy, man! Which gives me an idea for the next track to add to the ADK Playlist: here’s The Prodigy with Crazy Man.

Categories
Bakes Recipes

Banana, Walnut & Dark Choc Muffins

This week I’ve tried changing up a banana muffin recipe a little by introducing some different tastes.

I replaced about a fifth of the flour with oats, and used nearly half and half plain and wholemeal flour for the rest. I toasted some walnuts and then chopped them in the food pro, adding the pieces in with broken up shards of 70% dark chocolate. The final twist was to reduce the sugar by about a quarter, so that all those added ingredients can actually be tasted in the final muffin, rather than being drowned out by sweetness.

I’m pleased with the results and will bake these again. Apart from making for an interesting blend of flavours, the changes also mean less reliance on refined carbs and a higher score on protein, fibre and omega 3.

So you can genuinely feel good about yourself while scoffing these muffins 🙂

Servings

Makes 12 muffins.

Timings

About 10 mins to prepare, and 20 mins in the oven at 160C.

You Will Need:

  • 120g plain flour
  • 100g wholemeal flour
  • 1 tsp baking powder
  • 1 tsp bicarb of soda
  • 1/2 tsp salt
  • 60g walnuts, toasted and then chopped
  • 40g 70% dark choc, broken into pieces
  • 2 well ripened bananas
  • 90g caster sugar
  • 1 egg
  • 60g oats
  • 90ml semi-skimmed milk
  • 90ml veg oil

Method

  1. Turn on the oven to warm up to 160C. Prepare a muffin tin or mould,
  2. Sieve the flours, baking powder, bicarb and salt into a large bowl. Stir in the nuts and chocolate.
  3. In a separate bowl, mash the bananas and add in the egg, followed by the sugar, milk and oil. Stir in the oats and leave to soak for a few mins.
  4. When the oven is up to temp, pour the wet mix of ingredients into the dry, and stir so that there are no dry ingredients showing. Spoon into the tin or mould and bake for 20 mins or until browned to your desired level.
  5. Remove from the oven and, after 5 – 10 mins, remove the muffins to a wire rack to cool (as shown in my photo at the top of the post).

Customise It!

I chose walnuts as they work well with banana, but you could just as easily use almonds, hazelnuts or pecans if you wish. Whatever nut you choose, toasting it for 5 mins in the oven helps bring out its natural taste.

This week I’ve been listening to 90’s band, Mansun who hail from Chester. This is a great track, so I’m adding it to the ADK Playlist: Wide Open Space. Enjoy (with your muffin).

Categories
Recipes Sides

Feta & Black Olive Quinoa Salad

Now it’s summer, I’ve been eating more and more salad bowls for lunch, so reckoned it was about time to feature one here on A Different Kitchen.

This one throws together some of my favourite tastes, including feta, black olive and rocket leaves, in a tahini dressing. The quinoa boosts the protein intake and fills you up without being heavy on the carbs. Good as a lunch bowl, but also suitable to serve as a side alongside a mains.

Servings

Enough here for a couple of servings.

Timings

12 – 15 mins. That’s how long it takes to boil and cool the quinoa, during which time you can be getting ready the rest of the salad and the dressing.

You Will Need:

  • 70g quinoa
  • about 70g feta cheese, cut into cubes
  • about 12 – 15 pitted black olives from a jar, cut in half
  • 1 tomato, diced
  • 5 – 6 slices of cucumber, diced
  • 1 scallion, cut into rings
  • a handful of rocket leaves

Check out this link for my tahini dressing.

Method

  1. Place the quinoa in a saucepan with boiling water. Reduce and simmer for 12 – 15 mins.
  2. While the quinoa is cooking, prep the other ingredients and place in a bowl. Make up the tahini dressing.
  3. Drain the quinoa when cooked, and cool in a sieve under cold running water. Shake dry and add to the salad ingredients, stirring in to mix. Coat with the dressing and serve.

Customise It!

I used a packet mix of black, white and red quinoa just because it helps the dish look more interesting, but plain quinoa will work just as well. Feel free to sprinkle a few sesame seeds over the bowl before eating.

Here’s a track that’s been popping up recently on the playlists Spotify auto-generates for me, based on my other listening – clever that, especially when the track turns out to be one I find I like. Here’s Moby with Bodyrock.

Categories
Blog Mains

Baked Mackerel Al Fresco

This weekend we spent a few days down in the New Forest in our motorhome. A short cycle ride down to the beach, and along the coast, brought us to Mudeford Quay, a local sea fishing centre and home of a fresh fish stall.

Being a working quay, there is always lots going on to watch and do. Think you can catch a crab with a line and some bait? This is a good place to have a try (see below). Just make sure you don’t fall off that wall into the Solent!

There are views over to the Needles on the Isle of Wight, and a little ferry traversing the strong currents between here and Hengistbury Head.

The sea fish stall is as unpretentious as the rest of this delightfully busy area. Here it is tucked away behind the nets and lobster baskets, its roof heavily weathered by the sea air.

Inside, local catch of the day is sea bass, mackerel and bream. We chose a couple of mackerel, which this helpful lady cleaned and filleted for us, before biking them back to the camp site.

That evening, I wrapped them in foil parcels and cooked them on my Cadac Safari Chef. This is a portable and versatile grill that plugs directly into the gas tank of the motorhome. It makes al fresco cooking a breeze.

As you can see from my photo, it is obligatory at this stage of the process for the chef to have a chilled craft beer alongside 🙂 . Today’s choice is Neck Oil by Beavertown Brewery.

12 minutes later and the foil parcels are opened carefully, revealing the tender flakes of the baked fillets.

Cooked, freshly caught mackerel tastes great, so needs little added – just some lemon and a few twists of black pepper. We ate them with steamed new potatoes and broccoli as the sun was setting. Oh, and with a glass of chilled Pinot Grigio, of course.

From sea to plate in under 24 hours!

So what musical track can I pair with this post? There is such a choice: Hooked on a Feeling? Under the Sea? Maybe Rose Royce with Fishing on a Star? Anything by Fleetwood Mackerel?

I’ve settled on this one: Kayleigh by Marillion. The name of their lead singer? Fish, of course 🙂

Categories
Mains Recipes

Summer Veg with Bacon on Chard

Today’s challenge was to cook up a consignment of summer veg, freshly picked at our local community farm, into a meal for 2. The veg selection included leaves of chard, tomatoes, a courgette, and mange tout. I combined it with a few ADK kitchen stand-bys – chopped mushroom, onion, bacon and crushed garlic into the meal shown above.

Servings

Light lunch for 2.

Timings

15 mins to prepare.

You Will Need

  • 6 leaves of chard
  • 3 slices streaky bacon
  • half an onion
  • 1 clove of garlic
  • 2 mushrooms
  • 1 courgette
  • 3 – 4 tomatoes
  • 12 – 15 mange tout

Method

  1. Chop the bacon and fry until crisped. Remove to a plate to stay warm.
  2. Crush the garlic clove and add to the warm frying pan. Chop the mushroom, onion and courgette, then add to the pan. Add in the tomatoes and let them reduce to form a squishy sauce.
  3. Wash the chard and place in a steamer for 5 – 10 minutes. Add the mange tout for the last 3 – 4 minutes.
  4. Remove the chard and mange tout, and pat dry with kitchen roll.
  5. Arrange a bed of chard on each of 2 plates. Top with the tomatoey mix, then place the mange tout and bacon on top. Serve.

Customise It!

You can add or swap in any veg that is seasonal or which you have to hand. Chopped peppers would be fine. I also had green beans to hand so could easily have swapped those for the mange tout. Leave out the bacon and sprinkle with roasted nuts for a vegetarian/vegan option.

Here’s a track I came across recently on my ear buds while out and about in the sunshine. I found myself pacing my walk in time with the beat. Great fun – try it out! This is Overseer with Pump Action.