Categories
Mains Recipes

Roasted Winter Veg Curry

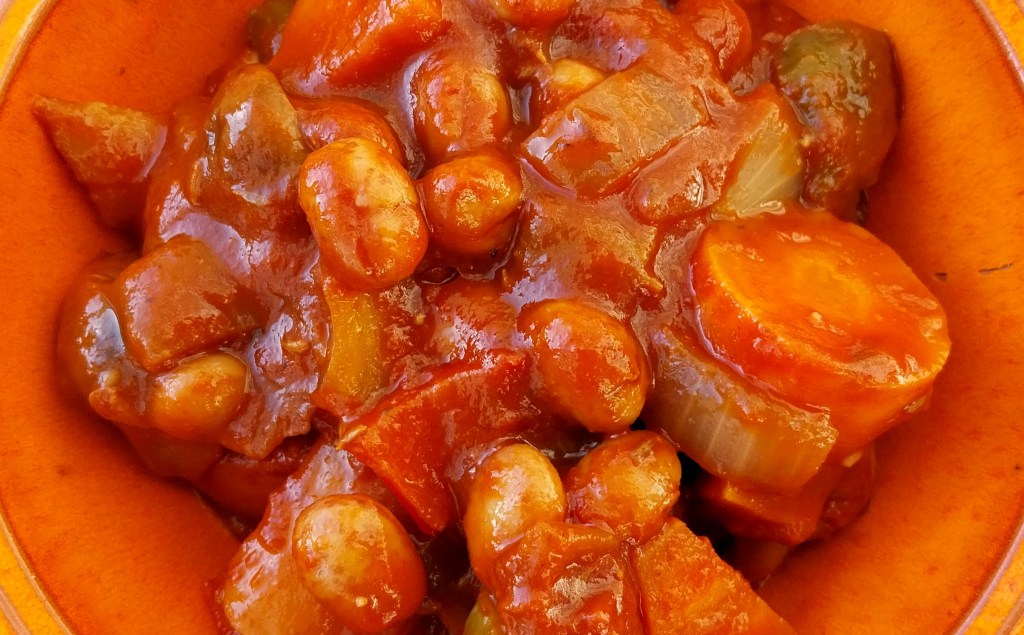
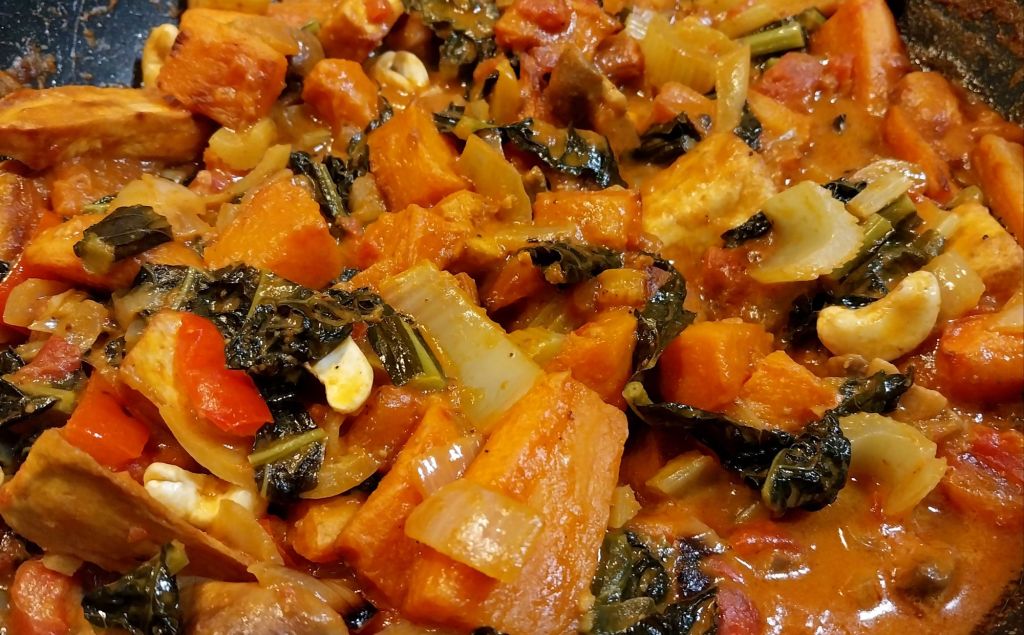
For this dish, which is suitable for both vegetarians and vegans, I’ve given a selection of seasonal squash and root veg a long, slow roast in the oven before coating it in a thick curry sauce. The roasting makes the veg soft, sweet and just a little caramelised around the edges.

We’ve just been experiencing our first few snow showers of the winter here, so all that deliciousness and comforting heat has turned out to be very timely!

Servings

4 adult portions.

Timings

1 hr to roast the winter veg, during which time the rest of the dish is prepared.

You Will Need:

  • 1/2 a butternut squash
  • 2 medium sweet potatoes
  • 2 medium parsnips
  • 3 – 4 medium carrots
  • Oil
  • 1 garlic clove
  • 3cm piece of root ginger
  • 1 onion
  • 2 tbsp curry powder
  • 2 celery sticks
  • 1/2 red pepper
  • 1/2 yellow pepper
  • 5 – 6 chestnut mushrooms
  • 1 400ml tin coconut milk
  • 1 400g tin chopped tomatoes
  • 4 – 5 leaves of cavalo nero
  • A handful of unsalted cashew nuts

Method

  1. Switch a fan oven on to 180C.
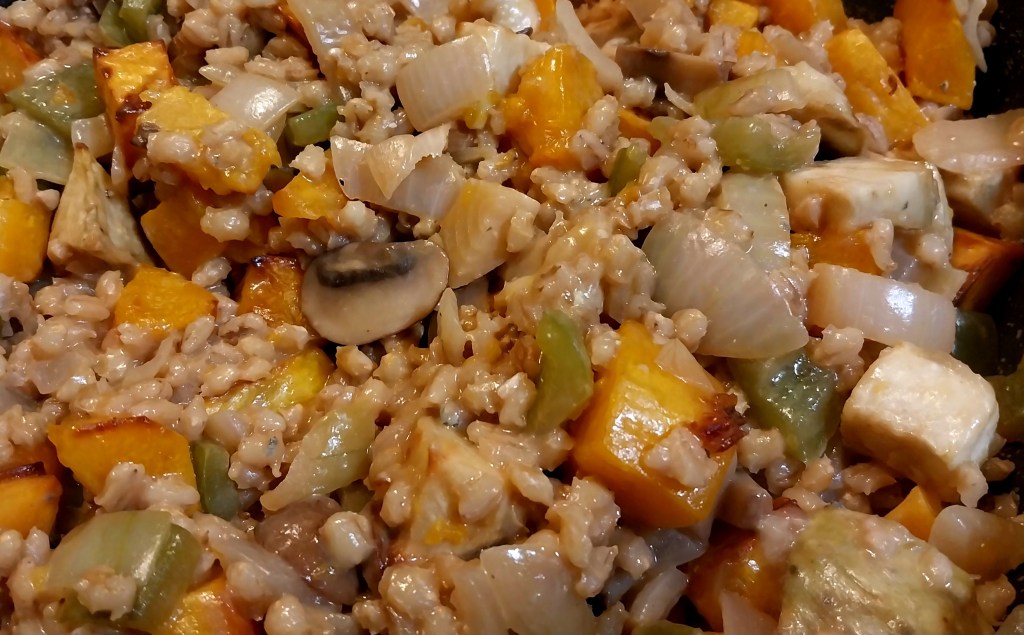
  2. Peel and roughly chop the squash, sweet potatoes, carrots and parsnips into chunks. Spread them out in a roasting dish and drizzle with oil. Place the dish in the hot oven for about an hour. Check on them every so often just to check they’re not burning, and give them a scatter with a spatula so they get evenly roasted.
  3. Meanwhile, crush the garlic and finely chop the ginger. Put both in a wok with some oil and heat. When the pan is sizzling, add in the onion, celery, mushrooms and peppers, all chopped. Sprinkle over the curry powder and toss with a spatula so all the veg is coated in a mix of the spices and oil.
  4. When the veg has softened, empty in the coconut milk and tomatoes. Give it all a good stir to mix and bring to a bubble, before turning down to a simmer. Let it slowly reduce to make a thick, spicy sauce.
  5. Shred the cavalo nero and wilt in for about 10 mins.
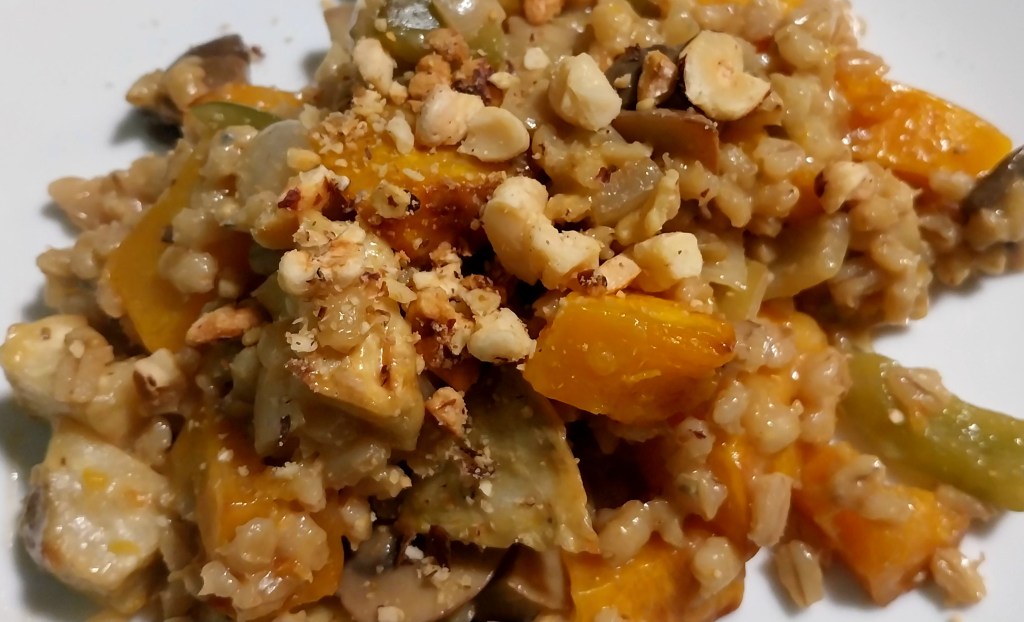
  6. When the tray of veg has finished roasting, take it from the oven and scrape all the lovely contents into the wok. Give it all a stir again, so that the veg chunks get coated in the thick curry sauce.
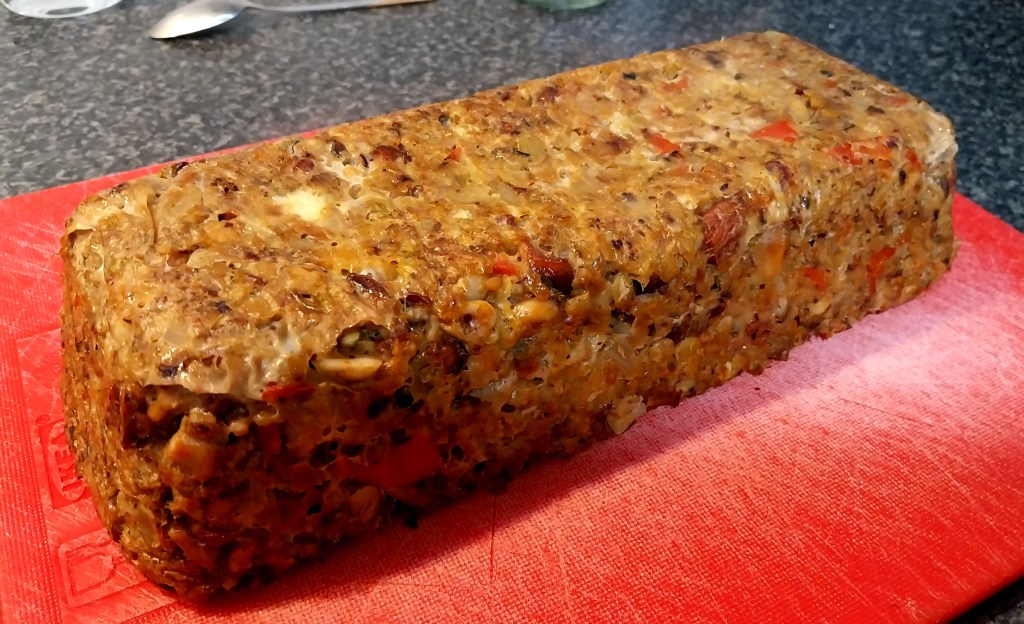
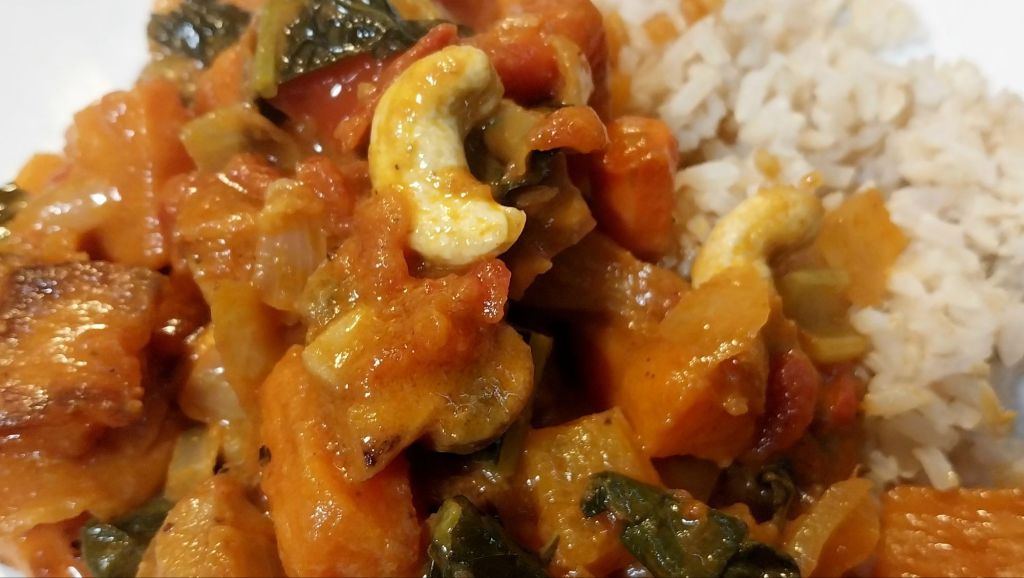
  7. Chuck in the cashews and mix, a few mins before serving. It should resemble my main photo at the top of the post.
  8. Serve up with rice on the side – see below.

Customise It!

Lots of scope here – substitute other root veg like potatoes or celeriac, or other types of squash, and vary the proportions between them if you wish, as long as you have 1 large roasting pan’s worth of it all.

Use your own favourite spice combo if you wish – I used the ready mixed blend I brought back from the Souq Waqif in Doha, which I really like. Why not chuck in a few nigella seeds? Play around and have fun!

No cavalo nero? Try other greens like spinach or chard.

Time to treat you to my most streamed song of 2024, as confirmed by Spotify Unwrapped, which landed this week. I first came across this indie band while on my travels to Australia earlier this year. They make a terrific sound and, I’m sure you’ll agree, this really is a very good track. Enjoy These New South Whales with Changes.

Categories
Mains Recipes

Nut Roast

Toasted on the outside and packed to the core with creamy, crunchy nuts, red lentils and softened veg. If you’re looking for a vegetarian mains to grace the centre of your table this winter, this delicious, homemade Nut Roast is hard to beat.

Servings

6 adult servings of 2 generous slices each.

Timings

30 mins to prepare and 50 mins to roast in a fan oven at 160C.

You Will Need:

  • 150g chopped mixed nuts
  • 1 onion
  • 2 celery sticks
  • 1/2 a red pepper
  • 1/2 a yellow pepper
  • 6 – 7 chestnut mushrooms
  • oil
  • 1 clove garlic
  • 75g red lentils
  • a good squelch of tomato ketchup
  • 300ml boiling water
  • 1 tbsp vegemite
  • 75g wholemeal breadcrumbs
  • 75g mature cheddar cheese, grated
  • sea salt and black pepper
  • 2 medium eggs

Method

  1. Switch a fan oven on to 160C. Grease a 1 litre loaf dish and line it with baking paper.
  2. Spread the nuts on a baking tray and place in the oven once its reached its temperature.
  3. While the nuts are roasting, place the onion, celery, pepper and mushrooms in a food processor with blade fitted. Blitz to small pieces.
  4. Heat some oil in a large frying pan and crush in the garlic. Add in the blitzed veg and stir. Leave to gently soften.
  5. Once the nuts have roasted for 10 mins, remove from the oven and roughly chop in a food processor with blade fitted. Scrape into a large bowl and set aside.
  6. Chuck the lentils into the frying pan with the veg. Dissolve the vegemite in the boiling water and pour into the pan with the ketchup. Bring to the boil, then reduce to a simmer for about 15mins. The liquid will reduce as the lentils soften.
  7. Add the breadcrumbs and grated cheddar to the nuts and mix in.
  8. Leave the pan of veg and lentils to cool slightly for 5 mins, then add to the bowl with the nuts, breadcrumbs and cheese. Twist in a little sea salt and black pepper to your taste. Crack in the eggs and mix thoroughly.
  9. Spoon the mixture into the prepared loaf dish and compact it down with the back of a spoon. Cover with foil and place in the oven for 30mins. Then remove the foil and leave it in the oven for another 20 mins.
  10. Remove and set aside for 10 – 15 mins before inverting onto a chopping board. The nut loaf should ease out of the upturned dish, and look something like my main photo at the top of the post.
  11. You can cut slices straight away, but it will become progressively easier to cut clean slices as it cools. Slices can be reheated if necessary by microwaving for 30 – 60 seconds.

Customise It!

Try adding in fresh herbs, or shreds of cavalo nero. Swap some or all of the cheddar for crumbled blue cheese.

Serve it with some green veg and a simple sauce made from a can of chopped tomatoes, garlic and chopped onion. If you’d prefer to save on effort, serving with condiments like ketchup or relish is fine.

Exciting musical news this week is that one of my favourite bands has been announced as headliner at next year’s Victorious Festival. I have already seen Queens of the Stone Age live 4 times and am very keen to make it 5. I’ll be hoping a surprise gift ticket may find its way to me under the Christmas Tree this year! I expect they will play this one: Queens of the Stone Age with Sick, Sick, Sick.

Categories
Mains Recipes

Beautiful Borlotti

This harvest of borlotti beans, fresh from the pod (shown in my photo above) has been a very welcome arrival recently in the ADK Kitchen. I always think they are one of the most beautiful foods in their natural uncooked form.

They’re not bad cooked, either. The beans do tend to lose that magical, mottled sheen, but more than make up for it in their creamy, smoky taste. They also provide generous amounts of protein and fibre.

For this dish (shown in my photo below), I have given them a starring role in a chilli suitable for vegetarians, vegans and, indeed, anyone who enjoys a bowl of rich, warm and creamy comfort food this time of year.

Servings

4 adult portions.

Timings

The beans soak overnight, and are then boiled/simmered for at least an hour. Once these stages are complete, the rest will take about 30 mins to cook.

You Will Need:

  • 120g uncooked borlotti beans
  • cold water
  • 1 onion
  • 1 garlic clove
  • 1 tsp chilli powder
  • 1 tsp cumin seeds
  • oil
  • 1/2 a red pepper
  • 1/2 a green pepper
  • 2 celery sticks
  • 1 carrot
  • 6 -7 chestnut mushrooms
  • 1 400g carton of tomato passata

Method

  1. Wash the beans, then place in a bowl with enough cold water to cover them. Leave for 24 – 36 hours.
  2. Drain and rinse the beans under cold running water. You should find that they have doubled their weight through the water they have absorbed. Place the beans in a saucepan with enough fresh water to cover them, and bring to the boil. Reduce and simmer for 50 mins.
  3. Drain the cooked beans and wash again under cold running water. Set aside.
  4. Heat some oil in a wok, and add in the garlic, chilli and cumin. When it sizzles, add in the onion, peppers and celery, chopped into chunks.
  5. About 5 mins later, add in the mushrooms and carrot, also chopped into bitesize chunks.
  6. Stir with a spatula until all the veg is nicely softened, then add in the passata and the cooked borlottis. Top up with about half an empty carton’s worth of fresh water, and turn it up to boil.
  7. Bring to a simmer for about 15 mins, by which time the sauce will have reduced to provide a thick, creamy coating for the beans.
  8. Serve up with a portion of brown rice.

Customise It!

Replace the onion with chopped leeks, and add in some roasted squash if you wish. Shred in some spinach, cavalo nero or chard leaves.

Skip the rice and wrap a few spoonfuls up in a warmed tortilla. Perhaps with some soured cream on the side. This is making me hungry again…

It’s getting to that time of year when I receive messages from Spotify that my Unwrapped Playlist – containing my most played tracks of 2024 – is imminent. Here’s one track that will almost certainly be on it, and which seems to go well with the subject of this post: Leftfield with Pulse.

Categories
Bakes Recipes

Monkey Nut Biscuits

Credit for this latest bake goes to my wife, Lesley, who refined the recipe and patiently shelled a bag of roasted monkey nuts in the process.

Monkey nuts are peanuts still in their shell, which means the nuts have no salt or anything else added. Combine them with a good quality peanut butter (the one we used has one ingredient: peanuts), and you get biscuits with a fresh, nutty taste. They have a soft textured centre and a crisp outer. You’ll find these are best enjoyed warm and eaten within a day or so.

Servings

This will give 3 batches of dough, each batch making 12 biscuits. You can freeze the mixture or keep it in the fridge for a week. That way you can have a biscuits snack ready in about 20 mins after thinking about it. 

Timings

10 mins to prepare and another 10 mins to bake in a fan oven at 180C.

You Will Need:

  • 120g butter or margarine
  • 150g crunchy peanut butter
  • 50g shelled peanuts, roughly chopped
  • 85g soft brown sugar
  • 1 large egg
  • 350g self-raising flour

Method

  1. Preheat your oven to 180°c . Prepare a flat baking tray with some greaseproof paper.
  2. In a large bowl, cream the butter, peanut butter and sugar together until completely combined. 
  3. Add the egg and mix in.
  4. Sift in the flour. Add the chopped peanuts and mix to make a dough, use your hands at the end to combine into a ball.
  5. Roll the dough into balls (about 1 tbsp of dough per ball) and place onto your baking sheets. Press each ball with  a fork to create a cross pattern which flattens the dough.
  6. Bake in your pre-heated oven for 8-10 minutes until golden.
  7. Transfer to a wire rack to cool completely, they slide off the baking paper beautifully.

Here’s a great track from The Specials that is right on theme: Monkey Man.

Categories
Mains Recipes

Roast Butternut & Celeriac Risotto

So, we’ve now had Halloween and Bonfire Night, and the clocks have gone back marking the end of British Summer Time. Yes, we’re well into autumn, a fact well reflected in the fresh veg now making its way into the ADK Kitchen from our local community farm.

All of which has inspired this warming, filling and satisfying vegetarian mains. I peeled, chopped and roasted a butternut squash and a celeriac – each having its own distinct flavour, and together giving the colours and tastes of autumn. I then tipped the softened, caramelised chunks into a pearl barley risotto. Crumbled stilton cheese is melted in at the end of cooking to provide a creamy, slightly salty consistency, with a final garnish of chopped toasted nuts.

Fetch your hat and gloves – here’s a dish to greet you, warming on the hob, at the end of a long, crisp autumnal walk.

Servings

4 adult portions.

Timings

Around 45 mins to make.

You Will Need

  • 1 medium butternut squash
  • 1 medium celeriac
  • oil for roasting
  • 100g pearl barley
  • 1 clove garlic
  • oil to drizzle
  • 1 onion
  • 1 green pepper
  • 3 – 4 chestnut mushrooms
  • 300ml veg stock
  • 50g stilton cheese
  • handful of chopped toasted nuts

Method

  1. Switch on a fan oven to 180C. Chop, peel and chunk the butternut squash and the celeriac. Place the chunks in a roasting dish and drizzle with oil. Place in the hot oven for 30 mins.
  2. Bring the pearl barley to the boil in a saucepan of water. Reduce to a simmer and leave for 30 mins.
  3. Crush the garlic and warm in a drizzle of oil in a wok. Chop and add in the onion, mushrooms and green pepper. Stir and let soften for around 10 mins.
  4. Drain the pearl barley and add to the wok. Tip in the veg stock and bring to the boil. Reduce and leave to simmer. You want the liquid to gradually reduce while finishing cooking the pearl barley, until it is soft but still slightly chewy in texture. Add in a few more drops of hot water from the kettle, if required.
  5. Take the roasting dish from the oven. The roast veg should be soft in the centre and slightly browned on the outside, with caramelised edges. Scrape the veg into the wok and crumble in the stilton, before stirring it all in.
  6. Serve on warmed plates, garnished with the toasted nuts.

Customise It!

I’ve been using pearl barley in risotto recently as I like its taste and bite, while it reduces the carb count. However, you can use arborio rice if you wish – just remember to adjust the cooking time as it takes about half that required by the barley.

Play around with some of the veg in the risotto base to include what you have – yellow or red pepper is fine. Try wilting in some autumn greens, spinach or shredded kale/cavalo nero for the last 5 – 10 mins of cooking.

Musical choice today reflects the fact that there is a rather important election taking place in the world. This track is dedicated to all our American friends, therefore: Muse with Will of the People.

Categories
Bakes Recipes

Pumpkin Spice Traybake

Treat yourself this Halloween! There’s nothing tricky in the making of this traybake – a delicious, sweet and spicy sponge, laced with freshly roasted pumpkin puree and topped with crunchy, honey-coated pumpkin seeds.

These guys were just dying to try it. They’ll tell you – it’s a monster hit 🙂

Servings

Makes 16 slices.

Timings

40 mins to peel, chunk and roast the pumpkin. 15 mins to prepare the traybake and then 30 mins to bake at 180C in a fan oven.

You Will Need

  • 1 medium-sized pumpkin or other squash
  • oil to drizzle for roasting
  • 3 large eggs
  • 200g vegetable oil
  • 140g light muscovado sugar
  • 250g self-raising flour
  • 1tsp bicarb of soda
  • 2 tsp ground cinnamon
  • 1tsp ground ginger
  • 1tsp grated nutmeg
  • runny honey to drizzle
  • a handful of pumpkin seeds

Method

  1. Turn a fan oven on to 180C. Cut and peel the pumpkin into chunks – you will need around 200g. Place on a baking tray and drizzle with oil. Put in the oven for 30 mins until softened and a little caramelised at the edges.
  2. Grease and line a traybake tin – mine used is 22cm square.
  3. Crack the eggs into a bowl, and add in the oil and sugar. Mix with an electric whisk until thickened.
  4. Sieve in the flour, bicarb and spices, and fold in with a spatula to incorporate.
  5. Once the pumpkin chunks are roasted, tip them into a food processor with blade fitted, and blitz to a puree. This will also help the pumpkin to cool. Add the puree to the bowl and stir to mix in.
  6. Tip the mixture into the lined traybake tin and level with a spoon. Place in the oven for 30 mins or until nicely browned, and a skewer inserted in the centre comes out clean.
  7. For the last 5 mins of baking, sprinkle the pumpkin seeds over and drizzle with honey.
  8. Remove from the oven and leave to cool in the tray. Transfer to a board and cut into slices.

Customise It!

Don’t just save the pumpkin seeds for the topping – chuck another handful into the mixture along with some chopped nuts.

Have fun this Halloween, eat well and don’t let the boogeyman get you! Here’s Echo & the Bunnymen with People Are Strange.

Categories
Bakes Recipes

Panela & Cacao Nib Muffins

I’ve been keen to try out a new ingredient I discovered on my recent travels, while visiting Cornwall’s Eden Project.

Panela is a block of totally unrefined raw sugar cane. Produced in Colombia, it retains the good nutrients and vitamins that are naturally present, but usually screened out by the refining process. It is reported therefore to be a healthier alternative to even unrefined brown sugar. Used in baking, it adds a golden colour (see my main photo above) and natural caramel, or toffee, flavour.

Panela was featured in the Eden Project’s Rainforest Biome, as a good example of organic and sustainable, small scale farming in South America. It’s available to purchase in their shop, sourced (of course) from the original producers on fair trade terms (I’ve since found that it can also be purchased via the internet).

I decided to keep the rainforest theme going in these muffins, by combining it with organic cacao nibs bought from a local refillery. Bitter, chocolatey, crunchy and naturally low in sugar, cacao nibs come with their own good mix of nutrients.

It all makes these some of the healthiest muffins I’ve featured yet on A Different Kitchen. And they’re delicious.

Servings

Makes 12 muffins.

Timings

15 mins to prepare, 25 mins to bake at 160C in a fan oven.

You Will Need:

  • 280g plain flour
  • 3 tsp baking powder
  • 1/2 tsp sea salt
  • 100g grated panela
  • 70g dried fruit
  • 1 egg
  • 150ml milk
  • 90ml rapeseed oil
  • 60g cacao nibs

Method

  1. Switch on a fan oven to 160C. Prepare a muffin tin or mould.
  2. Sieve the flour, baking powder and salt into a bowl. Stir in the dried fruit so it is evenly coated in the flour.
  3. Place another bowl on a weigh scale. Pick up the brick of panela and coarsely grate it into the bowl until you have around 100g. Add it to the flour. Originally I thought I would slice off a 100g piece, then grate it. However, the block of panela is so solid it is impenetrable by a knife!
  4. In another bowl, crack the egg and mix it with the oil and milk.
  5. When the oven has reached temperature, pour the egg mixture into the flour and combine. Spoon into the muffin tin or mould.
  6. Finally, stud the cacao nibs into the surface of the muffins, pushing them down gently so they adhere to the mixture.
  7. Place in the oven for 25 mins or until evenly browned.

Customise It!

If you are unable to source panela, then the best unrefined brown sugar you can find, such as muscovado, will do nicely. I included the soft dried fruit to complement the crunch of the cacao nibs and add interest to the texture. My choice was organic dried cranberries but you can use sultanas if you prefer.

Have you come across, or maybe even used, panela? I’ll be interested to hear in the comments.

Here’s a track from an album I’ve been rediscovering since returning from holiday. I really enjoyed The B-52s’ Cosmic Thing when it was first released, but haven’t played it in years. A few listens have reminded me how many brilliant tracks it contains. Here’s one of them: The B-52s with Roam.

Categories
Mains Recipes

Golden Corn Chowder

Fresh, golden sweetcorn is now arriving on the shelves of our supermarkets and market stalls. This is normally the time of year when I make a pot of sweetcorn soup, or chowder as it is traditionally known. This week’s creation is shown in the photo above, garnished with a sprinkling of cayenne pepper and some snipped scallions from the garden.

We are so used to having sweetcorn processed and ready-prepared for us, whether in tins, freezer packs or in cellophaned trays, that it can seem a bit strange at first to see them in natural form.

However, preparation isn’t difficult – I pull back the outer leaves to reveal the plump golden corn on the cob. Gathering the peeled-back leaves with my fist to form a grip, I stand the ear of corn in a flat-bottomed dish, and cut down the side with a sharp knife. Moving around the cob, all the corn then gathers in the bottom of the bowl.

And don’t discard those trimmed stalks just yet – snap one up to put into the chowder as it cooks, and it will add extra corn flavour (just remember to remove it before wading in with your blender, however).

One of the special pleasures about using fresh corn in this way is that one can appreciate why it is called sweet corn – taste a spoonful of this chowder and you may well wonder whether sugar has been added. However, there is no artificial sweetener involved – the pleasant taste is genuinely coming from the natural sweetness of the fresh corn.

Servings

For me, this made 2 adult portions with some leftovers for a lunch serving the next day.

Timings

10 mins to prepare, 20 mins to cook on the hob.

You Will Need

  • 1 clove garlic, crushed
  • 1 large onion
  • 2 – 3 celery sticks
  • 1 red pepper
  • 3 ears of fresh sweetcorn
  • 400ml vegetable stock
  • a few sprigs of fresh thyme
  • salt and pepper
  • a dash of milk
  • 3 scallions
  • 1 tsp cayenne pepper

Method

  1. Drizzle some oil in the bottom of a large saucepan and place over a medium heat on the hob. Add in the crushed garlic.
  2. Roughly chop the onion, celery and pepper, and add to the pan. Put the lid on the pan and let it all cook for 5 mins, while the veg sizzles and softens.
  3. Meanwhile, peel back the outer leaves of one ear of corn and gather it as a grip with your fist. Stand the cob up in a flat-bottomed bowl and cut down through the corn with a sharp knife, moving around the cob so that all the kernels fall and collect in the bowl. Repeat with the other two ears of corn.
  4. Lift the lid of the pan and add in the corn. Give it a good stir, then pour in the veg stock.
  5. Bring to the boil, then reduce to a simmer for 20 mins or so. Tear in the thyme leaves and add a few twists of salt and pepper.
  6. If you wish, snap one of the trimmed corn stalks in two and drop it into the pan – this will help add extra corn flavour as the chowder cooks.
  7. After 20 mins, remove the corn stalks and add a splash of milk.
  8. Blitz the soup with a handheld blender so that it takes on a thick and creamy texture, but with some of the corn kernels still clearly visible.
  9. Ladle into 2 bowls, topping it off with a sprinkling of cayenne pepper and chopped scallions.
  10. Serve on its own or with some fresh, crispy bread.

Customise It!

A couple of spuds will help bulk out the texture of the chowder if you wish. I have kept the dish vegetarian, but if you don’t mind your meat, then some finely chopped strips of salty bacon will also go down well as a garnish.

When it comes to pairing a fave musical track with Golden Corn Chowder, I am rather spoilt for choice. David Bowie’s Golden Years? The Stone Roses with Fool’s Gold? Maybe The Black Keys with Gold on the Ceiling? All would be excellent choices, as is this: Anymore by Alison Goldfrapp.

Categories
Bakes Desserts Recipes

Blackberry & Apple Crumble with Custard

You want comfort food? Here you go!

As my recent posts show, I’ve been making the most of blackberry season, and the generous bounty of juicy, fresh fruit burgeoning on our local hedgerows (see It’s Blackberry Time!).

This dish sees them combined with windfall apples that have tumbled on to the lawn from the trees in our garden, and topped with crumble. Serve it warm with a dollop of vanilla custard. And relax!

Servings

6 adult portions.

Timings

25 mins to prepare, and another 25 mins to bake at 180C.

You Will Need:

  • 4 large eating apples
  • 350g blackberries
  • 85g plain flour
  • 85g wholemeal flour
  • 85g butter
  • 85g caster sugar

Method

  1. Switch on a fan oven to 180C.
  2. Prepare the crumble by combining the flour, butter and sugar in a bowl. Rub together between the fingers until it resembles breadcrumbs in texture. Set aside.
  3. Put the blackberries in another bowl and place in the microwave on full power for 5 – 6 mins until soft and juicy. Remove and squeeze the juice through a sieve into a bowl, leaving the pips and pulp behind (to be discarded).
  4. Peel and slice the apples, discarding the cores. Scatter across the base of a casserole dish, then cover with the blackberry juice. Sprinkle the crumble mixture on top. Place in the oven at 180C for 25 mins.
  5. While the crumble is cooking, make up some custard using a store cupboard mix like Bird’s, following the instructions on the packaging.
  6. Serve the crumble warm in a bowl, with a swirl of yellow custard alongside.

Customise It!

Cooking apples can be used in place of the eating variety, but you will need to sprinkle over a few large spoonfuls of sugar to counter the bitterness. Replace around 30g of the wholemeal flour with oats if you wish, to give the crumble an added oaty, biscuity taste.

I had thought of featuring another Oasis track here today, but after yesterday’s controversial concert ticket sale I reckon everyone’s heard enough of Noel and Liam just for the moment. Let’s hope the Man City front line this season isn’t as sluggish as the Ticketmaster website, eh lads?

Disco has been taking its place at this year’s Summer Proms at the Royal Albert Hall in London, with full orchestral backing and being televised by the BBC. Here’s one of the tracks that’s been performed really well: Yvonne Elliman with If I Can’t Have You.

Categories
Bakes Recipes

It’s Blackberry Time!

Late August is the time when lots of free, fresh fruit starts ripening up on our local hedgerows – the joys of blackberry picking are here!

For me, this usually involves stowing a large sealed plastic box in the pannier of my bike, and heading off into our nearby country park. It is relatively easy there to find a quiet spot where the berries are glinting high up in the late summer sun, turning all those solar rays into vitamin C.

This week I brought home just over 300g from a half hour session. I like to bake with them when they’re still fresh, so aim to complete the transition from hedgerow to cake in under 3 – 4 hours. Solar powered baking, if you like.

I decided to make the Blackberry and Coconut Crumble Squares that I’ve featured previously on A Different Kitchen. You can see this week’s batch in my photo at the top of the post, and again below.

It’s a favourite in our household, and there is really only a short window of a few weeks every year in which this traybake can be made fresh – so why not? Just follow the above link to find the recipe.

I kept a few berries back as I like to have them topped over oats, nuts and seeds as a breakfast dish, with some milk and honey. Grating or chopping in some apple, fresh from our trees in the garden, is the perfect complement.

There may well be more blackberry recipes over the next few weeks, so stay tuned.

Choice of music today can really only be from one band – the long-awaited Oasis reunion tour has finally been announced. Along with probably the other 65 million people who live in the UK, I shall be on the Ticketmaster site this weekend trying to get a ticket before they all sell out – wish me luck!

Then it’s a case of waiting until next summer to see the concerts. That’s presuming Noel and Liam haven’t fallen out again by then, of course…

Here they are at their Beatles-influenced best, with Whatever.