Categories
Mains Recipes

Autumn Veg Roast

The signs of autumn are now all around us. I’ve been enjoying some beautiful wooded walks amidst glorious shades of red and orange leaves. The days are getting cooler, and this coming weekend, in the UK, our clocks will be going back one hour, bringing in earlier, darker evenings.

This dish was inspired by the arrival in the ADK Kitchen of a wonderful harvest of autumn vegetables from our local community farm. You can see these spread out in the photo below: butternut squash, another (as yet unidentified!) variety of squash, parsnip, carrots, onions, celeriac and mooli (white radish). Also included in the crop was some broccoli, green beans and fresh butter beans.

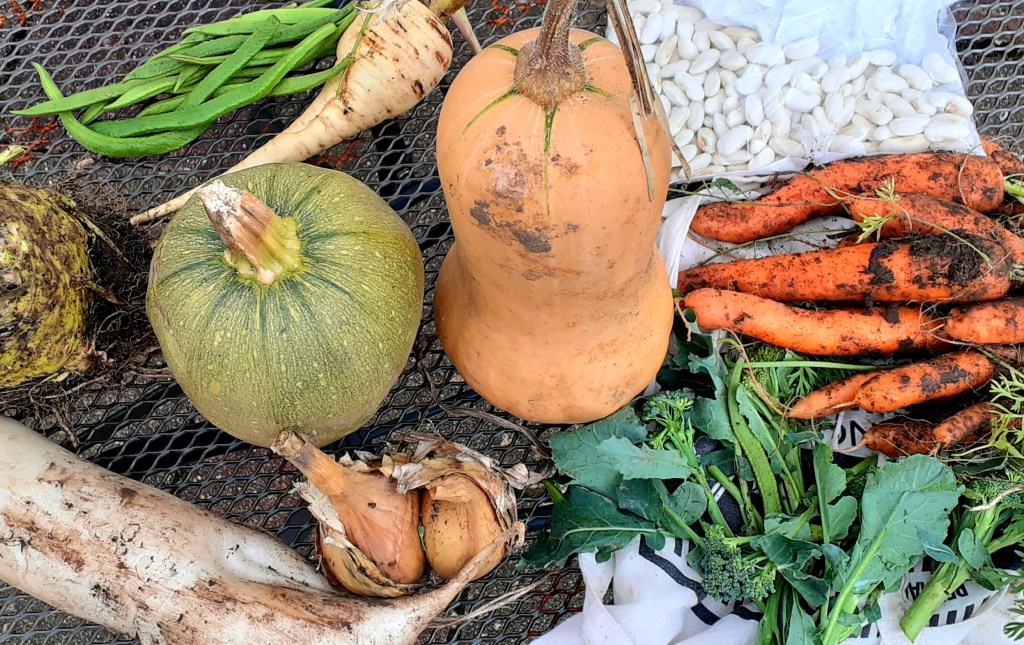
There was too much to use in one dish, so I focused on the squashes and root veg, which I think are lovely roasted. I added a tomato and onion sauce, with a maverick ingredient – black olives. It is topped with a crisp crust of wholemeal breadcrumbs, grated cheese and chopped nuts.

The next photo shows the finished article, warm from the oven. Served with a nice glass of red wine, it makes a great comforting meal on an autumn evening, now that the nights are drawing in.

Timings

10 mins to prepare and chop the veg, which then roasts for 30 mins. The rest of the prep you can do while the veg are roasting. Allow a further 20 mins for the assembled dish to roast further.

Servings

This will serve 6 people.

You Will Need

  • A pyrex dish-ful of chopped seasonal veg: I used butternut squash, celeriac, parsnip and mooli, and added some chestnut mushrooms and red pepper
  • A sprinkling of herbes de provence
  • Some olive oil
  • A 500g carton of tomato passata
  • 1 onion
  • 1 clove of garlic
  • 75 g pitted black olives, whole or chopped
  • 5 or 6 slices of wholemeal bread chopped into crumbs
  • 75g grated cheddar cheese
  • 75g chopped mixed nuts

Method

  1. Chop enough veg to half fill the pyrex dish that you will use. The veg should be in chunks roughly about 2-3cm square. Tip them into a separate metal baking dish and sprinkle with the herbes de provence. Drizzle with olive oil and roast in the oven for 30 mins at 180C. Spread them so that they are in a single layer, and use a second metal dish if necessary.
  2. While the veg is roasting, chop the onion and add it to some hot olive oil in a saucepan, with the garlic clove, crushed. After a few minutes, tip in the passata and black olives, and mix. Let it bubble for around 10 mins so that it is slightly thickened in consistency.
  3. Separately, combine the breadcrumbs, grated cheese and chopped nuts in a bowl. Get your hands in there and give it all a good mix. You want the cheese to be intertwined with the other ingredients so that, when it melts, it will bind it all together into a crisp coating.
  4. When the veg has roasted, combine it with the tomato sauce, and pour into the pyrex dish. Pat it all down with the back of a spatula so there are no gaps.
  5. Sprinkle over the bread, cheese and nut crust, evening it out and patting it down with the backs of your fingers. Give it a final drizzle of olive oil.
  6. Cook in the oven for around 20 mins, or until the top is crisp and golden. With some ovens, it may help to give it a final 5 mins under the grill to crisp it up. Serve.

Customise it!

Lots of scope for customising here, starting with choice of veg. Really, you can use whatever is in season and whatever particular veg you prefer. There are many varieties of squash and root veg around this time of year, most of which benefits from roasting, helping it sweeten and caramelise on the outside and succulent to bite into.

With the crust topping, you can use other bread for the crumbs, and other cheese. Grated blue cheese would give it a lovely taste twist, as would some parmesan. The next time I make this I will include some pumpkin and sunflower seeds in the crusty mix.

You can omit the olives if they’re not your thing. I love them, and had the idea to include them in the sauce and serve the dish with a warmed, sliced black olive ciabatta (see my photo), which all worked really well.

The dish is suitable for vegetarians. To make it vegan, simply omit the grated cheese, though the topping will be a little looser. However, you could always use a vegan cheese. As ever, feel free to experiment!

This time of year also means that Halloween is approaching. I’ll be saying more about this in this coming weekend’s post, and hopefully having a little fun. For now, I’ll choose a track from a Halloween Playlist I have on Spotify, to share as musical accompaniment.

Cue Superstition by Stevie Wonder. Nothing more to say!

Categories
Desserts Recipes

Passion Fruit and Lime Pots

I made these recently to share with friends as a dessert after a dinner party. They look good, taste fresh and tangy with a hint of sweet and sour, are a little different from the norm, and not that difficult to make. They can also be prepared well in advance of mealtime. It is a Mary Berry recipe originally, so thanks to Mary for the inspiration!

My recent photo post on Twitter for this dish received a new record number of likes for A Different Kitchen, so I’m sharing the full recipe here.

Timings

20 mins to prepare, at least two hours to set in the fridge.

Servings

This will make six pots.

You Will Need

  • 6 passion fruits
  • juice of 1 lime
  • 600ml double cream
  • 100g caster sugar

Method

  1. Tip the cream and sugar into a saucepan. Heat and stir until the sugar has dissolved, then step up the heat and boil for 3 minutes. Remove from the heat.
  2. Halve 5 of the passion fruits and scoop out the juice and seeds. Whirl the juice and seeds in a food processor with blade fitted, until smooth. Push through a sieve so that you have a smooth juice, and discard the seeds.
  3. Add the passion fruit juice to the warm cream and sugar mixture, so that the cream will start to thicken.
  4. Add the lime juice also to the mixture, and stir in so that it thickens further.
  5. Pour the mixture into six ramekins and let cool. Once cooled, place in the fridge to set for at least 3 hours.
  6. When ready to serve, cut the remaining passion fruit in half and scoop out the juice and seeds. Scatter this across the surface of the 6 pots, and serve.

The musical accompaniment to this dish should be smooth, mellow and sophisticated, with just a hint of an edge to reflect the combination of sweet and sour. I’ve opted for a band getting a lot of play recently in the ADK kitchen, and that is Massive Attack, here with the excellent vocals of Tracey Thorn. Enjoy Protection.

Categories
Bakes Desserts Recipes

Austrian Apple Cake

It’s a great pleasure to introduce our latest guest post this week on A Different Kitchen. My good friend, and accomplished cook, Eva, shares with us an old family recipe from her native Austria. Eva treated me to a generous slice of this recently (see my photos) and it was delicious!

Hi, this is an old family recipe of mine from Austria, where I grew up. It’s special to me as it reminds me of my childhood. Mum used to make this cake for when we had friends round for coffee. It’s a recipe that was passed down from one of her aunts to my Mum. Also, this is a typical Austrian “fruit cake” where you use the fruits according to the season, especially plums, apricots, pears or cherries.

Ingredients

160g unsalted butter

160g sugar

160g self raising flour

3 eggs

Zest of half a lemon

2-3 spoons of dark rum

3 cooking or dessert apples

Flaked almonds

Icing sugar for dusting

Method

Beat butter, sugar and egg yolks in a bowl until fluffy and pale in colour. Add the lemon zest and rum, then add the flour. Whisk the egg whites till fairly stiff and fold into the mixture. Put the cake mixture into a baking tin. I used a spring form cake tin of 23cm diameter. Then peel the apples and cut into thin slices and arrange them on top of the cake. Sprinkle with flaked almonds and bake in the oven at 180C (fan oven) for about 45 minutes.

Finish with a dusting of icing sugar before serving!

My choice of musical track for adding to Kevin’s ADK Playlist is the “Hallelujah Chorus” from the Messiah by Georg Friedrich Händel. I sung this piece many years ago when I first joined a choir in this country and thoroughly enjoyed it then. Many years later and with a different choir I sung it again at Winchester Cathedral, which was so special and one of my best moments in life. I find the Messiah totally exhilarating and uplifting which makes it one of my favourite pieces.

Categories
Mains Recipes

Kale and Potato Cakes

As summer slips away into autumn, the space in our garden occupied by sunshine-infused tomatoes and cucumbers is gradually giving way to curly kale.

Kale is highly regarded as a source of numerous vitamins and nutrients that keep our bodies healthy. It is also one of my favourite vegetables to cook with – watch out for some more kale dishes posted before this autumn is through!

This dish started out as a Mary Berry bubble and squeak-type recipe (thanks for the inspiration, Mary!), which I modified to take advantage of the copious amounts of fresh kale that have been appearing each day over our garden wall. I also added scallions/spring onions, which go down a treat.

I served the cakes with a rasher of good back bacon on top, along with a soft poached egg and a twist of chilli flakes. The cakes can be prepared in advance and shallow fried as required. They make a tasty and healthy midweek meal or weekend brunch.

Servings

This will make 8 cakes.

Timings

The first stage of preparing and boiling/steaming the veg (which can be done up to 24 hrs in advance) takes about 20 mins. Once slightly cooled, combining and shaping the cakes (which can also be done in advance) will take about another 10 – 15 mins. Allow 10 mins to shallow fry the cakes before serving.

You Will Need

  • 1kg potatoes – I used Maris Piper
  • 40g butter
  • 100g fresh curly kale
  • 1 tbsp wholegrain mustard
  • 50g cheddar cheese, grated
  • 3- 4 scallions/spring onions, finely chopped
  • 40 g plain flour
  • a few pinches of sea salt
  • oil for frying

Method

  1. Peel, chunk and boil the potatoes for 15 – 20 mins in water with a pinch of sea salt added. Drain well and leave in the warm saucepan to cool slightly – this will ensure that any excess moisture evaporates, leaving the potatoes dry.
  2. While the potatoes are cooking, place the kale in a steamer over the saucepan for about 10 mins. Remove the steamer and spread the kale out on some kitchen paper on a tray. With another piece of kitchen paper, pat the tops of the kale leaves to make them as dry as possible, then shred with a sharp knife.
  3. Add the butter to the warm potatoes and mash until smooth. Add in the shredded kale, scallions, cheese and mustard and combine well. Check the seasoning and give it another twist of sea salt if necessary.
  4. By this stage, the combined mixture should have cooled sufficiently to enable you to grab a handful and shape it into a pattie, or cake, the size of a burger.
  5. Sprinkle the flour on a plate and coat each cake on both sides.
  6. Shallow fry the cakes in the oil until brown and crispy on the outside, while soft in the middle.

Customise it!

I put some rashers of bacon in the pan to cook alongside the cakes, and poached some eggs at the same time. You can serve each cake with a rasher on top, and then a soft poached egg, topped with a twist of chilli flakes – see my photo.

For a veggie option, try chopped tomatoes on top, with or without the egg. Another good combo would be smashed avocado with egg and bacon. Be creative!

Choice of musical track is influenced by the gig tickets I managed to secure while working on this dish. I’m excited to say that next year I shall be seeing the Arctic Monkeys on their UK tour. Consequently, their music has been featuring quite heavily recently in the sounds playing in the ADK kitchen.

I am very interested to hear the new album which is due out in a few weeks’ time. I have always liked the band and saw them live on the AM tour at Earls Court, London in 2013. My favourite album of theirs is still Humbug. I liked the 2018 sci-fi influenced Tranquility Base Hotel and Casino album, though it was quite different from what they had done before. All in all, I’ll award it Four Stars Out of Five…

Categories
Mains Recipes

Bomb the Basa

Basa is still a relative newcomer to our fishmonger stalls and markets. Being a good source of protein, rich in healthy omega 3 fats, and coming from a plentiful and sustainable supply, it certainly deserves our attention alongside the more traditional cods and herrings. You could even say it has earned its plaice (sorry, couldn’t resist that one). Being quite inexpensive and available in many supermarkets also helps.

I’ve cooked with it a few times and found that it tends to stay firm, holding its texture and shape where some other types of fish are more likely to fragment into flakes. This means it is quite receptive to marinades and toppings that add complementary tastes.

Servings

This will make a meal for two.

Timings

10 mins to prepare, 25 mins in the oven.

You Will Need

  • 2 basa fillets
  • 1 garlic clove
  • 2-3 cm piece of root ginger
  • 1 small green chilli
  • 1 small red chilli
  • half a lemon
  • olive oil
  • black pepper

Method

  1. Line a baking tray with foil and brush it with a little of the oil. This will ensure that you can remove the fish after cooking, to serve in one piece!
  2. Lay the 2 fillets on the foil. Top with finely chopped garlic, ginger and chillis. Splash on the lemon juice and a drizzle of oil, with a few twists of pepper.
  3. Cook in the oven at 180C for about 25 mins.

Customise it!

Stick with the holy trinity of garlic, ginger and chillis, but if you want to add some chopped spring onions that would be fine also. Fresh coriander (cilantro) would be excellent.

If you like fish with a buttery sauce, you could make up some of the lime and sea salt butter I made on this earlier post (see here, step 9) and melt some over the fish as you serve it. The lime and sea salt will work well with the chilli and ginger.

I served this with some new potatoes and steamed green veg, as the picture shows. I imagine it would also be really good with some stir fried veg or noodles, and a spicy sauce.

There are other Basa recipes around, but you will do well to beat this. Or, should I say, Beat Dis!

It’s an honour to add Bomb the Bass to the ADK Spotify Playlist.

Keep this frequency clear!

Categories
Bakes Recipes

Blackberry, Oat & Yoghurt Muffins

The end of summer/start of autumn is a great time of year for fresh blackberries. You may find them in supermarkets and farm shops, and some farms will let you pick your own. Best of all though is that they grow plentifully in the wild in hedges in public places and country parks, and can usually be picked free of charge.

Nutritionists will say that they are good for our overall health in various ways, such as being a source of Vitamin C and antioxidants, which protect our body cells.

I recently went on a walk to pick some in a nearby country park. I have included a photo of my haul of two filled plastic containers. My Fitbit told me afterwards that I had earned 52 active zone minutes from the exercise, which shows how blackberries can be good for our health in more ways than one!

There are many ways to use blackberries. A favourite of mine is as a topping on muesli.

I have also used them recently in a blackberry, coconut and almond traybake.

Probably my favourite though is the muffins, shown in my main photo, where they are combined with rolled oats and natural yoghurt, The muffins can be enjoyed for breakfast, as a lunchtime snack, a picnic dessert, or indeed at any time.

Servings

Ths will make 12 muffins.

Timings

15 mins to make, 25 mins in the oven at 180C.

You Will Need

  • 200g plain flour
  • 1 and a half tsp baking powder
  • half tsp salt
  • 85g rolled oats
  • 240 ml natural yoghurt
  • 1 tsp bicarbonate of soda
  • 1 egg, beaten
  • 120g light brown sugar
  • 90ml milk
  • 90ml vegetable oil
  • 140g fresh blackberries

Method

  1. Preheat the oven to 180C and prepare a muffin tray/container. I use a flexible silicone plastic mould that requires no greasing. This makes it especially easy to pop out the muffins when they are baked.
  2. Wash and dry the fresh blackberries. Lay them on a dish.
  3. Weigh out the flour and sprinkle a few tablespoons over the blackberries, turning them so they are coated in the flour. This will help stop them sinking to the bottom of the muffin mixture as they are baking.
  4. Mix together the rest of the flour, baking powder and salt in a bowl.
  5. In a separate bowl, stir together the oats, yoghurt and bicarb of soda. Let this stand for a minute, then add the beaten egg, sugar, milk and veg oil.
  6. Pour the oat/yoghurt mix into the flour mix and stir to combine. Add the flour-coated blackberries in the final few strokes.
  7. Spoon the combined mixture into the muffin tray and bake for 25 mins.
  8. Remove from the tray/mould when the muffins have slightly cooled, and let cool fully on a wire tray.

Customise it!

Missed the blackberry season? Don’t worry – substitute another fresh berry, such as raspberry or blueberry, and the muffins will be nice also.

If you do venture into the countryside to go blackberry picking, here’s a topical track from The Farmer’s Boys to get you in the mood.

Categories
Mains Recipes

Chilli Mushroom with Lime & Sea Salt Buttered Veg

A roasted filled portobello mushroom makes a great vegetarian dinner. It holds its shape and texture when cooked and releases its juices when you cut into it with a knife. In this dish it is combined with summer veg served with melting slivers of butter infused with lime, sea salt and chilli flakes.

Servings

This will make one serving, so multiply up by however many mouths you are feeding (I’ll say more about this below!)

Timings

20 mins to make the vegetable chilli filling, then 20 mins in the oven to roast.

You Will Need

  • 1 stick celery
  • half an onion
  • 1 carrot
  • 1 tsp chilli powder
  • 1 tsp cumin seeds
  • half a red, green or yellow pepper
  • a little vegetable oil
  • 1 tablespoon of plain flour
  • half a 440g tin of kidney beans
  • 300g vegetable stock
  • 60g red lentils
  • 1 portobello mushroom
  • seasonal veg (e.g. green beans, carrots) for one, boiled or steamed
  • 40g butter, softened
  • zest and juice of half a lime
  • a few twists of sea salt
  • a few chilli flakes

Method

  1. Put the chilli powder and cumin seeds in some oil, until sizzling.
  2. Finely chop the onion, celery, carrot and pepper and shallow fry until softened.
  3. Take off the heat and sprinkle the flour over. Turn the veg over until it is coated in the flour.
  4. Add the stock and bring to the boil. When boiling, add the lentils and kidney beans. Put on the lid of the pan and simmer for 10 – 15 mins until the lentils have softened.
  5. Remove the lid and let the mix reduce through evaporation, until you have a soft, thick consistency.
  6. Remove the stalk from the centre of the mushroom, chop and set aside. Brush the mushroom all over with oil.
  7. Fill the mushroom with the chilli mix, topping it with pieces of the stalk, gently pressed down into the mix. Place on a metal tray and roast in the oven at 180C for 20 mins.
  8. While the mushroom is roasting, chop and boil or steam the seasonal veg.
  9. In a small bowl, mix the butter, lime zest and juice, sea salt and chilli flakes. Place in the fridge until serving.
  10. Serve up the roasted mushroom with the veg on the side. Slice off a few slivers of the butter and let melt over the veg.

Customise it!

Lots of scope for going off piste here, while sticking to the fundamentals of a roasted portobello mushroom, a chilli filling and seasoned butter for the veg. Swap in other types of lentil or pulse, and use some drops of tomato passata if you wish along with the stock. Choose whichever veg you prefer to serve on the side, and prepare it as you like it. Garlic goes well in both the chilli mix, and especially in the butter.

I’ve given the measurements to make one portion here. However, I would quite often make a larger pot of the vegetable chilli and serve some of it on other occasions, in a different way (e.g. with rice) or freeze some of it for a later date. Similarly, the seasoned butter is great with other foods, such as sweetcorn and fish, so I sometimes make a larger batch of that as well.

In other words, don’t be afraid to gross up the amounts. Stick to the instructions above and you’ll have a nice meal for one. Go larger and who knows – you may have enough to feed a Seven Nation Army. Cue the White Stripes!

Categories
Mains Recipes

Turkey, Feta and Courgette Burgers

I’m pleased to announce that we have another guest post on A Different Kitchen! It is by my sister Pamela, an experienced and talented cook whose meals I have enjoyed on numerous occasions. 

Hi. My featured meal is Turkey, Feta and Courgette Burgers. I have used this recipe many times. It’s healthy, tasty, easy and uses up some of the mint in our garden (you can see some of our mint bush in the photo). It is also useful if you have an abundant courgette (or zucchini) harvest, which some of you may be experiencing at this time of year.

Servings

Depending on your preferred size of burger, the recipe makes as many or as few burgers as you like!

Timings

10 mins prep, and 10 mins to grill.

You Will Need

  • 500g turkey breast mince
  • 1 large courgette, spiralised or cut into tiny cubes (I use a Kenwood mini chopper)
  • 100g feta crumbled
  • 2 crushed garlic cloves
  • half teaspoon chilli flakes
  • small bunch of mint, finely chopped
  • 1 teaspoon sumac powder
  • zest of an unwaxed lemon
  • 1 large egg beaten

Method

  1. Mix all the ingredients together in a large bowl with your hand and shape into burgers.
  2. Place these on a baking tray lined with tin foil and cover with cling film.
  3. Put these in the fridge to firm – the smell is amazing.
  4. At this stage you can also freeze the burgers – or some of them – for another day.
  5. Put the tray under a hot grill and cook the burgers for 8-10 minutes, gently turning, until golden brown. 
  6. Enjoy with a fresh salad. No burger baps required!

Well done Pam and thanks for sharing this delicious looking recipe.

The author of a guest post gets to choose a favourite track of theirs for adding to the ADK Playlist. Pam’s choice is Happy by Pharrell Williams. She saw him performing the song live and says it was brilliant!

Categories
Desserts Recipes

Plum and Almond Crumble Squares

Those following on Twitter (@differentkitch) may recognise the above photo from my tweet earlier in the week. It shows a batch of lovely Victoria Plums, which have recently come into season and are appearing on our market stalls. This post shows how I turned them into Plum and Almond Crumble Squares.

I researched some plum recipes, with the general idea that I felt they would be great in a traybake. I settled upon one in BBC Good Food and, as usual, modified it to my liking.

The Squares have several layers, beginning with a biscuity base. On top of this is an egg custardy/almond/ bakewell pudding type layer, and then the subtle taste of the chopped plums. The main area where I modified the recipe was on the topping, adding rolled oats, pumpkin seeds and sunflower seeds to flaked almonds. This makes a crumble finish which is totally loaded, adding a toasted crunch as it bakes.

Servings

This will make 16 square slices (4 had already been eaten when the above photo was taken!)

Timings

Total prep time about 25 mins, total cooking time about 1 hr – 1hr 10mins.

You Will Need

  • 250g baking spread
  • 225g caster sugar
  • 300g ground almonds
  • 140g plain flour, plus an additional 25g
  • 2 eggs
  • 1 teaspoon mixed spice
  • 1 teaspoon baking powder
  • 7 plums, stones removed and cut into slices
  • 50g flaked almonds
  • 50g rolled oats
  • 25g pumpkin seeds
  • 25 g sunflower seeds

Method

  1. Grease and line a baking dish with baking paper. My baking dish was 20cm square. Cut one piece that extends across the base and two opposite sides, leaving a little overhanging on each side. Paste a strip on each of the two remaining sides.
  2. Put the baking spread, sugar and ground almonds in a food processor with blade fitted. Pulse until it is mixed.
  3. Remove the mix from the food processor and reserve half of it aside. Put the other half back in the processor with the 140g flour, and mix till it forms a dough.
  4. Remove the dough and flatten it out with a rolling pin on a floured surface. You will not be able to lift it up in one piece (like a pastry base) but, as it gets flatter, lift it in pieces and gradually place these in the base of the baking dish. Press it down with the back of a spoon and distribute it so that it covers all of the base and at least about half way up the sides. It will all meld together as it bakes.
  5. Fill the base with a piece of crumpled up baking paper and baking beans, and place in the oven to bake blind at 180C for 10 – 15 mins. The edges of the base should be beginning to brown.
  6. While the base is in the oven, make the filling. Into the food processor goes the reserved half of the spead/sugar/almond mix. Add the 2 eggs, the 25g flour, mixed spice and baking powder. Pulse it to form a creamy batter.
  7. Remove the base from the oven and add the batter on top. Then gently press the sliced plums into the top of the batter so that they remain visible. Make sure that they are evenly spread across the whole of the cake – when it is cut into squares you want each one to contain plums. Bake in the oven, still at 180C for 25 mins.
  8. In a bowl, mix the flaked almonds, oats, and the two types of seeds. Give them a good swirl so that they are well mixed up together.
  9. Remove the dish from the oven and sprinkle the topping over. As with the plums, ensure even coverage. Gently press the nuts, oats and seeds towards the batter mix, so that they will adhere to it, and not fall off when it is cut!
  10. Place back in the oven for another 25 mins. After about 20 mins, check it and insert a skewer in the centre. If it comes out clear, it is baked. If it has some uncooked batter on it, put back in for another 5 – 10 mins and keep an eye on it.
  11. When baked to your satisfaction, remove and leave aside to cool in the tin. When cool, the base will have set and you should be able to lift it out in one piece, by gripping the two overhanging sides of the baking paper liner.
  12. Put on a board and cut into 16 squares. I find a serrated (bread) knife is better for cutting through the sides of the crust, so that these doesn’t crumble. Any other sharp knife will cut through the bottom of the base.

Customise it!

You could add other types of nuts and seeds to the crumble topping – whatever you fancy really. Just make sure you press the pieces gently towards the batter so that they adhere to the cake. Some of the crumble topping will still fall off and flake into your hand as you bite into it, but that is all part of the fun and indulgence of eating it. It’s food to make you feel good!

Categories
Recipes Sides Starters

Chunky Guacamole

Here is another recipe that is ideal for outdoor summer eating. This avocado dish goes well as a starter with a barbecue, or side with a salad eaten al fresco, particularly if accompanied by an ice cold bottle of Mexican beer. It is based on a recipe for guacamole by those motorcycling masterchefs, those culinary cruisers, those grooming gastronomes (Ed: that’s enough alliteration, thank you) the Hairy Bikers.

Servings

This will make enough as a starter, or side, for 4.

Timings

10 mins to prepare, no cooking involved.

You Will Need

  • one mild chilli pepper, seeds removed
  • bunch of coriander leaves
  • two medium sized tomatoes
  • half a red onion
  • juice of half a lime, plus slice to garnish
  • 2 – 3 fresh avocados

Method

  1. Put the ingredients in a food processor with blade fitted, and blitz until well blended, but still with chunks of veg visible.
  2. Er, that’s it. Scrape into a bowl and serve.

Customise it!

Serve with tortilla chips or with veg crudites, like carrot and celery sticks. The idea of leaving it a little chunky is so that you can pick up some identifiable pieces of the veg, coated in the creamy green sauce. It’s important not to over pulse it in the food processor to the extent that you lose the chunks and it takes on the consistency of baby food!

Enjoy this while the sun is shining on us – it won’t last forever. ‘Avo’ nice day!