Categories
Bakes Recipes

Spiced Fruit & Rooibos Traybake

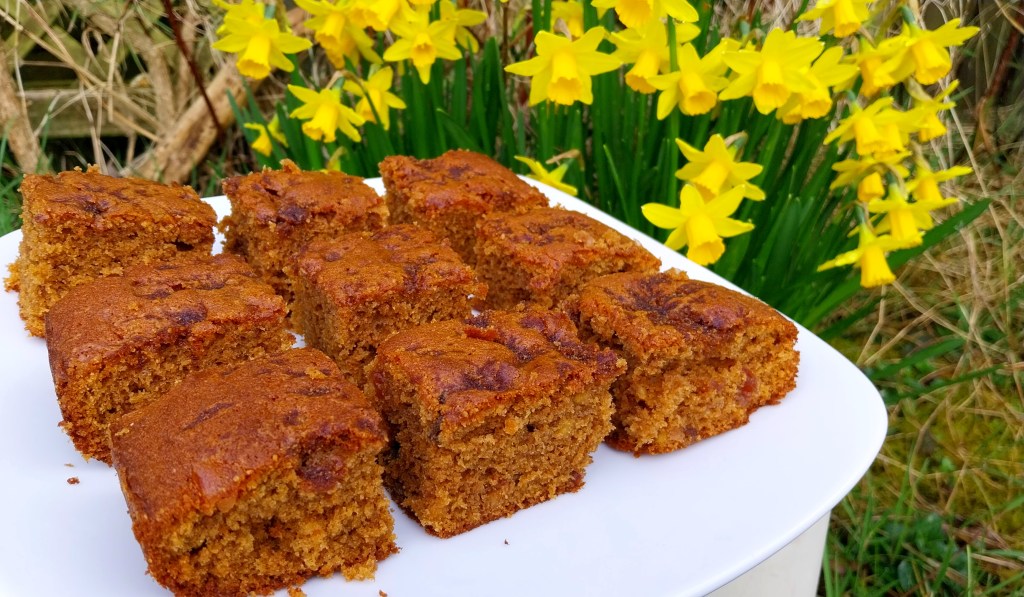
Here’s a fresh and fruity traybake to welcome the first signs of spring. Dried mixed fruit is plumped up by infusion in freshly brewed Rooibos (or Redbush) tea. Dark brown sugar and mixed spice ensure a deep rich colour and satisfying warmth.

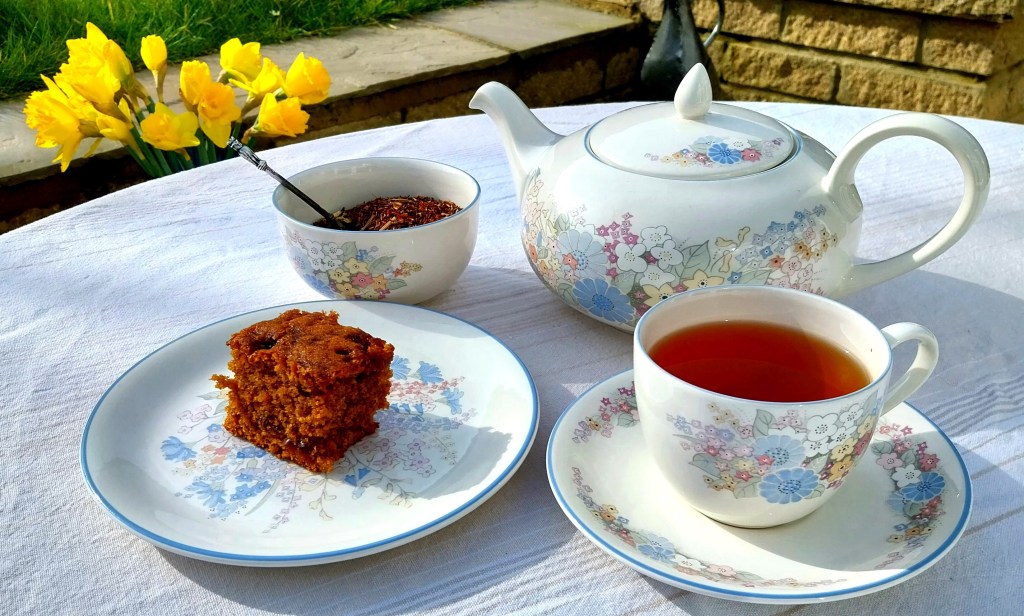
The tea blend I used is one called Kalahari that I picked up in the Tea Emporium in Bath, on one of our motorhome trips down to the west country. It mixes Rooibos leaves with orange peel, lemongrass, and specks of marigold and thistle flowers. It looks beautiful and makes a lovely, refreshing caffeine-free drink. Here it is:

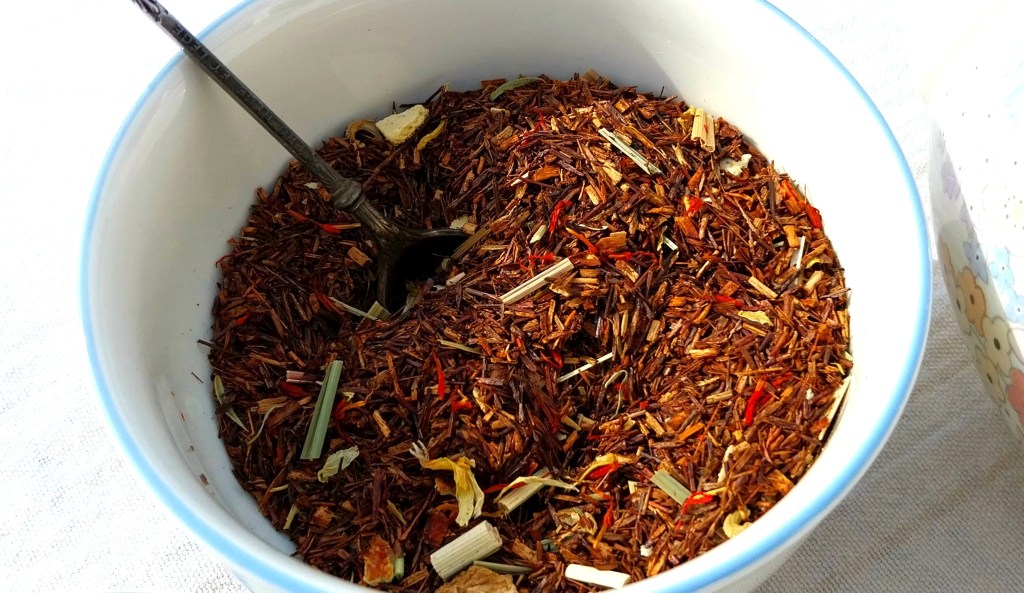
I’m pleased to say it can now also be enjoyed in cake form! No Kalahari? No problem – other blends of Rooibos (flavoured or plain) can be used just as well.

Servings

This should give you around 16 slices.

Timings

Prep took me around 30 mins, including soaking the dried fruit in the tea. Bakes in a fan oven at 160C for 40 mins.

You Will Need:

  • 75ml tea made up with Rooibos leaves and boiling water
  • 160g mixed dried fruit – I used sultanas, candied peel and glace cherries
  • 180g butter, softened
  • 160g dark brown sugar
  • 3 large eggs
  • 200g self-raising flour
  • 1 tsp mixed spice (nutmeg, cinnamon, coriander seed, clove, pimento and ginger)
  • 3 tbsp dark brown sugar for sprinkling

Method

  1. Grease and line a tray bake tin. The one I used is 22cm square.
  2. Place your assortment of dried mixed fruit in a bowl.
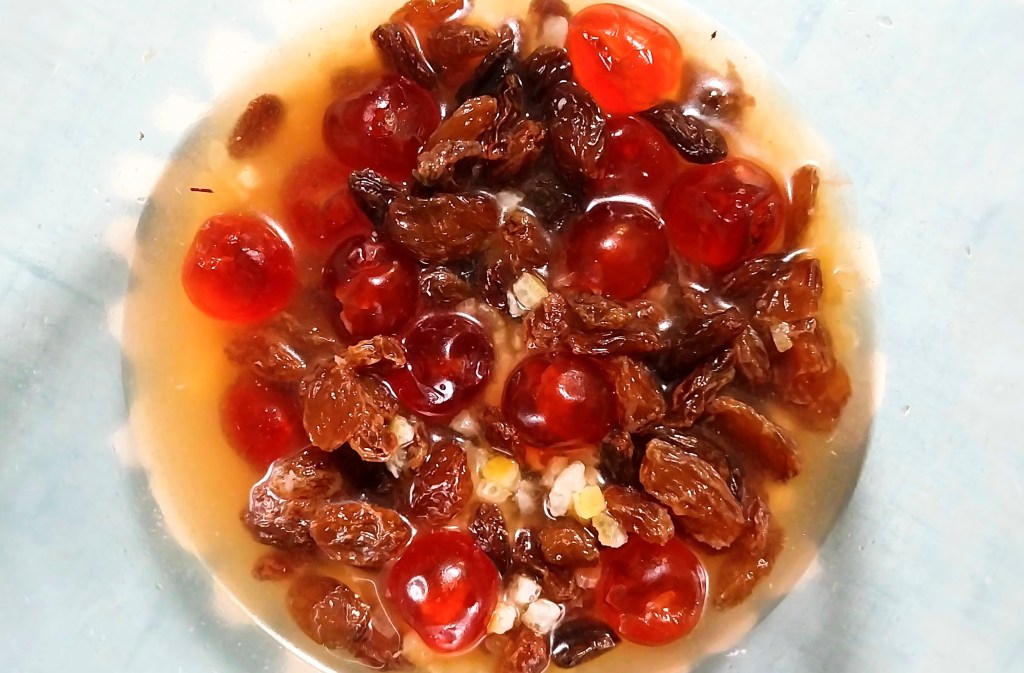
  3. Make up a pot of tea using the Rooibos leaves and boiling water. Using a tea strainer, measure out 75 ml and pour it over the dried fruit. Stir and set aside (see the photo just above, showing my fruit soaking in the Rooibos tea).
  4. Put the sugar and softened butter in another bowl, and whisk together with an electric mixer until nice and creamy.
  5. Crack in each egg one at a time, and whisk in. Sprinkle in a little of the flour each time to avoid curdling.
  6. Sieve in the rest of the flour and the mixed spice. Whisk again to combine.
  7. Turn a fan oven on to 160C.
  8. Drain the mixed dried fruit with a sieve, catching the tea to retain in a separate bowl. Tip the fruit into the cake mixture and whisk in.
  9. Add in as much of the retained tea as necessary to bring the cake mix to the right consistency. You should be able to pick up a spoonful and slowly but surely let it slide back off the spoon, into the rest of the mix with a plop! I used most of the retained tea in mine.
  10. Give it a final whisk then scrape into the prepared tin with a spatula. Spread out into the four corners and level the top.
  11. Finally, sprinkle the dark brown sugar topping over the cake with your fingers.
  12. Place in the oven at 160C for 40 mins. Check after about 30 mins – if a skewer in the middle comes out dry then it’s done.
  13. Leave to cool and cut into slices. They will keep in a tin for a few days but, seriously, they will all be eaten by then anyway!

Customise It!

You can use a different combination of mixed dried fruit if you wish, or if that’s what you have in the cupboard – currants, dried apricots and so on should work fine.

Rooibos leaves that come with different natural flavourings to mine will be ok. If you like plain Rooibos to drink then use that. I sometimes have Rooibos with a dash of vanilla extract, and that would make an interesting combo for using here.

The weather is due to be fine this weekend, so I’m getting out into the garden today to enjoy our first real sun and warmth of 2025, with a pot of Rooibos and a slice of traybake. Time to relax and enjoy the silence.

Speaking of which, it’s currently the 35th anniversary of the release of the classic Violator album by Depeche Mode, which I plan to listen to again in the garden on my headphones. So, let’s add this track to the ADK Playlist: Enjoy the Silence.

Categories
Mains Recipes

Firecracker Salmon

Here’s a fairly quick and easy way to zing up some salmon fillets, using a fiery topping sauce made mainly from ingredients you might find stowed away in a kitchen cupboard or fridge.

I served the firecracker salmon over a bed of veg and beansprouts, flash cooked in the wok using the remainder of the fiery topping as a spicy and fruity stir fry sauce. The veg consisted of crushed garlic and chopped root ginger, with fine batons of carrot, celery and red pepper, a few sliced mushrooms and a chopped red onion. I also chopped in a bunch of coriander/cilantro leaves and wilted in some pak choi.

No carb accompaniments required, but see Customise It! below for another suggestion to accompany the salmon.

The stir fry was made in the time it took the salmon to cook in the oven, so no additional time is required. The finished meal you can see in my photo at the top of the post.

Servings

2 adult portions.

Timings

5 mins to prepare, 20 mins to cook.

You Will Need:

  • 2 salmon fillets

    For the fiery topping
  • 2 tbsp red chilli paste
  • 100g tomato passata
  • 2 tbsp fruit jam
  • 2 tbsp rice or white wine vinegar
  • 2 tbsp soy sauce

    To sprinkle
  • a handful of sesame seeds

Method

  1. Turn a fan oven on to 180C.
  2. Take a roasting dish and line it with a rectangle of tin foil. Drizzle a little of the oil on the foil and lay the two salmon portions down on it, side by side. Then lift up the edges of the tin foil and pinch them at the corners to form a little fence tightly around the sides of the salmon.
  3. Put the fiery topping ingredients in a clean screw top jar and close with the lid. Give it a really good shake to mix.
  4. Unscrew the jar and, using a basting brush, smear the topping over the tops and sides of the salmon. The tin foil parcel will help it stay on the fish while it cooks, and stop it dripping off.
  5. Place the tray in the oven when it is up to temp. After 10 mins, remove it and baste the tops and sides again with another layer of fiery topping. Place back in the oven for a further 10 mins.
  6. Remove and use a spatula to lift each portion of salmon on to a warm plate. Sprinkle over the sesame seeds to serve.

Customise It!

An alternative to the stir fry accompaniment would be to place some small potatoes with chopped onion and peppers on the roasting tray alongside the salmon parcel, then serve it all together. This way there is only one cooking pan involved, and the wok can stay in the drawer.

Here’s a cracker of a track I’ve been playing this week in the ADK Kitchen. I heard it by chance recently and it reminded me how good this band were in their day. I have always liked the guitar sound of Andy Gill in particular. This is What We All Want from Gang of Four.

Categories
Mains Recipes

Steak & Real Ale Hotpot

This week I’ve had the electric slow cooker back in action, delivering another true winter warmer of a Sunday dinner.

For this variation on the Gastropub classic, steak and ale pie, I bought locally reared beef from a farm shop butcher, along with a favourite dark ale from a local craft brewery. Add hot beef stock and seasonal veg, and leave it to bubble away for several hours in the corner of the kitchen, filling the house and whetting the appetite with its satisfying aroma.

What’s more, I heartily recommend buying an additional bottle of the ale, so that the chef can relax with a glass while all that cooking is quietly underway. Preferably while watching the Premier League on Super Sunday. Hey, I earned it!

For the record, my choice was Meon Valley Bitter, brewed by Bowman Ales in the rolling countryside of the South Downs.

Cheers!

Servings

At least 6 adult portions here.

Timings

5 – 6 hours in an electric slow cooker on low. or fan oven at 140C (No slow cooker? See Customise it below).

You Will Need

  • 3 – 4 tbsp of plain flour
  • a few twists of black pepper
  • around 1kg chuck steak
  • a good drizzle of oil
  • 1 clove garlic
  • 1 onion
  • 2 carrots
  • 1/4 of a celeriac
  • 500ml bottle of real ale
  • 500ml beef stock
  • 100ml tomato passata
  • 2 tsp Dijon mustard
  • 1 tbsp dark brown sugar
  • salt, pepper
  • 1 bay leaf
  • sprinkling of fresh herbs – I used rosemary and thyme.
  • 2 tbsp cornflour
  • 2 tbsp cold water

Method

  1. Turn the electric slow cooker on at the high setting, and leave to warm up. Sprinkle the flour into a shallow dish and season with the black pepper.
  2. Chop the steak into bite-sized chunks. Roll the chunks in the flour and pepper mix until they are coated all over.
  3. Warm some oil in a large frying pan on the hob. Transfer the chunks of steak over and sizzle until the outsides are sealed. Place in the slow cooker bowl.
  4. Top up the oil in the frying pan if necessary, then crush in the garlic. Roughly chop the onion, carrots and celeriac into chunks a similar size to the steak, and add to the frying pan. Turn over a few times with a spatula to get all the veg warmed through and just beginning to sear at the edges. Transfer to the slow cooker bowl.
  5. Next, add the passata, mustard and sugar to the frying pan. Pour in the ale and stir to mix. Turn up the heat and, as it starts to bubble, transfer to the slow cooker bowl.
  6. Finally, pour the beef stock into the frying pan and bring to the boil, before tipping it into the slow cooker bowl.
  7. Place the bay leaf in the slow cooker bowl. Tear or sprinkle in the herbs, and give it all a good churn with the spatula.
  8. After about 40 mins, turn down to the medium setting and leave to bubble away quietly for 5 – 6 hours.
  9. After that cooking time, make up a roux by mixing the cornflour and water until smooth, then pour into the hotpot. Stir in and watch as the sauce thickens. Repeat this stage a few more times if you like, till the hotpot gravy reaches your preferred consistency. You will then be ready to serve.
  10. I served this with some roasted charlotte potatoes, as shown in my main photo at the top of the post.

Customise It!

Don’t worry if you do not have an electric slow cooker – just replace it with a lidded casserole dish. Start it off at 180C in a fan oven for 40 mins, then turn down to 140C for 5 – 6 hours.

I used celeriac, but you could just as easily use parsnip and a few sticks of celery, roughly chopped. The rosemary and thyme were the fresh herbs I had to hand, but you could replace these with mixed dried herbs.

The choice of beer is a matter of personal taste. My Meon Valley Ale is a locally brewed best bitter, but you can use any other real ale. Make sure it is brown or ruby though, to help provide the taste and the colour – a lager just won’t work as well.

Here’s a classic punk album I’ve been listening to again this week, featuring the inimitable voice of Poly Styrene. I could have chosen many tracks from their debut album, but have settled on this: X-ray Spex with Let’s Submerge.

Categories
Bakes Recipes

Spiced Plum & Almond Bakewells

It’s Valentine’s Day, and here’s a sweet treat you’ll love.

Recently we received a delicious present from a family friend – a jar of her home made Spiced Plum jam. Rich with soft plums in a silky, sweet coating and laced with the delicate influence of star anise, it deserved some special treatment.

I liked the idea of pairing it with almond, so have used it here as the jammy foundation for these bakewell slices. Never mind if you don’t have any spiced plum – ordinary plum or raspberry jam will do a perfectly fine job. Try to use home made though, as it gaves the cake that extra personal touch!

Servings

This made 16 bakewell slices.

Timings

30 mins to prepare, 10 mins to blind bake the pastry base at 180C, and 40 mins to bake the whole traybake at 160C (fan oven).

You Will Need:

For the Pastry Base

  • 125g plain flour
  • 100g plain wholemeal flour
  • pinch of salt
  • 100g butter or baking spread
  • a few drops of cold tap water

For the Sponge Filling

  • 150ml veg oil
  • 100g ground almonds
  • 100g self-raising flour
  • 1tsp baking powder
  • 160g caster sugar
  • 1tsp almond extract
  • 4 eggs
  • 25g flaked almonds
  • 5 – 6tbsp fruit jam

Method

  1. Grease a traybake tin – the one I used is 20cm square – and line with baking paper.
  2. Sieve the plain flours and salt into a food processor with blade fitted. Chop the butter/spread into cubes and add in. Pulse a few times until it resembles fine breadcrumbs. Add in a few drops of water and blitz. Repeat until the ingredients are fully combined and you have a ball of pastry dough whirling around inside the processor bowl.
  3. Roll out the pastry dough on a floured surface until it is roughly the size of the tin, including the sides. Carefully transfer to the tin and gently press down against the bottom and sides. Trim the edges as necessary with a knife to make a neat edge. Place the tin and pastry in the fridge and turn on a fan oven to 180C.
  4. While the pastry is chilling, and the oven warming up, make the sponge filling. Sieve the self-raising flour into a baking bowl. Add in the oil, baking powder, sugar, ground almonds, eggs and almond extract. Whisk with an electric mixer till combined into a smooth batter.
  5. When the oven is up to temp, remove the pastry and tin from the fridge. Line with a large, crumpled piece of baking paper and fill with ceramic baking beans. Place in the oven for 10 mins.
  6. After 10 mins, remove the tin and pastry from the oven, and turn the heat down to 160C. Remove the baking paper and beans, and spoon in the jam, spreading it evenly over the pastry base and into all 4 corners.
  7. Pour the sponge batter on top of the jam and smooth out to make even. Sprinkle the flaked almonds evenly all over the top, and place in the oven for 35 – 40 mins.
  8. Remove from the oven and check it is fully baked – a skewer inserted in the centre should come out with no wet batter showing. Leave aside to cool in the tin.
  9. Carefully transfer to a board and chop into slices. These will keep for 2 – 3 days, though they will all be snaffled up without delay, I assure you.

Customise It!

In addition to using your favourite fruit jam, you can feel free to use ready made or ready rolled pastry if you wish.

For Valentine’s Day I have chosen a track for the ADK Playlist written by that old punk romantic, Pete Shelley. This blog has a special relationship with his band, of course, taking its name from the title of their first album, the seminal Another Music in a Different Kitchen. This track is actually from their third album, but I’ve been playing it recently while making these bakewells, and realising how good it sounds. So here they are: Buzzcocks with You Say You Don’t Love Me.

Categories
Mains Recipes

Vietnamese Rice Soldiers

I first came across Vietnamese Rice Soldiers on my travels to Australia, where there is a varied range of Asian cuisine and the quality is high.

Initially I thought they were uncooked sausages when I saw them in a deli takeaway. I soon learned that in fact they contain a mix of finely chopped protein, veg, herbs or spices, with rice or noodles, all wrapped up in a piece of transparent, edible rice paper. They are eaten cold as finger food, with a sauce for dipping, and usually accompanied by a stir fry side or noodles.

I sampled them in a restaurant in Little Vietnam, the name given locally to Victoria Street in Melbourne, and immediately became a fan! I brought home a pack of rice papers and am now able to make my own at home. Here is a photo of my latest batch:

A pack of rice papers is essential if you want to give these a try. I bought mine (below) in Aussie supermarket chain, Coles. Availability will depend on where you are in the world, but in the UK I have seen some smaller packs in M&S. The best bet may be a specialist Asian food store or online.

They are made from simply flour, salt and water, requiring just some fresh, lukewarm water to rehydrate and make them soft and flexible.

Servings

This made 8 soldiers. At 2 per serving, that makes 4 adult portions.

Timings

30 mins to chop and prepare the filling. Rolling up takes seconds. The soldiers can be made up in advance and kept in the fridge for a day or two.

You Will Need:

  • 8 circular rice papers
  • a shallow dish filled half with just boiled water, and half with water cold from the tap (so that overall the water is lukewarm, around 50C)

    For the filling:
  • 120g boiled rice, cooled
  • 1 marinaded chicken breast, cooled
  • 1 carrot
  • around 10cm length of cucumber
  • 2 – 3 scallions/spring onions
  • half a red pepper
  • small bunch of coriander/cilantro

    For the dipping sauce
  • 2 tbsp chilli paste
  • 1 tbsp each of soya sauce, rice vinegar, honey and orange juice
  • a good squidge of tomato passata.

Method

  1. Chop the carrot and cucumber into tiny little batons. Chop the other filling ingredients into small pieces and lay everything out on a board.
  2. Take one of the rice papers and submerge it in the lukewarm water. It will begin to soften and take on a slightly, sticky, stretchy feel. Lay it down on a chopping board and put a line of rice across the middle.
  3. Lay a line of chicken pieces on top of the rice, then follow with the carrot, cucumber, scallions, coriander and pepper. Use a little judgment here – you want the soldier to be well-filled but not overstacked.
  4. Lift the flap of the rice paper nearest you and fold over the filling. Tuck in both sides, then roll the whole soldier forward until you have a sealed parcel. Check out my photos below, showing the rolling up in action! Set aside on a tray.
  5. Carry on until all the soldiers are made up.
  6. Put all the dipping sauce ingredients in a clean, screw top jar with lid on. Give it a good shake to combine, then pour into a serving bowl. The soldiers can be dipped into the sauce, or alternatively, once you’ve bitten off the top, spoon it on and let it drizzle down to mingle with the filling. Yum!

Customise It!

Vary the protein to include small pieces of fish, or use chopped cashews if you want to go vegan. A sprinkle of sesame seeds would be an excellent idea. Swap in fine, vermicelli noodles or bean shoots for the rice. Finely chopped root ginger, corn, celery are also options. As always on A Different Kitchen, use your imagination and go with the ingredients you like.

I served these with a side of stir fried bean shoots, pak choi, root ginger, garlic, red onion, carrot and mushroom topped with a sprinkling of sesame seeds (as shown in my main photo at the top of the post). For the stir fry sauce I simply made up more of the dipping sauce and poured that in. Hey – keep things simple!

It’s Superbowl weekend once more, and I am looking forward to staying up late this Sunday to watch the game. I can’t see any other outcome than the Kansas City Chiefs winning again, as they seem to be invincible when it comes to play-off season. Apologies to any Philly Eagles fans, but who knows, maybe you will surprise me?

Here’s a piece of classic Americana – Tom Petty with Running Down a Dream. Enjoy the Superbowl, everybody.

Categories
Mains Recipes

Gochujang Lentil Roast

This week, my continuing search for comforting winter dinners has brought me to the Korean aisle in my local supermarket, to pick up a jar of Gochujang paste. I have used it before in a few recipes here on A Different Kitchen (Korean Pulled Pork Sandwich, Cauli Roast, Salmon Noodles) and am a real fan of its sweet and smoky taste.

Gochujang is a spicy condiment made from red chilli peppers and fermented soya beans, and is definitely worth a try if you haven’t come across it before. Find it in the Asian section of a reasonable-sized supermarket or in a specialist deli.

In this dish its magical spicy warmth is the base for a hearty lentil dahl-like stew with char-roasted winter veg.

Servings

4 adult portions.

Timings

30 mins to make.

You Will Need

  • a large roasting tray’s worth of chopped root veg – I used carrot, parsnip and sweet potato
  • 1 red pepper
  • oil
  • 1 clove garlic
  • 1 medium red chilli
  • 1 tbsp cumin seeds
  • 2 tbsp gochujang paste
  • 1 red onion
  • 3 celery sticks
  • 500g carton tomato passata
  • 100g red lentils

Method

  1. Switch on a fan oven to 180C.
  2. Chop the root veg and red pepper into chunks and spread out in the roasting pan. Drizzle with oil and place in the oven when it’s up to temp. Leave for 30 mins.
  3. Crush the garlic and place in a wok with a drizzle of oil, over a medium heat. Finely chop the chilli and add to the wok with the cumin seeds. Give it all a gentle stir and leave to sizzle for a few moments.
  4. Add the onion and celery, chopped, and stir again, and add in the gochujang paste. Stir once more so the veg is coated in the lovely smokey red paste.
  5. Tip in the passata. Fill the empty carton with tap water and add this also, then sprinkle in the lentils. Bring to the boil, then turn down to a simmer and leave to reduce and thicken.
  6. When the roasting veg have had their 30 mins, remove the tray from the oven and scrape them into the wok. The veg should be softened and a little charred at the edges. Stir so all the veg is coated, then serve. I served mine with steamed fresh kale, as shown in my photo at the top of the post.

Customise It!

Feel free to swap in whatever roasting veg you have to hand – swede, potato, celeriac can all be contenders, so can mushroom or aubergine.

Dance classic season continues here on A Different Kitchen. Next up is the legendary Teddy Pendergrass, in the form of Harold Melvin & The Blue Notes, with Don’t Leave Me This Way.

Categories
Mains Recipes

Mushroom & Bean Stroganoff

Crisp cold air, weak rays of sun on a walk along an empty beach, NFL play-offs, storms that have their own names, and Chris and Michaela in padded jackets outside a yurt on BBC’s Winter Watch – all the signs that we really are in the far depths of January.

It can only mean one thing in the ADK Kitchen – slow cooker season!

The electric slow cooker is a wonderful invention – chuck in a bunch of seasonal veg with some hearty stock, fresh herbs, a large glass of wine, and leave it to bubble away for a few hours in the corner of the kitchen, unassumedly radiating warmth and a delectable aroma that leaves everyone looking forward to dinner time.

Here’s a new addition to the ADK slow cooker recipe collection – a vegetarian hotpot rich in succulent mushrooms that take on the flavours of a creamy white wine and Dijon mustard sauce, with freshly torn thyme sprigs and the pleasing texture of soft cannellini beans. A true culinary comfort blanket!

No slow cooker? No problem – just use a casserole dish in a fan oven at 140C.

Servings

4 adult portions.

Timings

20 mins to prep – 3 hrs in the slow cooker.

You Will Need

  • 30g dried porcini mushrooms
  • 200ml boiling water
  • a drizzle of oil
  • 1 garlic clove
  • 1 onion
  • 3 celery sticks
  • 1 red pepper
  • 250g chestnut mushrooms
  • 3 tbsp plain flour
  • 150ml veg stock
  • 200ml dry white wine
  • 1 tsp cayenne pepper
  • 2 tbsp Dijon mustard
  • 1 bunch of fresh thyme
  • 1 400g can of cannellini beans

Method

  1. Switch on an electric slow cooker to the high setting.
  2. Cover the porcini mushrooms in the boiling water and let them sit in a bowl for around 20 mins.
  3. Crush the garlic and chop the onion into some hot oil in a wok. Then add in the chopped celery and pepper, and stir.
  4. After a few moments, add in the chestnut mushrooms, halved. Give it all a good stir and let it simmer for a few minutes.
  5. Turn the heat down and sprinkle over the flour. Turn the veg over with a spatula until all of it is coated in the flour, then pour in the stock and wine. Turn the heat up again and stir so that a thickish, creamy sauce begins to form around the veg.
  6. Add in the Dijon mustard and cayenne pepper. Twist in some black pepper and sea salt. Tear in a good few sprigs of the fresh thyme. Tip in the porcini mushrooms and the water they’ve been soaking in.
  7. Add the cannellini beans and mix through, then transfer to the bowl of the slow cooker. Turn down to the low setting and let it simmer for 3 hours, stirring every so often.
  8. Spoon on to warmed plates, and tear over some more sprigs of the fresh thyme. Serve with boiled brown rice.

Customise It!

I’ve used two different kinds of mushrooms – porcini and chestnut – but you could add in a third, maybe swapping in some chunked portobello in place of some of the chestnuts. I was tempted to change the white wine to a full-bodied, warming red, and may do this the next time I make this, as I reckon it will pair well with the beefy-like stock water that comes from the soaked porcinis.

Dance classics season continues in the ADK Kitchen – hey, it helps keep us warm this time of year! Here’s a great opportunity to hone those moves – it’s Gloria Gaynor with Never Can Say Goodbye.

Categories
Mains Recipes

Air Fryer Veg Burritos

The air fryer is the 21st century device that, seemingly, no kitchen should be without. They’ve become extremely popular in a relatively short space of time, and now come in all shapes and sizes, at a generally affordable cost.

The fact it is instantly ready to cook, with no warming up time as with a conventional oven, makes it perfect for prepping quick and easy meals. They are energy-efficient, keeping cooking costs down, are great for small portions, and can deliver health benefits through using little or no oil or fat.

My experience, rightly or wrongly, has been that the most common use of an air fryer is to heat up something ready prepared from the supermarket chilled cabinet. Nothing wrong with that, but I wondered if I could use it to make something quick, tasty and healthy, totally from fresh source ingredients.

So let me introduce you to my Air Fryer Veg Burritos.

Servings

This makes 2 burritos.

Timings

12 minutes to air fry the filling ingredients, and another 12 mins to air fry the burritos, all at 180C.

You Will Need:

  • olive oil
  • 2 tsp smoked paprika
  • a few twists of sea salt
  • 1 sweet potato
  • 1 red pepper
  • 1 red onion
  • a bunch of fresh coriander/cilantro
  • 9 – 10 black olives
  • around 100g feta cheese
  • half a 400g tin of kidney beans
  • half a 400g tin of chopped tomatoes
  • 2 flour tortillas

Method

  1. Chop the sweet potato, red onion and red pepper into chunks, and place in a small plastic food bag. Add a drizzle of olive oil, the smoked paprika and sea salt. Massage the food around in the bag so that all the veg is evenly coated. Tip from the bag, and into the drum of the air fryer at 180C for 12 mins.
  2. While the veg is air frying, chop the feta into chunks, and the black olives in half. Mash the kidney beans and tomatoes together to a thick-ish consistency.
  3. Tip the air fried veg on to a plate to cool slightly.
  4. Lay out the 2 flour tortillas on a board and place the filling in a line down the middle (see photo above). Start with the kidney bean/tomato mash, then add chunks of sweet potato, red pepper, onion, feta and olive. Use scissors to snip in some coriander leaves. Be generous, but don’t overfill, otherwise the burrito may unfurl while cooking.
  5. Wrap up each tortilla, making sure to tuck in the ends to form a parcel, and brush all over with oil. Brushing the ends helps seal them and avoid the filling escaping.
  6. Place in the drum of the air fryer (see my photo below) and cook for 10 – 12 mins at 180C. The tortilla will take on a brown and crispy shell, as shown in my main photo at the top of the post.
  7. Remove, slice each into 2, and serve. I served this with a pot of soured cream and a bowl of Chunky Guacamole.

Customise It!

There is major scope for varying the filling to use up whatever leftovers you may have in the fridge. Pots of chilli, pasta sauce or a lining of a good quality chilli jam can take the place of the kidney beans/tomatoes mash-up.

Mushrooms would be amazing – just air fry them whole at stage 1 above, and then cut into chunks to go in the filling. Skip the feta and add a line of grated cheddar, or maybe some mozzarella. Swap in Cajun seasoning for the smoked paprika. Have fun and use your imagination!

The dance classics theme for the ADK Playlist continues into 2025. Next to step up to the dancefloor are Deee-Lite with Groove is in the Heart.

Categories
Desserts Recipes

Golden Crème Brûlée

I love making Crème Brûlée – it gives me an excuse to fire up my chef’s mini blowtorch, which is always good fun! That’s it in action in my photo above.

It helps that it is also a magnificent dessert – silky vanilla custard nestled beneath a solid layer of brittle caramel shell, that splinters into shards when cracked with the side of a spoon. The soft underside, together with the crunchy topping, is simply sensational.

No blowtorch? No problem – just place the desserts under a hot grill to caramelise, keeping an eye on them so they don’t burn! You will need 4 individual ramekin dishes and a high-sided roasting dish to act as a bain-marie. Got that? OK, here we go…

Servings

This will make 4 individual desserts.

Timings

20 mins to prepare. 35 mins to bake. 5 – 10 mins for that all-important blowtorching before serving.

You Will Need:

  • some butter for greasing
  • 400 ml double cream
  • 1 tsp vanilla extract
  • 80g caster sugar (plus 4 tsp extra for the caramel topping)
  • the yolks of 4 large eggs

Method

  1. Preheat a fan oven to 140C.
  2. Prepare your bain-marie. That may sound posh, but really it is just a large roasting dish with deep sides, into which you will place 4 individual ramekin dishes. Grease the insides of each ramekin dish with butter.
  3. Tip the double cream into a saucepan and add the vanilla. Gradually bring it to a boil, stirring gently, then turn it down to a simmer for about 5 mins.
  4. Set out 2 bowls and crack the eggs carefully, catching the whites in one bowl and the yolks in the other. Set the whites aside to be used another time – we are working with just the yolks for making Crème Brûlée.
  5. Sprinkle the sugar into the bowl with the yolks, and whisk together till gold and creamy.
  6. Bring the double cream back to the boil stirring once again. When it just reaches the boil, pour it over the egg and sugar mixture, and whisk again to combine.
  7. Place a sieve over a jug, and pour the mixture through. This will take out any lumps that may have formed while heating the cream.
  8. Fill a kettle with water and boil.
  9. Take the jug of strained mixture and pour it equally between the 4 ramekins. Then pour boiling water into the bain-marie (roasting dish), so that it comes about halfway up the outside of the ramekin dishes.
  10. Cover the bain-marie with tin foil and place in the oven.
  11. Check after about 30 – 35 mins. The desserts are cooked when the custard has set. Note that the surfaces will not yet be golden caramel – that stage is yet to come!
  12. Using oven gloves, lift the ramekins from the bain-marie and set aside on a tray to cool. Carefully tip the hot water away.
  13. Once the ramekins have reached room temperature, place in the fridge to chill until you are ready to serve.
  14. Now the fun begins. Scatter a teaspoon full of caster sugar over the top of each ramekin. Fire up that blowtorch and heat so that they are caramelised and golden. Alternatively, place under a hot grill.
  15. Place each back in the fridge for a few minutes. The caramelised topping will set to a crisp.

Customise It!

I made a coffee version of this at New Year, dissolving 4 teaspoons of instant coffee granules in the double cream as it warms. It’s a really good variation, giving a good coffee taste and colour (see below). You can check out the reel of it (Café Crème Brûlée) on my Instagram site if you wish @differentkitch.

We’re sticking with the dance theme for the ADK Playlist this January. It’s a brand new year and, hey, I just know that something good is going to happen. Cue Utah Saints with the Kate Bush-inspired Something Good.

Categories
Bakes Recipes

Spiced Cranberry Muffins

This year’s home baked Christmas Cake has gone down well in the ADK household – so much so that we are now down to the final few crumbs on the serving plate. How to fill the gap, I wondered, and maybe also use up some of the tasty ingredients left over from making it?

We still had some currants, golden sultanas, glace cherries and mixed candied peel in the cupboard. There was also the last of the juicy red cranberries, left over from making the sauce I’d been merrily ladling on to my roast turkey.

Too good to waste, of course, so they’ve all ended up in these New Year muffins. I’ve incorporated cinnamon and nutmeg to add to that seasonal feel of deep midwinter, so cosy up and enjoy.

Servings

Makes 12 muffins.

Timings

15 mins to make, 20 mins to bake in a fan oven at 160C.

You Will Need

  • 280g plain flour
  • 3 tsp baking powder
  • half tsp salt
  • 1 tsp ground cinnamon
  • 1 tsp grated nutmeg
  • 120g caster sugar
  • 1 egg
  • 110g fresh cranberries, coarsely chopped in a food processor
  • 20g currants
  • 20g sultanas
  • 20g glace cherries
  • 20g chopped mixed candied peel
  • 240ml milk
  • 90ml veg oil

Method

  1. Prepare a muffin tin or mould. Switch on a fan oven to 160C.
  2. Sieve the flour, baking powder and salt into a bowl. Stir in the cinnamon, nutmeg and sugar.
  3. In a separate bowl, combine the egg, chopped cranberries, milk and oil. Stir in the currants, sultanas, glace cherries and candied peel.
  4. Pour the wet ingredients into the dry, and stir so that no dry ingredients are visible.
  5. Spoon the mixture into the tin/mould, and bake for 20 mins.
  6. Remove to a wire rack to cool.

Customise It!

Basically, the rule here is that if it might have gone in your Christmas Cake, and is sitting left over in the cupboard, then it’s good enough for the muffins! Swap in raisins for some of the currants or sultanas, for example. Chop up some nuts and add them in. I didn’t go so far as to feed in a teaspoon of brandy but, hey, why not try it? If mixed spice is all you have, then use it in place of the cinnamon and nutmeg.

First musical selection of 2025 is from Sophie Ellis-Bextor. I enjoyed her New Year’s Eve Disco shown on TV here. She performed Groovejet and Murder on the Dancefloor, both of which I have always rated, and also this one, which I don’t think I’d heard before. It is a paean to the classic Sheila B. Devotion track, Spacer, so can’t really go wrong. Here’s Sophie with Crying at the Discotheque.