Categories
Mains Recipes

Mushroom & Bean Stroganoff

Crisp cold air, weak rays of sun on a walk along an empty beach, NFL play-offs, storms that have their own names, and Chris and Michaela in padded jackets outside a yurt on BBC’s Winter Watch – all the signs that we really are in the far depths of January.

It can only mean one thing in the ADK Kitchen – slow cooker season!

The electric slow cooker is a wonderful invention – chuck in a bunch of seasonal veg with some hearty stock, fresh herbs, a large glass of wine, and leave it to bubble away for a few hours in the corner of the kitchen, unassumedly radiating warmth and a delectable aroma that leaves everyone looking forward to dinner time.

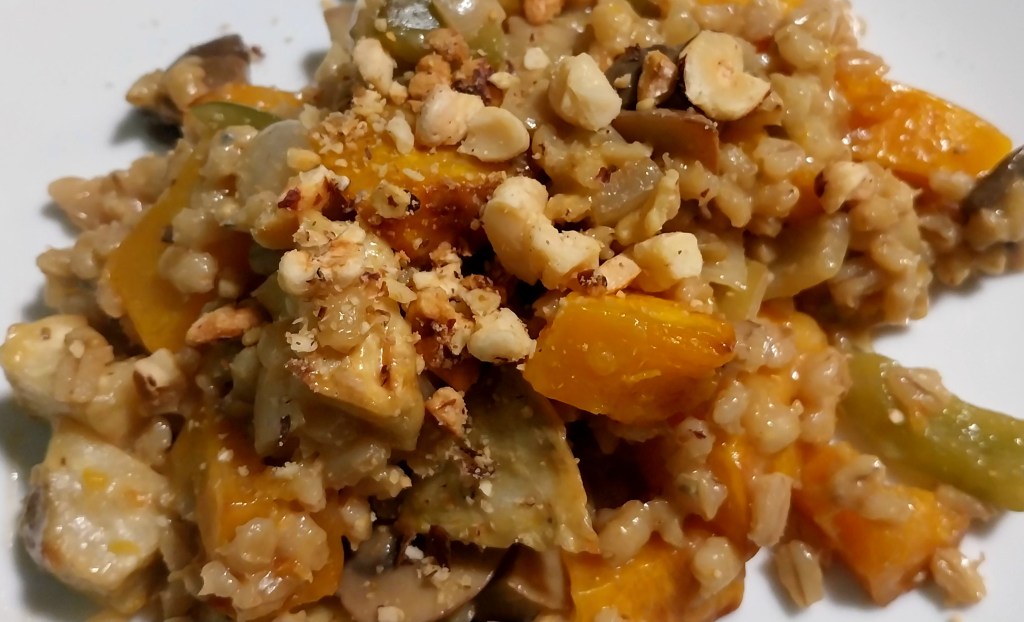
Here’s a new addition to the ADK slow cooker recipe collection – a vegetarian hotpot rich in succulent mushrooms that take on the flavours of a creamy white wine and Dijon mustard sauce, with freshly torn thyme sprigs and the pleasing texture of soft cannellini beans. A true culinary comfort blanket!

No slow cooker? No problem – just use a casserole dish in a fan oven at 140C.

Servings

4 adult portions.

Timings

20 mins to prep – 3 hrs in the slow cooker.

You Will Need

  • 30g dried porcini mushrooms
  • 200ml boiling water
  • a drizzle of oil
  • 1 garlic clove
  • 1 onion
  • 3 celery sticks
  • 1 red pepper
  • 250g chestnut mushrooms
  • 3 tbsp plain flour
  • 150ml veg stock
  • 200ml dry white wine
  • 1 tsp cayenne pepper
  • 2 tbsp Dijon mustard
  • 1 bunch of fresh thyme
  • 1 400g can of cannellini beans

Method

  1. Switch on an electric slow cooker to the high setting.
  2. Cover the porcini mushrooms in the boiling water and let them sit in a bowl for around 20 mins.
  3. Crush the garlic and chop the onion into some hot oil in a wok. Then add in the chopped celery and pepper, and stir.
  4. After a few moments, add in the chestnut mushrooms, halved. Give it all a good stir and let it simmer for a few minutes.
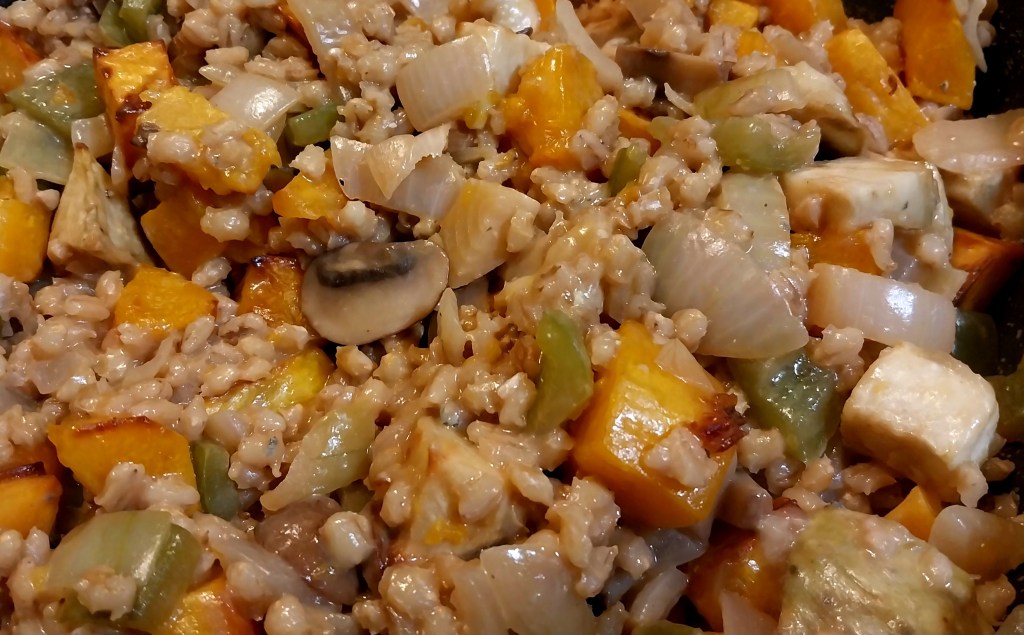
  5. Turn the heat down and sprinkle over the flour. Turn the veg over with a spatula until all of it is coated in the flour, then pour in the stock and wine. Turn the heat up again and stir so that a thickish, creamy sauce begins to form around the veg.
  6. Add in the Dijon mustard and cayenne pepper. Twist in some black pepper and sea salt. Tear in a good few sprigs of the fresh thyme. Tip in the porcini mushrooms and the water they’ve been soaking in.
  7. Add the cannellini beans and mix through, then transfer to the bowl of the slow cooker. Turn down to the low setting and let it simmer for 3 hours, stirring every so often.
  8. Spoon on to warmed plates, and tear over some more sprigs of the fresh thyme. Serve with boiled brown rice.

Customise It!

I’ve used two different kinds of mushrooms – porcini and chestnut – but you could add in a third, maybe swapping in some chunked portobello in place of some of the chestnuts. I was tempted to change the white wine to a full-bodied, warming red, and may do this the next time I make this, as I reckon it will pair well with the beefy-like stock water that comes from the soaked porcinis.

Dance classics season continues in the ADK Kitchen – hey, it helps keep us warm this time of year! Here’s a great opportunity to hone those moves – it’s Gloria Gaynor with Never Can Say Goodbye.

Categories
Mains Recipes

Air Fryer Veg Burritos

The air fryer is the 21st century device that, seemingly, no kitchen should be without. They’ve become extremely popular in a relatively short space of time, and now come in all shapes and sizes, at a generally affordable cost.

The fact it is instantly ready to cook, with no warming up time as with a conventional oven, makes it perfect for prepping quick and easy meals. They are energy-efficient, keeping cooking costs down, are great for small portions, and can deliver health benefits through using little or no oil or fat.

My experience, rightly or wrongly, has been that the most common use of an air fryer is to heat up something ready prepared from the supermarket chilled cabinet. Nothing wrong with that, but I wondered if I could use it to make something quick, tasty and healthy, totally from fresh source ingredients.

So let me introduce you to my Air Fryer Veg Burritos.

Servings

This makes 2 burritos.

Timings

12 minutes to air fry the filling ingredients, and another 12 mins to air fry the burritos, all at 180C.

You Will Need:

  • olive oil
  • 2 tsp smoked paprika
  • a few twists of sea salt
  • 1 sweet potato
  • 1 red pepper
  • 1 red onion
  • a bunch of fresh coriander/cilantro
  • 9 – 10 black olives
  • around 100g feta cheese
  • half a 400g tin of kidney beans
  • half a 400g tin of chopped tomatoes
  • 2 flour tortillas

Method

  1. Chop the sweet potato, red onion and red pepper into chunks, and place in a small plastic food bag. Add a drizzle of olive oil, the smoked paprika and sea salt. Massage the food around in the bag so that all the veg is evenly coated. Tip from the bag, and into the drum of the air fryer at 180C for 12 mins.
  2. While the veg is air frying, chop the feta into chunks, and the black olives in half. Mash the kidney beans and tomatoes together to a thick-ish consistency.
  3. Tip the air fried veg on to a plate to cool slightly.
  4. Lay out the 2 flour tortillas on a board and place the filling in a line down the middle (see photo above). Start with the kidney bean/tomato mash, then add chunks of sweet potato, red pepper, onion, feta and olive. Use scissors to snip in some coriander leaves. Be generous, but don’t overfill, otherwise the burrito may unfurl while cooking.
  5. Wrap up each tortilla, making sure to tuck in the ends to form a parcel, and brush all over with oil. Brushing the ends helps seal them and avoid the filling escaping.
  6. Place in the drum of the air fryer (see my photo below) and cook for 10 – 12 mins at 180C. The tortilla will take on a brown and crispy shell, as shown in my main photo at the top of the post.
  7. Remove, slice each into 2, and serve. I served this with a pot of soured cream and a bowl of Chunky Guacamole.

Customise It!

There is major scope for varying the filling to use up whatever leftovers you may have in the fridge. Pots of chilli, pasta sauce or a lining of a good quality chilli jam can take the place of the kidney beans/tomatoes mash-up.

Mushrooms would be amazing – just air fry them whole at stage 1 above, and then cut into chunks to go in the filling. Skip the feta and add a line of grated cheddar, or maybe some mozzarella. Swap in Cajun seasoning for the smoked paprika. Have fun and use your imagination!

The dance classics theme for the ADK Playlist continues into 2025. Next to step up to the dancefloor are Deee-Lite with Groove is in the Heart.

Categories
Desserts Recipes

Golden Crème Brûlée

I love making Crème Brûlée – it gives me an excuse to fire up my chef’s mini blowtorch, which is always good fun! That’s it in action in my photo above.

It helps that it is also a magnificent dessert – silky vanilla custard nestled beneath a solid layer of brittle caramel shell, that splinters into shards when cracked with the side of a spoon. The soft underside, together with the crunchy topping, is simply sensational.

No blowtorch? No problem – just place the desserts under a hot grill to caramelise, keeping an eye on them so they don’t burn! You will need 4 individual ramekin dishes and a high-sided roasting dish to act as a bain-marie. Got that? OK, here we go…

Servings

This will make 4 individual desserts.

Timings

20 mins to prepare. 35 mins to bake. 5 – 10 mins for that all-important blowtorching before serving.

You Will Need:

  • some butter for greasing
  • 400 ml double cream
  • 1 tsp vanilla extract
  • 80g caster sugar (plus 4 tsp extra for the caramel topping)
  • the yolks of 4 large eggs

Method

  1. Preheat a fan oven to 140C.
  2. Prepare your bain-marie. That may sound posh, but really it is just a large roasting dish with deep sides, into which you will place 4 individual ramekin dishes. Grease the insides of each ramekin dish with butter.
  3. Tip the double cream into a saucepan and add the vanilla. Gradually bring it to a boil, stirring gently, then turn it down to a simmer for about 5 mins.
  4. Set out 2 bowls and crack the eggs carefully, catching the whites in one bowl and the yolks in the other. Set the whites aside to be used another time – we are working with just the yolks for making Crème Brûlée.
  5. Sprinkle the sugar into the bowl with the yolks, and whisk together till gold and creamy.
  6. Bring the double cream back to the boil stirring once again. When it just reaches the boil, pour it over the egg and sugar mixture, and whisk again to combine.
  7. Place a sieve over a jug, and pour the mixture through. This will take out any lumps that may have formed while heating the cream.
  8. Fill a kettle with water and boil.
  9. Take the jug of strained mixture and pour it equally between the 4 ramekins. Then pour boiling water into the bain-marie (roasting dish), so that it comes about halfway up the outside of the ramekin dishes.
  10. Cover the bain-marie with tin foil and place in the oven.
  11. Check after about 30 – 35 mins. The desserts are cooked when the custard has set. Note that the surfaces will not yet be golden caramel – that stage is yet to come!
  12. Using oven gloves, lift the ramekins from the bain-marie and set aside on a tray to cool. Carefully tip the hot water away.
  13. Once the ramekins have reached room temperature, place in the fridge to chill until you are ready to serve.
  14. Now the fun begins. Scatter a teaspoon full of caster sugar over the top of each ramekin. Fire up that blowtorch and heat so that they are caramelised and golden. Alternatively, place under a hot grill.
  15. Place each back in the fridge for a few minutes. The caramelised topping will set to a crisp.

Customise It!

I made a coffee version of this at New Year, dissolving 4 teaspoons of instant coffee granules in the double cream as it warms. It’s a really good variation, giving a good coffee taste and colour (see below). You can check out the reel of it (Café Crème Brûlée) on my Instagram site if you wish @differentkitch.

We’re sticking with the dance theme for the ADK Playlist this January. It’s a brand new year and, hey, I just know that something good is going to happen. Cue Utah Saints with the Kate Bush-inspired Something Good.

Categories
Bakes Recipes

Spiced Cranberry Muffins

This year’s home baked Christmas Cake has gone down well in the ADK household – so much so that we are now down to the final few crumbs on the serving plate. How to fill the gap, I wondered, and maybe also use up some of the tasty ingredients left over from making it?

We still had some currants, golden sultanas, glace cherries and mixed candied peel in the cupboard. There was also the last of the juicy red cranberries, left over from making the sauce I’d been merrily ladling on to my roast turkey.

Too good to waste, of course, so they’ve all ended up in these New Year muffins. I’ve incorporated cinnamon and nutmeg to add to that seasonal feel of deep midwinter, so cosy up and enjoy.

Servings

Makes 12 muffins.

Timings

15 mins to make, 20 mins to bake in a fan oven at 160C.

You Will Need

  • 280g plain flour
  • 3 tsp baking powder
  • half tsp salt
  • 1 tsp ground cinnamon
  • 1 tsp grated nutmeg
  • 120g caster sugar
  • 1 egg
  • 110g fresh cranberries, coarsely chopped in a food processor
  • 20g currants
  • 20g sultanas
  • 20g glace cherries
  • 20g chopped mixed candied peel
  • 240ml milk
  • 90ml veg oil

Method

  1. Prepare a muffin tin or mould. Switch on a fan oven to 160C.
  2. Sieve the flour, baking powder and salt into a bowl. Stir in the cinnamon, nutmeg and sugar.
  3. In a separate bowl, combine the egg, chopped cranberries, milk and oil. Stir in the currants, sultanas, glace cherries and candied peel.
  4. Pour the wet ingredients into the dry, and stir so that no dry ingredients are visible.
  5. Spoon the mixture into the tin/mould, and bake for 20 mins.
  6. Remove to a wire rack to cool.

Customise It!

Basically, the rule here is that if it might have gone in your Christmas Cake, and is sitting left over in the cupboard, then it’s good enough for the muffins! Swap in raisins for some of the currants or sultanas, for example. Chop up some nuts and add them in. I didn’t go so far as to feed in a teaspoon of brandy but, hey, why not try it? If mixed spice is all you have, then use it in place of the cinnamon and nutmeg.

First musical selection of 2025 is from Sophie Ellis-Bextor. I enjoyed her New Year’s Eve Disco shown on TV here. She performed Groovejet and Murder on the Dancefloor, both of which I have always rated, and also this one, which I don’t think I’d heard before. It is a paean to the classic Sheila B. Devotion track, Spacer, so can’t really go wrong. Here’s Sophie with Crying at the Discotheque.

Categories
Blog

Around the World in 80(ish) Plates

As 2024 draws to a close, I’ve been looking back at some of the many dishes enjoyed on my travels over the past 12 months. I’ve reached some far-flung destinations over that period, as well as some places closer to home, in a bid to savour some of the best food and drink the cuisines of the world have to offer. It’s a tough job, I know, but hey, someone has to do it 🙂 .

I’ll start with my main photo above, taken in Satay by the Bay in Singapore, where I visited in March. They served up a plate of chicken and beef skewers grilled over hot coals, along with a pot of peanutty satay sauce for dipping. Perfect fast food.

Kampong Gelam is the heartland of Singapore’s Malaysian community. The traditional Malay dish, Nasi Lemak (shown above), was excellent – a pandan leaf parcel is unwrapped to reveal steamed, soft and fluffy jasmine-scented and coconut-flavoured rice.

The breakfast shown above was a sight for sore eyes on arrival early one morning off a plane, very hungry, in Sydney, Australia : eggs benedict served with spinach and bacon on sourdough toast, with a balsamic drizzle.

I had wanted to try an Acai bowl for some time, and managed to do so at the Drip Bar in Melbourne, Australia. This purply-chocolate coloured acai berry smoothie is topped with fresh banana, crushed cacao, coconut, ground almonds, granola and a very generous (ahem) drizzle of peanut butter.

The Sunshine Coast in Queensland, Australia, saw my introduction to Asian Fusion – bringing together the sights and tastes from the culinary traditions of India, Thailand, Korea, Indonesia, China and Japan. Amongst a tasty and adventurous buffet, my fave was this Miso Caramel Eggplant shown above – chunks of roasted aubergine coated in a sticky sauce, topped with spliced snake beans, coriander and sesame.

The month of June saw a trip to France, where they do food rather well. One highlight of several is shown above – an Entree of cod and yuzu croquette, served with baby gem lettuce, and a sweetcorn and avocado salsa. I liked the Gallic flair with which the dish was presented, resembling artistic brush strokes of red pepper aioli and lemony yuzu.

In summertime in France, it is always a simple pleasure to enjoy an evening al fresco buffet with purchases from the local fromagerie and charcuterie (see above) – along with a bottle of the the local vin rouge, of course.

A July trip to Belfast provided the opportunity to visit St. George’s Market to sample the best of traditional Ulster food. A breakfast of toasted soda farl, here filled with egg, bacon, roasted cherry tomatoes and avocado, certainly satisfied the appetite.

The month of September was spent motorhoming around Cornwall in England’s south-west, sampling numerous pasties like the one shown below. This one is named Veggie Power, and has the traditional filling of steak and potato replaced by mushroom and butternut squash.

I found my visit to Cornwall’s Eden Project very inspiring, and an opportunity to learn more about sustainable food production. All the tea, coffee and chocolate now making its way into the ADK kitchen is certified Fair Trade. The dishes on the Eden menu are made from local ingredients, such as this griddled flatbread shown above, topped with white bean paste, leaves, marinated roasted vegetables, tomatoes, balsamic drizzle, herbs and toasted seeds.

Revisiting all of these meals has now made me hungry again, so I will leave it there! Thanks to everyone who has followed along, read, liked and/or commented in 2024. My travels, along with the home bakes and recipes, will be continuing into 2025 here, on Instagram and on X.

Happy New Year, everyone.

Categories
Mains Recipes

Roasted Winter Veg Curry

For this dish, which is suitable for both vegetarians and vegans, I’ve given a selection of seasonal squash and root veg a long, slow roast in the oven before coating it in a thick curry sauce. The roasting makes the veg soft, sweet and just a little caramelised around the edges.

We’ve just been experiencing our first few snow showers of the winter here, so all that deliciousness and comforting heat has turned out to be very timely!

Servings

4 adult portions.

Timings

1 hr to roast the winter veg, during which time the rest of the dish is prepared.

You Will Need:

  • 1/2 a butternut squash
  • 2 medium sweet potatoes
  • 2 medium parsnips
  • 3 – 4 medium carrots
  • Oil
  • 1 garlic clove
  • 3cm piece of root ginger
  • 1 onion
  • 2 tbsp curry powder
  • 2 celery sticks
  • 1/2 red pepper
  • 1/2 yellow pepper
  • 5 – 6 chestnut mushrooms
  • 1 400ml tin coconut milk
  • 1 400g tin chopped tomatoes
  • 4 – 5 leaves of cavalo nero
  • A handful of unsalted cashew nuts

Method

  1. Switch a fan oven on to 180C.
  2. Peel and roughly chop the squash, sweet potatoes, carrots and parsnips into chunks. Spread them out in a roasting dish and drizzle with oil. Place the dish in the hot oven for about an hour. Check on them every so often just to check they’re not burning, and give them a scatter with a spatula so they get evenly roasted.
  3. Meanwhile, crush the garlic and finely chop the ginger. Put both in a wok with some oil and heat. When the pan is sizzling, add in the onion, celery, mushrooms and peppers, all chopped. Sprinkle over the curry powder and toss with a spatula so all the veg is coated in a mix of the spices and oil.
  4. When the veg has softened, empty in the coconut milk and tomatoes. Give it all a good stir to mix and bring to a bubble, before turning down to a simmer. Let it slowly reduce to make a thick, spicy sauce.
  5. Shred the cavalo nero and wilt in for about 10 mins.
  6. When the tray of veg has finished roasting, take it from the oven and scrape all the lovely contents into the wok. Give it all a stir again, so that the veg chunks get coated in the thick curry sauce.
  7. Chuck in the cashews and mix, a few mins before serving. It should resemble my main photo at the top of the post.
  8. Serve up with rice on the side – see below.

Customise It!

Lots of scope here – substitute other root veg like potatoes or celeriac, or other types of squash, and vary the proportions between them if you wish, as long as you have 1 large roasting pan’s worth of it all.

Use your own favourite spice combo if you wish – I used the ready mixed blend I brought back from the Souq Waqif in Doha, which I really like. Why not chuck in a few nigella seeds? Play around and have fun!

No cavalo nero? Try other greens like spinach or chard.

Time to treat you to my most streamed song of 2024, as confirmed by Spotify Unwrapped, which landed this week. I first came across this indie band while on my travels to Australia earlier this year. They make a terrific sound and, I’m sure you’ll agree, this really is a very good track. Enjoy These New South Whales with Changes.

Categories
Mains Recipes

Nut Roast

Toasted on the outside and packed to the core with creamy, crunchy nuts, red lentils and softened veg. If you’re looking for a vegetarian mains to grace the centre of your table this winter, this delicious, homemade Nut Roast is hard to beat.

Servings

6 adult servings of 2 generous slices each.

Timings

30 mins to prepare and 50 mins to roast in a fan oven at 160C.

You Will Need:

  • 150g chopped mixed nuts
  • 1 onion
  • 2 celery sticks
  • 1/2 a red pepper
  • 1/2 a yellow pepper
  • 6 – 7 chestnut mushrooms
  • oil
  • 1 clove garlic
  • 75g red lentils
  • a good squelch of tomato ketchup
  • 300ml boiling water
  • 1 tbsp vegemite
  • 75g wholemeal breadcrumbs
  • 75g mature cheddar cheese, grated
  • sea salt and black pepper
  • 2 medium eggs

Method

  1. Switch a fan oven on to 160C. Grease a 1 litre loaf dish and line it with baking paper.
  2. Spread the nuts on a baking tray and place in the oven once its reached its temperature.
  3. While the nuts are roasting, place the onion, celery, pepper and mushrooms in a food processor with blade fitted. Blitz to small pieces.
  4. Heat some oil in a large frying pan and crush in the garlic. Add in the blitzed veg and stir. Leave to gently soften.
  5. Once the nuts have roasted for 10 mins, remove from the oven and roughly chop in a food processor with blade fitted. Scrape into a large bowl and set aside.
  6. Chuck the lentils into the frying pan with the veg. Dissolve the vegemite in the boiling water and pour into the pan with the ketchup. Bring to the boil, then reduce to a simmer for about 15mins. The liquid will reduce as the lentils soften.
  7. Add the breadcrumbs and grated cheddar to the nuts and mix in.
  8. Leave the pan of veg and lentils to cool slightly for 5 mins, then add to the bowl with the nuts, breadcrumbs and cheese. Twist in a little sea salt and black pepper to your taste. Crack in the eggs and mix thoroughly.
  9. Spoon the mixture into the prepared loaf dish and compact it down with the back of a spoon. Cover with foil and place in the oven for 30mins. Then remove the foil and leave it in the oven for another 20 mins.
  10. Remove and set aside for 10 – 15 mins before inverting onto a chopping board. The nut loaf should ease out of the upturned dish, and look something like my main photo at the top of the post.
  11. You can cut slices straight away, but it will become progressively easier to cut clean slices as it cools. Slices can be reheated if necessary by microwaving for 30 – 60 seconds.

Customise It!

Try adding in fresh herbs, or shreds of cavalo nero. Swap some or all of the cheddar for crumbled blue cheese.

Serve it with some green veg and a simple sauce made from a can of chopped tomatoes, garlic and chopped onion. If you’d prefer to save on effort, serving with condiments like ketchup or relish is fine.

Exciting musical news this week is that one of my favourite bands has been announced as headliner at next year’s Victorious Festival. I have already seen Queens of the Stone Age live 4 times and am very keen to make it 5. I’ll be hoping a surprise gift ticket may find its way to me under the Christmas Tree this year! I expect they will play this one: Queens of the Stone Age with Sick, Sick, Sick.

Categories
Mains Recipes

Beautiful Borlotti

This harvest of borlotti beans, fresh from the pod (shown in my photo above) has been a very welcome arrival recently in the ADK Kitchen. I always think they are one of the most beautiful foods in their natural uncooked form.

They’re not bad cooked, either. The beans do tend to lose that magical, mottled sheen, but more than make up for it in their creamy, smoky taste. They also provide generous amounts of protein and fibre.

For this dish (shown in my photo below), I have given them a starring role in a chilli suitable for vegetarians, vegans and, indeed, anyone who enjoys a bowl of rich, warm and creamy comfort food this time of year.

Servings

4 adult portions.

Timings

The beans soak overnight, and are then boiled/simmered for at least an hour. Once these stages are complete, the rest will take about 30 mins to cook.

You Will Need:

  • 120g uncooked borlotti beans
  • cold water
  • 1 onion
  • 1 garlic clove
  • 1 tsp chilli powder
  • 1 tsp cumin seeds
  • oil
  • 1/2 a red pepper
  • 1/2 a green pepper
  • 2 celery sticks
  • 1 carrot
  • 6 -7 chestnut mushrooms
  • 1 400g carton of tomato passata

Method

  1. Wash the beans, then place in a bowl with enough cold water to cover them. Leave for 24 – 36 hours.
  2. Drain and rinse the beans under cold running water. You should find that they have doubled their weight through the water they have absorbed. Place the beans in a saucepan with enough fresh water to cover them, and bring to the boil. Reduce and simmer for 50 mins.
  3. Drain the cooked beans and wash again under cold running water. Set aside.
  4. Heat some oil in a wok, and add in the garlic, chilli and cumin. When it sizzles, add in the onion, peppers and celery, chopped into chunks.
  5. About 5 mins later, add in the mushrooms and carrot, also chopped into bitesize chunks.
  6. Stir with a spatula until all the veg is nicely softened, then add in the passata and the cooked borlottis. Top up with about half an empty carton’s worth of fresh water, and turn it up to boil.
  7. Bring to a simmer for about 15 mins, by which time the sauce will have reduced to provide a thick, creamy coating for the beans.
  8. Serve up with a portion of brown rice.

Customise It!

Replace the onion with chopped leeks, and add in some roasted squash if you wish. Shred in some spinach, cavalo nero or chard leaves.

Skip the rice and wrap a few spoonfuls up in a warmed tortilla. Perhaps with some soured cream on the side. This is making me hungry again…

It’s getting to that time of year when I receive messages from Spotify that my Unwrapped Playlist – containing my most played tracks of 2024 – is imminent. Here’s one track that will almost certainly be on it, and which seems to go well with the subject of this post: Leftfield with Pulse.

Categories
Mains Recipes

Roast Butternut & Celeriac Risotto

So, we’ve now had Halloween and Bonfire Night, and the clocks have gone back marking the end of British Summer Time. Yes, we’re well into autumn, a fact well reflected in the fresh veg now making its way into the ADK Kitchen from our local community farm.

All of which has inspired this warming, filling and satisfying vegetarian mains. I peeled, chopped and roasted a butternut squash and a celeriac – each having its own distinct flavour, and together giving the colours and tastes of autumn. I then tipped the softened, caramelised chunks into a pearl barley risotto. Crumbled stilton cheese is melted in at the end of cooking to provide a creamy, slightly salty consistency, with a final garnish of chopped toasted nuts.

Fetch your hat and gloves – here’s a dish to greet you, warming on the hob, at the end of a long, crisp autumnal walk.

Servings

4 adult portions.

Timings

Around 45 mins to make.

You Will Need

  • 1 medium butternut squash
  • 1 medium celeriac
  • oil for roasting
  • 100g pearl barley
  • 1 clove garlic
  • oil to drizzle
  • 1 onion
  • 1 green pepper
  • 3 – 4 chestnut mushrooms
  • 300ml veg stock
  • 50g stilton cheese
  • handful of chopped toasted nuts

Method

  1. Switch on a fan oven to 180C. Chop, peel and chunk the butternut squash and the celeriac. Place the chunks in a roasting dish and drizzle with oil. Place in the hot oven for 30 mins.
  2. Bring the pearl barley to the boil in a saucepan of water. Reduce to a simmer and leave for 30 mins.
  3. Crush the garlic and warm in a drizzle of oil in a wok. Chop and add in the onion, mushrooms and green pepper. Stir and let soften for around 10 mins.
  4. Drain the pearl barley and add to the wok. Tip in the veg stock and bring to the boil. Reduce and leave to simmer. You want the liquid to gradually reduce while finishing cooking the pearl barley, until it is soft but still slightly chewy in texture. Add in a few more drops of hot water from the kettle, if required.
  5. Take the roasting dish from the oven. The roast veg should be soft in the centre and slightly browned on the outside, with caramelised edges. Scrape the veg into the wok and crumble in the stilton, before stirring it all in.
  6. Serve on warmed plates, garnished with the toasted nuts.

Customise It!

I’ve been using pearl barley in risotto recently as I like its taste and bite, while it reduces the carb count. However, you can use arborio rice if you wish – just remember to adjust the cooking time as it takes about half that required by the barley.

Play around with some of the veg in the risotto base to include what you have – yellow or red pepper is fine. Try wilting in some autumn greens, spinach or shredded kale/cavalo nero for the last 5 – 10 mins of cooking.

Musical choice today reflects the fact that there is a rather important election taking place in the world. This track is dedicated to all our American friends, therefore: Muse with Will of the People.

Categories
Mains Recipes

Butternut, Goat’s Cheese & Walnut Tartlets

Out at a restaurant recently, I spotted rosary goat’s cheese tartlet on the menu, and thought it sounded interesting. It was delicious – mixing the soft, slightly acidic creaminess of goat’s cheese with caramelised onion in a short, biscuity pastry base. I came away inspired to try making my own – always a sign that I’ve enjoyed a good meal.

For my version, I decided to pair the creamy goat’s cheese with toasted walnuts, over an autumnal-coloured base of wholemeal shortcrust pastry and sweet, roasted butternut squash.

I was pleased with the result, in particular how well the tastes of the goat’s cheese and toasted walnuts complement each other, so am sharing it here. I’ll say more below on options for sides, to serve it up as an attractive vegetarian mains.

You’ll need 4 tartlet or shallow mini-pie dishes – the ones I used are each about 11cm diameter.

Servings

Enough here for 4 tartlets.

Timings

30 mins initially to roast the butternut and prepare the pastry. 10 mins to assemble the tartlets, and another 25 mins to bake them.

You Will Need:

  • half a large butternut squash, peeled and cut into small chunks
  • olive oil to drizzle
  • 125g plain flour
  • 100g plain wholemeal flour
  • pinch of salt
  • 100g butter
  • several drops of cold water
  • 1 rosary goat’s cheese
  • 60g walnuts

Method

  1. Turn on a fan oven to 180C. Spread the butternut squash chunks on a baking tray and drizzle with olive oil. Add to the oven once it’s up to temp, and leave for 30 mins.
  2. Next, make the pastry. Sieve the flours and salt into a food processor bowl, with blade fitted. Cut the butter into chunks and add in, pulsing the mix a few times till it resembles breadcrumbs.
  3. Pour in a few drops of water and pulse again. Repeat until the pastry comes together and is whirling round the bowl in one large ball, with the blade.
  4. Remove to a floured surface and finalise shaping it into a roundish ball. Wrap in cling film and put in the fridge for 10 mins.
  5. Take the tartlet dishes and spread with oil or butter, so that they won’t stick. Remove the pastry from the fridge and roll out to about 1/2cm thickness on a floured surface. Cut off a round or square that will cover one of the tartlet dishes. Drape over the dish, then press down and trim the edge for a neat finish. Repeat with the other 3 tartlet dishes.
  6. Remove the butternut from the oven. It should be soft and a little charred at the edges. Press down all over with a fork to make it into a soft, orange mash.
  7. Scoop forkfuls of butternut mash into the tartlet pastry bases, and spread it out towards the edges. Arrange 2 – 3 discs of rosary goat’s cheese on top. Place in the oven for 20 – 25 mins.
  8. For the final 5 mins of baking, remove the tray from the oven and sprinkle the walnut pieces on top. Press down gently into the soft cheese so that they hold in place.
  9. Remove from the oven when they’re looking like mine in the main photo above – you want the butternut and goat’s cheese discs to be browning and caramelising at the edges, but not burning.

Customise It!

I served the tartlets warm on a bed of celeriac mash, with steamed purple sprouting broccoli on the side. Any seasonal veg will work well as an accompaniment. You could also drizzle some baby potatoes with oil and add a few twists of seasalt, putting them on a roasting tray in the oven alongside the tartlets. You can also enjoy them cold with a salad, and maybe some leaves scattered over.

Music-wise, I’ve been very encouraged recently by the comments Robert Smith’s been making in the media about playing some gigs again next year. I’m a long time fan of The Cure since seeing them in their very early days supporting Siouxsie & the Banshees. There is also a new album fully due out next month, which I’m looking forward to. For now, here’s a classic from their early days: The Cure with Jumping Someone Else’s Train.