Having made my Peanut Butter Boosters recently, I found myself with half a jar of good quality peanut butter left. I wanted to come up with another bite-sized temptation to fill the annoying hunger gap that can open up after exercise, or simply when the next mealtime is still a little way away.
These fit the bill. What’s more, they don’t require any cooking and are very quick to make. There are only 5 ingredients, so you stay in control of exactly what is going into the snack. They are both vegetarian and vegan.
The best part however, is that making them requires the squidge technique i.e. getting your hands into the baking bowl and manipulating the mix with your fingers. Why is that the best bit? Well, when you’ve finished shaping the Bites, your reward is getting to lick your fingers clean. Mmm!
Convinced? Then give this a try…
Servings
Depending on your preferred size, this mix will make around 9 -10 Bites.
Timings
15 mins max to make, after which they are ready to eat. Keep them in the fridge and they’ll last for 2 – 3 days (if they’re not all eaten by then, that is 🙂 ).
You Will Need
120g oats
120g peanut butter
60g maple syrup or runny honey
40g dried apricots, finely chopped
a few splashes of milk (dairy or non-dairy)
Method
Combine all the ingredients in a bowl, and squidge together between your fingers till you have a sticky mix.
Pull off a piece of your desired size and roll into a ball between the palms of both hands. Set on a plate, and repeat till all the mixture is used up.
Place in the fridge.
Enjoy licking your fingers!
Customise It!
You could swap in another dried fruit for the apricots if you wish – dates would go well. Chuck in a handful of seeds if you like.
I’ve carried on listening to The 1975 this past week – their music is very uplifting and it reminds me of a great night in Birmingham with my friend – see The 1975. Here’s another track I particularly like, therefore: The Sound.
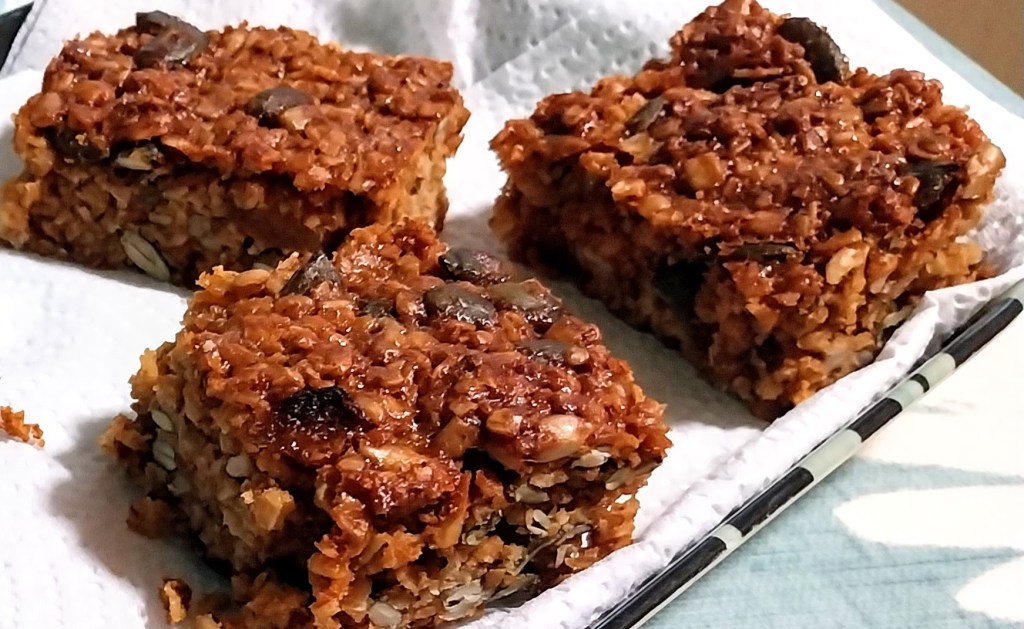
Here’s a wholesome and nutritious, home-made alternative to those commercially-produced cereal bars we often reach for, to cure the hunger pangs between meals. I wanted to see if I could create a version that gave greater control over the ingredients and, in particular, the carb and sugar levels.
The words ‘peanut butter’ are enough to bring a smile to most faces, so I decided to put that centre stage. I used a make that consists of 100% peanuts, with no palm oil (Meridian).
Taking inspiration from a recipe by Hugh Fearnley-Whittingstall, I also cut out all flour and eggs, and brought in oats, seeds and honey. I used muscovado sugar instead of the refined variety, and reduced the amount of it by about a third from what is often found in sweet recipes.
The challenge with removing a number of staple ingredients from a bake is finding a mixture that holds together, and doesn’t descend into crumbs. The consistency of the peanut butter and the stickiness of the honey definitely helped with this, as did letting it cool completely in the tin, before cutting into slices.
The resulting booster bars do hold together – see my main photo above. They’re also vegetarian and vegan. They aren’t completely crumb-free, but that’s a small price to pay for having a box full of these tasty and nutritious boosters to plug that hunger gap.
And if you do get some crumbs – hey, just gather them up and sprinkle them over your breakfast cereal – they’re delicious!
Servings
16 booster bars.
Timings
15 mins to prepare, 30 mins to bake at 180C.
You Will Need:
125g vegetable baking spread
80g light muscovado sugar
125g peanut butter
75g runny honey
zest of 1 orange
zest of 1 lemon
200g oats
100g dried apricots, finely chopped
120g mixed seeds e.g. pumpkin, sunflower.
Method
Grease and line a traybake tin – mine used is 20 cm square. Switch on the oven to 180C.
Place the spread, brown sugar, peanut butter and honey in a saucepan and warm over a gentle heat. Stir until it melts into a thick mixture.
Add in the other ingredients and stir well to combine.
Tip into the prepared tin and level with a spoon. Place in the oven for 30 mins.
Remove from the oven and let cool completely in the tin. Turn out carefully and cut into 16 squares.
Customise It!
Swap in other dried fruit for the apricot. The real nut fiends can swap in some different varieties of chopped nuts (e.g, pecans) for some of the seeds, if you wish. Do what’s necessary to give you the tasty energy boost you need.
This week in the ADK Kitchen I’ve been playing the new release by The Black Keys, a band from Ohio that I really like and who’ve already provided several tracks for the ADK Playlist. With all that energy from the Peanut Butter Boosters, this new track should have you up on your feet, singing and dancing along with its catchy chorus: Beautiful People (Stay High).
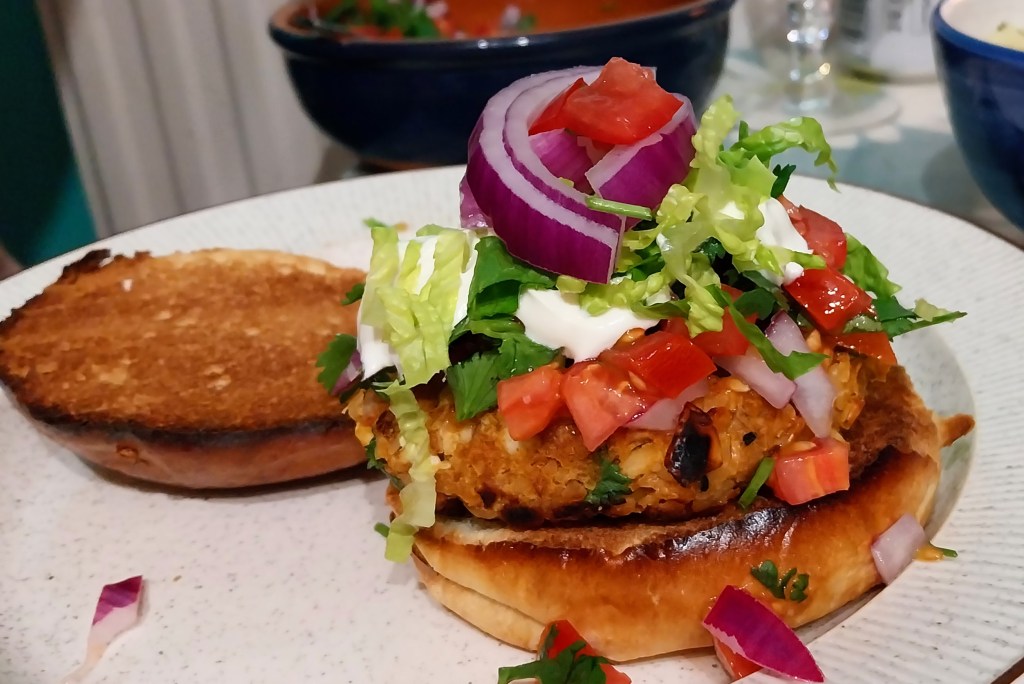
Whenever I look at the above photograph, I just want to place the fingers of both hands on the top of the roll, my thumbs underneath, scrunch it all together and take a large bite.
Which is a pretty good clue to what happened next, the moment I’d set my camera phone to one side.
I love the taste of a good veggie burger, and many times will choose one over a meat version. So when a bag of freshly harvested pulse beans arrived from our local farm, I had little doubt what to make them into.
I soaked the beans overnight and then boiled them for around 45 mins, before draining, cooling and mashing. However, you can just as easily use a can of beans that are ready to use.
Mixing the mashed beans with breadcrumbs and an egg gives a good texture that ensures the burgers, once shaped into patties by hand, stay together during the cooking process.
A fun part of the exercise is deciding what spices to add, and you can really go to town on tailoring it to your tastes. I opted for chopped red chilli, ground cumin, freshly chopped coriander and nigella seeds. Hey, you want garlic? Crush it in!
Here’s another shot just before the lid was positioned, showing the toppings including raw red onion, chopped lettuce, sour cream and my home made tomato salsa. Don’t worry if some pieces topple over the side while building it – this is real food. The scrunching down of the brioche roll between your hands will hold everything in, as you go to take that first bite….
Getting hungry, yet?
Servings
This mixture made 6 burgers, each the size of a brioche bun.
Timings
If cooking the beans from raw, they need to soak overnight, then be boiled for around 45 mins before draining and cooling. You can save time on this by opening a can of beans instead. Otherwise, prepping the burger mixture and salsa takes about 20 mins, with another 20 mins to fry/keep warm.
You Will Need
For the bean burgers:
400g cooked beans e.g. kidney beans, butterbeans
100g wholemeal breadcrumbs
1 egg
2 red chillis, finely chopped
1 tsp ground cumin
small bunch of coriander leaves, chopped
1 tbsp nigella seeds
For the tomato salsa:
4 – 5 ripe tomatoes, finely chopped
half a red onion, finely chopped
small bunch of coriander, chopped
1 garlic clove, crushed
juice of half a lime
a splash of white wine vinegar
To serve:
6 brioche buns
chopped lettuce
soured cream
chopped raw red onion
Method
Mash the beans on a plate with a potato masher, and scrape into a bowl. Add in the breadcrumbs, egg and all the spices.
Roll up your sleeves and get your hands in there, squidging the mixture between your fingers till it is all well combined.
Pull out just enough of the mixture to make one burger, and flatten it down between the palms of your hands. Set aside on a tray. Repeat to make 6 burgers in all. Place the tray in the fridge to chill while you make the salsa.
In a separate bowl, combine all the salsa ingredients and give them a stir. Set the bowl in the fridge.
Switch on the oven to 140C. Fry each burger on the hob for 4 – 5 mins on each side, then transfer to a tray and place in the oven. This will keep the burgers warm until serving time, and also round off the cooking process, making them browned and crisped all over.
Serve each burger in a toasted brioche roll, on a bed of chopped lettuce, and topped with a dollop of the salsa. Add raw chopped red onion and sour cream.
Customise It!
The sky really is the limit here. Add slices of avocado to the bed of chopped lettuce if you want. Top it off with your favourite cheese, grated, and slam it back in the warm oven for a few mins to melt, before adding the salsa. Engage imagination!
The next band to feature on the ADK Playlist has been around for over 20 years, and is finally enjoying some well-deserved public attention, following a collaboration with Taylor Swift. Two critically acclaimed albums released in 2023 have also helped their cause. Their sound reminds me of Nick Cave and the Bad Seeds, and Arcade Fire, so they are definitely worth a listen if you haven’t heard their stuff. Here’s a good one to start with, included on 2023’s Laugh Track. From Cincinnati, Ohio, this is The National (featuring Bon Iver), with Weird Goodbyes.
It’s nearly Christmas, and today I’m sharing the fruity breakfast topper I’ve made to last the family over the holidays. It’s made with fresh cranberries, oranges, sugar and spices, and comes with a heavenly taste and fragrance that’s sure to conjure up a festive mood. It is designed for spooning over muesli, or stirring in to porridge.
Christmas on a spoon!
The compote contains a glass of Port. Well, we wouldn’t want you to lose out on those healthy polyphenols over the holiday period now, would we?
Servings
You should get about 8 – 10 servings from this.
Timings
10 mins to prepare, 20 mins to boil/simmer.
You Will Need
250g fresh cranberries
zest and juice of 2 oranges
1 glass of Port
75g light brown sugar
1 cinnamon stick
3 star anise
5 cardamom pods
Method
Put all the ingredients in a saucepan and bring to the boil. Reduce to a simmer and leave for 20 mins to reduce/thicken.
Er, that’s it. Leave to cool and keep in the fridge, then stir a dessert spoonful in to a bowl of muesli and greek yoghurt, as shown in the photo above. It is also great stirred in to warm porridge.
You can leave in the spices, as they will continue to flavour the compote. The cinnamon and star anise mustn’t be eaten, however, so be sure to pick around them when you are filling your spoon.
Customise It!
The first time I made this, I used a glass of sherry instead of the Port and it was fine. Feel free to swap in your favourite tipple of choice, or leave it out if you prefer.
It has to be a Christmas track this week for the ADK Playlist. If you are looking for some quality festive listening that’s a little different from the fare commonly served up in shops and on commercial radio, check out Tracey Thorn’s 2012 album, Tinsel and Lights. Here’s a lovely track from it called Like A Snowman.
Have a great Christmas everyone. See you back here next week for another serving of kitchen fun and madness.
It’s that one time in the year when the UK’s lovely friends and allies over there in the US and Canada share with us your precious treasure of fresh cranberries. Thank you!
The rest of the year, we have to make do with jars of Ocean Spray Sauce. Not that I am complaining about that, though – they are a reliable addition to the winter dinner table. We also have dried cranberries, of the sort I used to make Cranberry & Pistachio Cookies, for example. However, none of these ever tastes quite the same as the fresh article.
So how excited was I this week, when I saw packs of fresh cranberries imported from America, sitting there in Sainsbury’s fruit and veg section, nestling up alongside the blueberries. I quickly threw a couple of packs in the trolley and began making plans.
Here I am sharing with you my fresh cranberry, oat and yoghurt muffins – just follow the recipe below. I like these because they bring out the natural sourness in the berries, which we can’t usually taste as the processed varieties have been sweetened before they reach us. That sourness is enhanced by the bitterness of the yoghurt, while there is also a chewy, nutty bite in the rolled oats.
The light brown sugar provides a complementary sweetness in the cake mixture, making for an overall, pleasing blend of flavours on the tongue. What’s more, as the fresh cranberries burst with the baking, they infuse the muffin with juice that will keep the cake moist. Irresistible!
See my main photo above for the muffins, including one I cut in half to show the richness of the filling. A highly satisfying, healthy muffin to be enjoyed at breakfast, as a snack or a dessert.
So, to all our North American friends – as you can see, we are taking care of your special gift to us, and turning them into healthy, tasty treats. Please keep these little fellas coming!
Servings
This will make 12 muffins.
Timings
10 mins to prepare, 20 mins to bake at 180C.
You Will Need
200g plain flour
1 tsp baking powder
half tsp salt
85g rolled oats
140g natural yoghurt
1 tsp bicarbonate of soda
1 egg
120g light brown sugar
140g fresh cranberries
90ml milk
90ml veg oil
Method
Switch on the oven to 180C. Prepare a muffin tray or mould.
Sieve the flour, baking powder and salt into a bowl.
Pulse the cranberries in a food processor with blade fitted, for a few seconds, 2 or 3 times. Light chopping will help them fully bake and soften in the muffins. Tip into the bowl of flour and stir so the fruit is coated.
In a separate bowl, combine the oats with the yoghurt and bicarb. Leave for a couple of minutes, then stir in the egg and the sugar. Finally, stir in the milk and veg oil.
When the oven is up to temp, combine the wet ingredients with the dry, and stir until no dry ingredients are visible. Spoon in to the muffin tray/mould, and place in the oven for 20 mins.
When they are looking browned, as in my main photo above, remove to a wire rack to cool. Enjoy!
Customise It!
If I was making one change to this, I would swap in broken pieces of white chocolate for some of the cranberries, at a ratio of up to half and half. That also helps bring out the sweet and sour contrast.
There really can be only one band to accompany this post, so I’m adding this track to the ADK Playlist. Limerick’s own The Cranberries with Dreams.
If there’s anything guaranteed to give your sense of wellness a morning boost, it’s a breakfast of genuine Bircher Muesli, served with a fresh fruit topping in the form of a smiley face 🙂
I’m due to catch a plane back to London shortly, after a thoroughly enjoyable stay in Ljubljana, Slovenia, and then Graz, Austria. I’ve enjoyed some great, tasty fare while here and, before leaving, wanted to find an authentic dish based around fruit and veg.
I’m pleased to say I found it on our final morning, with a party of 4 of us meeting for breakfast in a branch of Graz’s Martin Auer delis. Billed on the menu as Brainfood, it featured oatmeal, wheat, rye flakes and linseed that had been soaked overnight in natural yoghurt. Pieces of freshly chopped apple and nuts were then stirred through. Grapes, blueberries and a raspberry had been added to make the smiley face, and honey drizzled over.
The invention of Bircher Muesli is attributed to Swiss medic Maximilian Bircher-Brenner around 1900, when he put together a mix of oats, grains, seeds and fruit for his patients. These ingredients have various health benefits – oats contribute to lowering cholesterol, for example. The name of Brainfood is likely to stem from the dish being slow to digest, meaning one stays feeling fuller for longer. Hunger is therefore less of a distraction from accomplishing one’s daily tasks and challenges.
I certainly enjoyed it, alongside the cappuccino shown in my photo. I’ll be expecting now to easily conquer the killer sudoku I’ve saved to do on the flight home!
This is me signing off from Austria. It’s been a great trip, catching up with family and friends and sampling some authentic food and drink. My next post will be from back in the UK.
Hey, with my newly heightened intellectual faculties, I’ve just worked out that the word Brainstorm is only a couple of letters away from being Brianstorm. Regular readers will know that I need little excuse to feature the Arctic Monkeys on ADK. So here they are.
With the start of the November evenings, I’m declaring the opening of slow cooker season in our household.
The electric slow cooker is a fine invention, in my view. It means I can put the family Sunday dinner together in the morning, and let it spend the afternoon and early evening quietly bubbling away in the corner of the ADK Kitchen, with very little more for me to do. An important benefit of this is that I can then spend the lead-up to dinnertime on the sofa with a cold beer, watching the Premier League on Super Sunday, safe in the knowledge that all prep is taken care of. Get in!
First up is this slow cooked dish combining chicken with Spanish onion, red pepper, tomatoes, spicy chorizo, black olives, stock and Spanish white wine. Left to develop for 4-5 hours, all the flavours will gradually meld together and infuse the chicken. Delicioso!
Servings
4 adult servings.
Timings
20 mins to combine, 4-5 hours to slow cook.
You Will Need
3 chicken breasts
Oil
1 large Spanish onion
1 red pepper
1 whole chorizo sausage
700ml chicken stock
400g tin chopped tomatoes
1 large glass of Spanish white wine
15-20 pitted black olives
A handful of frozen peas
Method
Switch on an electric slow cooker at the hot setting.
Cut the chicken breast into chunks, and fry in oil in a pan until lightly browned all over. Transfer to the slow cooker bowl.
Chop the onion and pepper and fry. Slice the chorizo into discs, then cut each disc in half. Add to the onion and pepper, and after 5 mins, transfer to the slow cooker bowl.
Next into the pan, put the chopped tomatoes, stock and wine. Stir till it all begins to bubble, then add to the slow cooker bowl.
Put the olives and peas directly into the slow cooker bowl and give it all a stir. Place the lid on the slow cooker and turn the setting down to medium. Leave for 4-5 hours.
Serve with plain boiled rice.
Customise It!
If you don’t have an electric slow cooker, you can use a casserole dish. Put it in an oven at 180C and transfer in the ingredients from the frying pan as described above. When all have been added, turn the oven down to 160C, and leave for 4-5 hours.
You can add in other veg as you like – carrots and celery will go well. You can include a garlic clove or spices if you want, though I find the chorizo brings all the garlic, flavouring and colour needed.
Chicken thighs or drumsticks will work well in place of the chopped chicken breast, if you don’t mind eating meat off the bone.
The next track for the ADK Playlist has a Spanish feel, naturally. This band is one of the New York punk and new wave generation that grew out of CBGBs in the mid to late 70s: Mink DeVille with Spanish Stroll.
This autumn warmer of a soup combines seasonal sweet, silky smooth, roasted butternut squash with fiery red chillis. Energy prices being so high these days, a bowl may also save you some money – it gives all the central heating your body needs!
Servings
3 – 4 bowls.
Timings
40 mins – 10 mins to prepare the butternut, and 30 mins for it to roast. The rest of the soup can be made while the veg is roasting.
You Will Need
1 butternut squash, peeled, seeds and pith removed, and cut into chunks
1 red pepper, cut into 7 – 8 pieces
oil
1 clove of garlic, crushed
2tsp grund cumin
1 tsp turmeric, fresh or powdered
1 onion, chopped
2 medium red chillis, chopped
2 sticks celery, chopped
3 – 4 potatoes, peeled and chopped
700ml veg or chicken stock
salt and pepper
Method
Switch the oven on to 180C. Spread the butternut and red pepper pieces on a roasting tray, and drizzle with oil. Place in the oven when up to temp, and leave for 30 mins.
Pour some more oil into a large saucepan and warm on the hob. When the oil is hot, put in the garlic, cumin, turmeric, chillis and onion. Stir and let it cook for a few mins, before adding the celery and potatoes.
Let it all cook for another few mins – the onion should soften, and the celery/potatoes brown a little at the edges.
Pour in the stock and bring to the boil. Reduce and simmer until the butternut and pepper have had their full 30 mins in the oven.
Take the butternut and pepper from the oven – it should all have softened and become a little charred at the edges. Scrape it all into the soup and stir.
Finally, grind it all smooth with a hand blender. The soup should take on a creamy consistency, and orange colour, with red specks, as in my photo above.
Ladle into bowls and serve with freshly baked bread.
Customise It!
If you want to increase the creaminess you could add a swirl of single cream when serving.
Adjust the strength of the chillis to your personal taste – I used medium, but you can revert to mild, or fire up to hot!
A bit like changing their intensity from low to high, I suppose – a cue for me to add Ohio’s the Black Keys to the ADK Playlist. Here’s Lo/Hi.
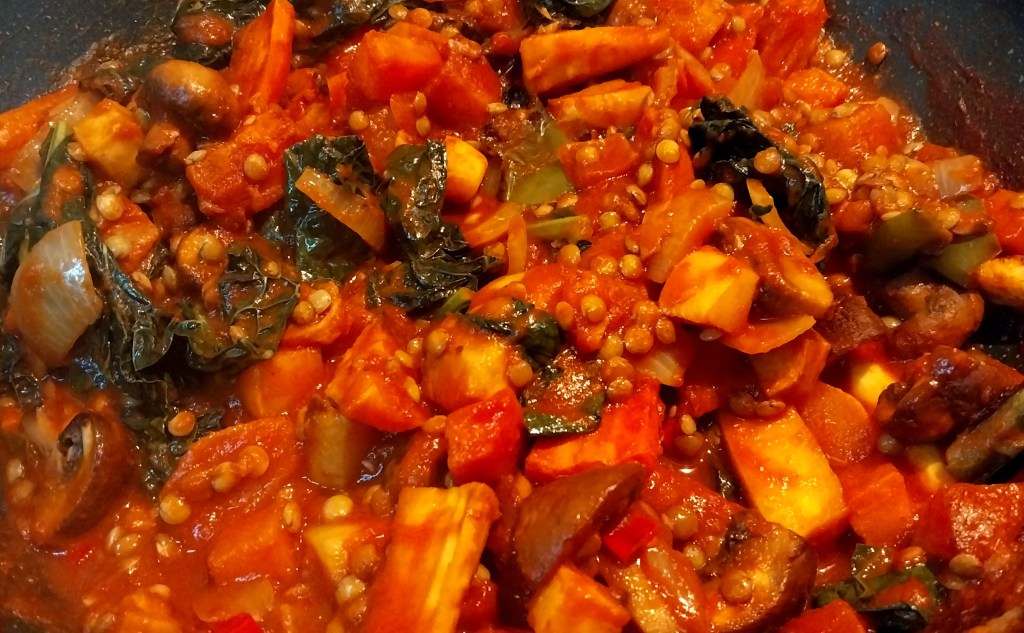
Ready for some autumn evening comfort food? If that’s a yes, you’ll love this rich, smokey, spicy stew with seasonal roasted vegetables and puy lentils. It’s vegetarian and vegan, while the puy lentils are a great source of protein.
Servings
4 adult servings.
Timings
40 mins to make and cook.
You Will Need
1 roasting tray’s worth of chopped root veg (mine comprised sweet potato, swede, carrot, parsnip and celeriac)
1 red pepper, chopped
oil
1 clove garlic
2 medium chillis
1 tsp ground cumin
1 onion
8 – 9 mushrooms
1 tbsp gojuchang paste
1 500g carton of tomato passata
water
100g puy lentils
4 – 5 leaves of cavolo nero
Method
Warm the oven to 180C. Fill a roasting tray with the chopped root veg and red pepper, and drizzle to coat with the oil. Place in the oven for 30 mins, once it is up to temp.
Drizzle some oil in a wok. When it is warm, add in the crushed garlic, chopped chillis and cumin, and stir.
Tip in the chopped onion and mushrooms, and stir again. When the onion is softening, add in the gojuchang paste and stir.
Pour in the passata. Fill the carton with cold water and add in also. Put in the puy lentils and turn up the heat to boil, then reduce to a simmer. Leave for about 10 mins, while the sauce reduces and the lentils cook.
Chop the cavalo nero into strips and wilt in for the last 5 mins.
Take the roasting tray from the oven – the veg should be softened and a little charred around the edges. Scrape the roasted veg into the wok. Stir to combine.
Spoon into bowls to serve.
Customise It!
Feel free to swap in any veg you like or have to hand. Butternut squash or celery will work well. Boil or steam some brussels sprouts and add in if you wish. For the second serving of this dish I mixed in some new potatoes that were already cooked and in the fridge – see below.
The key ingredients you should keep are the passata, garlic, chillis and the gojuchang paste – which combine to create the delicious smokey background sauce – and the lentils, which give texture and protein.
Talking of Smokey, here’s a classic track to add to the ADK Playlist. I actually prefer this ska version to his original, however: The Beat with The Tears of a Clown.
What to make for a meal when you’ve just returned from holiday and haven’t yet done the weekly shop?
That was this week’s challenge following arrival back from our motorhome trip to Scotland. This vegetarian chilli version of sausage rolls came together using a few pieces of fresh veg we still had in the van, and some store cupboard ingredients. Served up with a choice of tomato ketchup, brown and bbq sauce, they make a great fun and filling meal that you can eat with your fingers.
My photo above shows the rolls having just been taken out of the oven, cooling on a wire rack. The residual heat of the oven gives the house a comforting warmth, now the autumn nights are starting to draw in.
Servings
Makes 14 sausage rolls, so 3 – 4 servings.
Timings
About 40 mins in total to prepare, and 25 mins to bake at 180C.
You Will Need
veg oil
1 red onion
1 red pepper
1 yellow pepper
1 carrot
2 medium red chillis
1 tsp ground cumin
1 400g tin of kidney beans
1 400g tin of tomatoes
225g plain flour
pinch of salt
100g spread for baking
a few tsps of cold water
nigella seeds to sprinkle
1 egg, beaten
Method
Peel the onion, chop roughly into chunks, and put in a food processor with blade fitted.
Cut the flesh from the peppers, and add to the food processor. Cut the top off the chillis and add the spicy flesh to the processor also. Blitz it all for a few pulses until it is all finely chopped.
Add a little oil to a wide-based frying pan and warm on the hob. Add in the cumin and then the finely chopped veg. Stir and let it all soften in the heat.
Without cleaning the processor bowl, put in the kidney beans and tomatoes, and blitz again. Add to the frying pan and stir in to mix.
Stir every so often, letting the moisture steam away, leaving the mix to gradually thicken over about 10 mins. You are aiming for a thickish consistency that can hold its own as a sausage roll filling.
Switch off and transfer the mix to a cold plate, spreading it out so that it cools. Place the plate in a cool place.
Having washed and dried the food processor bowl and blade, you can now use it to make the pastry. Sieve in the flour and salt. Add in the spread cut into chunks, and pulse a few times till it resembles breadcrumbs. Pour in a few drops of water and pulse again. Repeat until the pastry comes together and is whirling round the bowl in one large ball, with the blade.
Remove to a floured surface and finalise shaping it into a roundish ball. Wrap in cling film and put in the fridge for 10 mins. Turn on the oven to warm to 180C.
Remove the pastry from the fridge and roll out on a floured surface into a long rectangular strip. Take the cooled filling mix and spoon it in a line down the centre. Try to make it a consistent width all along, so that the rolls will be evenly filled.
Brush one long edge with the beaten egg. Lift up the other long edge, so that the pastry folds over the filling and tucks in under its other side. Roll the whole length over so that it sits on top of the egg-brushed edge. Gravity will then help the rolls seal, and no one will be able to see the join!
Cut into individual rolls and place on a metal tray lined with baking paper. Prick with a fork, brush the tops and sides with the beaten egg, and sprinkle over the nigella seeds. Place in the oven for up to 25 mins. Keep an eye on them and remove earlier if they are looking browned to your taste.
Serve up with your favourite ketchups and table sauces for dipping, and absolutely no cutlery. Your guests have full permission to eat and dip with their fingers.
Customise It!
This dish is about using up what you have, so switch up the veg to include a brown onion, garlic, celery, mushrooms etc. Herbs and coriander would go well. Stick with the kidney beans and tomatoes, though, as these give the texture the filling needs to hold its shape. You could add a line of grated cheese alongside the filling, before you roll it up, and the cheese will then melt as they cook. Be daring – if it seems a good idea for you to include it, go for it!
For the ADK playlist, here’s a track from another Scottish band we played a lot when we were away, but I didn’t quite get to feature on any of my travel-related posts. They have also just announced a tour next year, which I am hoping I can get tickets for – I saw them live the last time they toured and enjoyed them very much. This is Texas with In Our Lifetime.