Categories
Mains Recipes

Thai Green Curry with Jasmine Rice

Today I’m pleased to announce we have our first guest post on A Different Kitchen! It is by my son Jonny, a talented, fast-up-and-coming young cook. If you’re finding that work makes you too busy to prepare tasty and healthy meals, try Jonny’s suggestion below.

Hi. My featured meal is a Thai Green Curry with Jasmine Rice. I like this meal because it is fun to make, healthy and tasty, with a spicy kick. It also reminds me of when I ate it in Bangkok on my 22nd birthday.

I cook for myself, alongside having a busy full-time job. Quite often this means I have to spend time researching and preparing reports and presentations at short notice, with tight deadlines. It would be easy for me to fall back on convenience meals from the freezer and microwave, but I try to avoid this. I don’t think they are as tasty or healthy as meals made from fresh meat and vegetables. I don’t mind using some ready-made ingredients, as this speeds me up (for example, the recipe below uses a jar of curry sauce that I like).

Cooking is also good fun and gives me a break from my work.

Servings

This will make enough for three main meals. I usually make enough in advance to give me a main meal each day for three days. This saves me preparation time on subsequent days.

Timings

20 mins to prepare.

You Will Need

  • 250g green beans
  • 1 red pepper
  • 100g garden peas
  • 1 chicken breast
  • 1 340g jar of Thai green curry sauce (I like Morrisons’ one, made with coconut, green chillies and lemongrass, but others are available)
  • Sprinkling of chilli flakes
  • 200g jasmine rice

Method

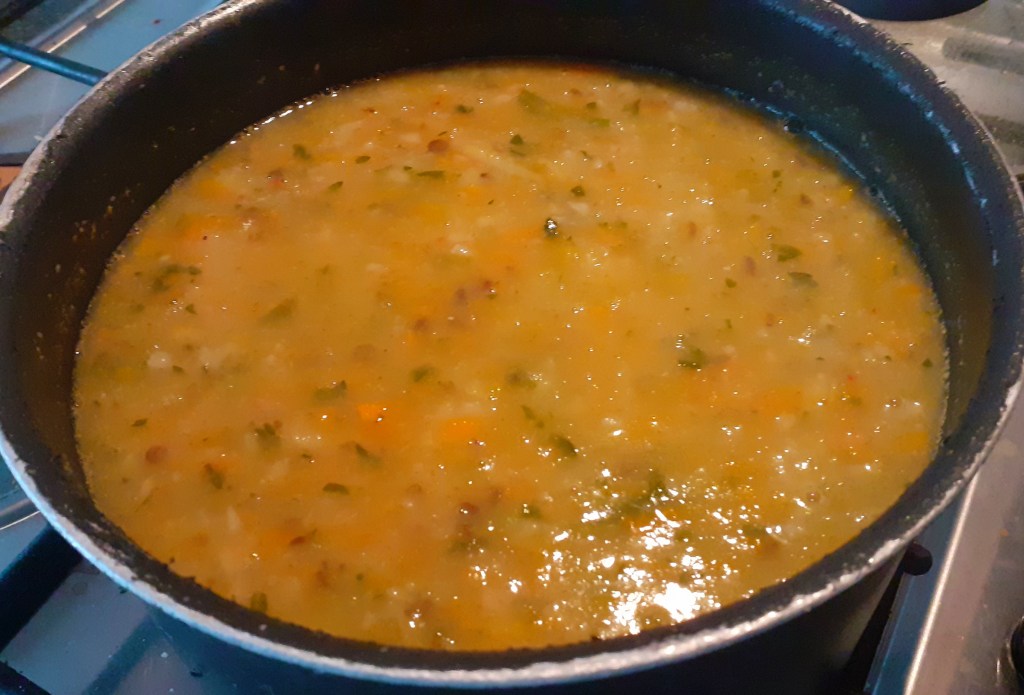
  1. Chop the chicken into chunks and fry in a wok, till they are turning nice and brown.
  2. Chuck in the green beans and the red pepper, chopped. Give it all a good stir.
  3. While it’s cooking, boil the kettle and add the water to the jasmine rice in a saucepan. Bring to the boil and simmer for about 10 – 12 mins.
  4. Add the jar of sauce to the wok and stir it in so it is all heated through. Sprinkle over the chilli flakes.
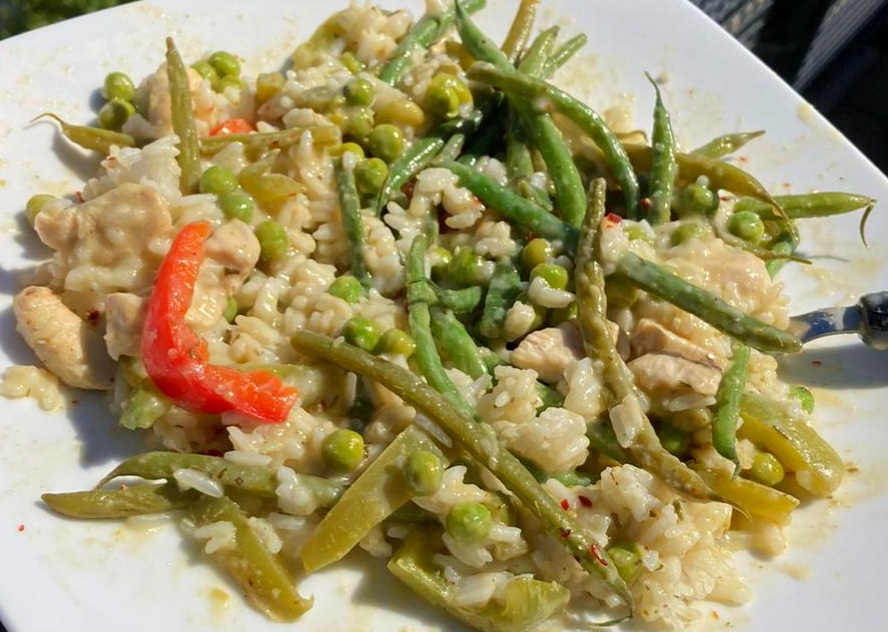
  5. Drain the rice and serve a third of it on a plate, along with a third of the curry.

Customise it!

You can add any other veg you like or have to hand. An onion would go well, or anything else green, like courgette or mange tout.

I serve this with a bottle of ice cold water! Earlier in the day I fill two thirds of a 2l plastic bottle with water and put it in the freezer till it’s frozen. Take it out of the freezer and it will slowly thaw, providing ice cold water all day. This helps me stay cool and hydrated in all the heat we’ve been having, and is a good accompaniment to the spicy curry.

Well done Jonny and thanks for sharing this delicious looking curry. Jon now has a repertoire of 10 recipes he’s mastered, each providing three days of main meals. All being well, he’ll share some more of these in future guest posts!

The author of a guest post gets to choose a favourite track of theirs for adding to the ADK Playlist. Jon’s choice is Electric Feel by MGMT. 

Categories
Mains Recipes

BBQ-Baked Fish

Our weather this weekend was just ridiculous – 30+ degrees C every day – so cooking out of doors was definitely on the agenda.

Fish baked on the barbecue is an idea I first came across in a recipe book by legendary outdoor chef, Keith Floyd. For me, this was a different way to cook fish and I have done this several times since.

Servings

This is a meal for two.

Timings

5 mins prep, 15 mins to cook.

You Will Need

  • Tin foil
  • 2 fillets of fish
  • handful of spring onions
  • juice of half a lemon
  • drizzle of olive oil
  • cherry tomatoes on the vine
  • sprinkling of herbes de provence

Method

  1. Start by tearing off a large sheet of foil, and brush it lightly with oil.
  2. Place a couple of fish fillets in the middle (I used cod loins, but other fish will do just as well)
  3. Give the fish a topping. This can change depending on what’s in season and what you have to hand. I had a good crop of spring onions from the garden, so chopped these over the fish, adding the juice of half a lemon, a drizzle of olive oil, and a few twists of black pepper.
  4. Then gather up the sides of the foil to form a parcel, crimping the edges together in a pasty-type shape.
  5. Place the parcel on the griddle plate of the barbecue and close the lid. Leave it for about 10 – 15 mins.
  6. We have a glut of cherry tomatoes in the garden at the moment, with all this hot weather, so I snipped off a vine and cooked this also on the griddle, alongside the fish parcel. I brushed the vine and tomatoes in olive oil and gave them a sprinkling of herbes de provence. They look great on the plate and provide a rich, squishy sauce to complement the fish.
  7. Take care when opening the fish parcel as there will be a sudden escape of heat. The flesh of the fish should be in flakes, and some parts of the underside will be lightly charred (see the photo above, taken as the parcel was opened). This is a really nice part of the dish, as it gives it a taste and texture you will not normally get when cooking fish in a more conventional way, like in an oven or a pan. Don’t overdo it though, or the fish will burn!

Customise it

There’s lots of scope for playing around with the topping – parsley goes well if you have it, and also a few capers.

My BBQ-baked fish and tomatoes was served with a few new potatoes and lightly steamed summer green veg, washed down with a glass of chilled Sauvignon Blanc – dining al fresco, of course!

As for the musical accompaniment to this post, the last time I blogged about a barbecue meal I opted for The Doors’ Light My Fire. This great track by The Prodigy was in close contention, so here it is in its own right, now added to the ADK Playlist. It’s the song every barbecue chef should be humming as they warm up their grill, and guaranteed to get the party going:

I’m a Firestarter!

Hey, hey hey!


Categories
Breakfast Recipes Snacks

Banana Oat Breakfast Bars

The recipe for these first appeared on page 66 of the February 2005 issue of Sainsbury’s Magazine. I know this because I ripped the page out and have kept it carefully ever since. I have lost count of the number of times I have made these – the recipe has proved reliable as a fresh, tasty and healthy snack for breakfast, lunchboxes, car journeys, filling the gap at half-time at a football match etc.

Servings

Depending on how you cut these, it will make 16 squares or around 20 rectangular bars.

Timings

15 – 20 mins preparation, plus baking time 25 mins.

You Will Need

  • 75g mixed nuts
  • 110g margarine
  • 75g demerara sugar
  • 3 tablespoons golden syrup
  • 200g rolled porridge oats
  • 75g self-raising flour
  • 40g dried cranberries
  • 2 medium ripe bananas
  • 1 egg

Method

  1. Spread the nuts across a baking tray and toast in the oven at 180C for 5 mins.
  2. While the nuts are toasting, combine margarine, syrup and sugar in a saucepan and heat gently until all have dissolved into a thick paste.
  3. Remove the nuts from the oven and chop in the food processor with blade fitted. Leave the oven on.
  4. Combine nuts, flour (sifted), oats and dried cranberries in a bowl.
  5. In a separate bowl, peel and mash the bananas, and mix in the egg.
  6. Combine the banana/egg with the oats/flour and give it a good stir. Finally , add in the syrup/sugar paste. Mix well so that there is no dry flour and all the oats are covered in the brown syrupy paste.
  7. Tip the combined mixture into a traybake tin. The one I use is 20cm square, but it also works with a rectangular tin measuring 25cm x 16cm ( I have made both with these ingredients).
  8. Bake in the oven, still at 180C, for 25 mins.
  9. Remove and leave to cool in the tin. Once cool, invert it on to a chopping board, then carefully invert it back again on to another board. You can then chop it into rectangular bars or squares, as you wish. These will keep in a tin for up to 3 – 4 days, though they are usually all gone well before that!
Categories
Recipes Snacks

Fruit and Nut Booster Balls

Ever find yourself tempted to snack between meals, and picking up a packet of biscuits or something else sweet-loaded to give you a quick sugar rush? Mmm, yes – me too. Try these energy booster balls as a healthier, tastier and ultimately more satisfying alternative.

The recipe is based on one originating from Sainsbury’s Magazine and (as with most things on the ADK blog) has been developed and customised through trial, experience and error.

Servings

This should make around 12 energy balls.

Timings

15 mins to make. They can then be eaten straight away but will taste better eaten cold from the fridge.

You Will Need

  • 100g mix of cashews and pistachio nuts
  • 150g mix of pitted dates and dried apricots
  • a sprinkling of cacao nibs
  • a few drops of orange essence
  • 4 tablespoons of desiccated coconut

Method

  1. Finely chop the nuts and the dried fruit. This is better done by hand rather than the food processor, as bitter experience shows the dried fruit makes a real mess of the blade!
  2. Put the chopped nuts and fruit in a bowl and add the cacao nibs and orange essence. Mix it all together into a sticky paste.
  3. Pull off a tea spoon sized piece of the mix and roll between your palms into a ball. Roll it then on a plate on which you’ve sprinkled the desiccated coconut, till it’s covered all over, then set aside. Repeat until all the mixture has been used, and you have around a dozen energy balls.
  4. Place in a sealed container and store in the fridge. Eat within 3 – 4 days.

Customise it!

You can try mixing in other types of nuts or dried fruits. Seeds also go well – the smaller the better so maybe sunflower or chia seeds. Omit the cacao nibs if you wish, and switch the orange essence for another flavour. Rolling in coconut isn’t compulsory, though it adds presentationally and stops the ball sticking to your fingers! Try covering half in coconut and half without. Cocoa powder is another option for a coating, and (with imagination) can help give the illusion that you are eating a truffle.

Categories
Mains Recipes

Light My Fire

It’s the season of outdoor cooking, so why not crack open a beer or soft drink and get some skewers roasting on the barbecue?

Mine shown in the photo are made from 5 marinaded chicken breasts cut into chunks, one red pepper and one courgette sliced. The marinade ingredients were a crushed clove of garlic, a finely sliced chilli, some chopped root ginger, a handful of fresh coriander leaves, juice of a lemon, a grind of seasalt, a twist of black pepper, a dollop of olive oil and a squidge of tomato puree to give it some colour. I left the marinading meat in the fridge for about 18 hours in a tight lidded casserole dish. Be warned that an impatient lifting of the lid will release an incredible aroma that will have you salivating and invoke an instant craving for hot food!

I threaded the meat and veg on to 8 wooden skewers about an hour before cooking. The skewers had been soaked in water for about an hour to stop the exposed ends from burning up in the heat. Use a basting brush to coat the slices of veg with the residue of the marinade so that they cook nicely rather than burn.

About 15 – 20 mins on the barbecue should do it, turning the skewers every so often so they cook evenly all over. Serve up with salads plus aforementioned soft drink or beer.

After exploring a few options for a track to add to the ADK Playlist with this post, I’ve settled on this classic from the Doors. To any fans of the Prodigy who may be following, all I’ll say is it was a close-run thing, and I guarantee there will be at least one more bbq-related post for you before the summer is out!

Categories
Blog Recipes Starters

Yellow

Today’s starter is a lemon hummus, based on a recipe by Hugh Fearnley-Whittingstall. I added a little less lemon juice than the recipe, and added fresh coriander to the usual base of blitzed chickpeas, tahini and olive oil. Topped off with a sprinkle of ground cumin, and served up with breadsticks and crudites, accompanied by a glass of prosecco. Mmm!

Pitched into this yellow earthenware bowl, I think I enjoyed the bright summer sunshine colour of the dish almost as much as the fresh taste. Kept reminding me of this great track from Coldplay, now the latest addition to the ADK Playlist.

Categories
Desserts Recipes

Blackcurrant Ice Cream

Regular visitors will know that this week I’ve been researching how to turn a lovely fresh crop of blackcurrants into ice cream. Well, my photo shows a few scoops of the results! I relied heavily on an old Delia recipe, and updated it for the age of the electric ice cream maker. There is really very little added other than sugar and cream, leaving this tart and vibrant coloured summer fruit to be the star of the show.

Servings

This will make 500g of ice cream, so comfortably enough for 5 – 6 servings.

Timings

15 mins preparation, and 35 mins churning.

You Will Need

  • 400g freshly picked blackcurrants
  • 175g granulated sugar
  • 150ml water
  • 300g double cream
  • an electric mixer
  • an ice cream maker

Method

  1. Place the drum of the ice cream maker in the freezer to get really frozen. I usually allow 24 hours.
  2. Press the blackcurrants through a sieve with a bowl beneath. The bowl will fill with divine purplish juice, leaving behind the pips and skins in the sieve, which can be discarded.
  3. Combine the sugar and water in a saucepan and bring to the boil, dissolving the sugar. Simmer for a few minutes, then switch off. Combine with the blackcurrant juice and leave to cool.
  4. Whisk the double cream with a mixer.
  5. Place both the bowl of whipped cream and the bowl of blackcurrant juice in the fridge for a couple of hours to get really cold. Then remove from the fridge and combine, stirring it through so that all the cream takes on a purplish colour.
  6. Remove the frozen ice cream maker drum from the freezer. Tip the blackcurrant/cream mix into it and churn for around 35 mins.
  7. Switch off and spoon/scrape the ice cream out of the drum into a plastic container. Seal and place in the fridge for a good few hours before serving. The longer it has the more it will set.

And finally, a reminder of how it all began…

Categories
Blog Desserts

Seven Days in Sunny July

With this week’s great weather set to continue, I am looking forward to cooking for friends coming over this weekend. I plan to get much of the preparation done in advance, so we can make the most of the time together al fresco, relaxing and catching up over cold drinks and lunch. Home-made ice cream makes an ideal dessert for this, as it can be made earlier in the week and left to sit in the freezer till it’s required.

This is particularly true this time of year. We are lucky to have some great soft fruit producers locally (which also helps to keep the food miles down). My photo shows the batch of strawberries I’ve bought to make into ice cream. As I write this, they are chopped, mashed and soaking in sugar and lemon juice in the fridge, waiting to be combined with whipped double cream and churned for a half hour in the ice cream maker. All being well, there should be another post in a few days showing some scoops of the finished product!

Meanwhile, here’s a favourite track of mine by Jamiroquai, that seems to capture that summertime feeling.

Categories
Blog Mains

Soup-ermassive

Today’s crop from the local community farm had soup written all over it – turnip, swede, carrots, potatoes and a handful of flatleaf parsley. I added onion and celery, and defrosted 1 litre of chicken stock from a previous Sunday roast. Throw in around 100g of pea and barley soup mix and simmer for 40 mins. Plunge in the handheld blender for a few blitzes to give it just the right consistency. Served with a loaf of sourdough for dipping, and eaten (again) al fresco.

This harvest of fresh, natural ingredients made enough for two hearty servings, with about 3 – 4 left over. Soup-ermassive! Earlier in the day I had been lying in the warm sun listening to Muse’s Black Holes and Revelations album on my headphones, so it seems apt to add this latest track to the ADK Playlist. Take it away, Muse.

Categories
Blog Mains

Both Ends Burning

Well, that’s a good description of how it’s felt this last few days in the UK heatwave. After lots of no-cook meals and salads recently, the temperature in the kitchen finally subsided sufficiently, so that we could contemplate turning the cooker back on again.

It had to be something quick, however, so as not to undo the good work of the increasingly refreshing afternoon breeze coming across the back garden. Cue the classic midweek standby – the omelette. This one had a Spanish feel to it, using up some leftover Jersey new potatoes (from the potato salads), half a sweet red pepper and a few chopped black olives. I mixed in the rest of a dish of ricotta with the eggs, chopped fresh spring onions from the garden and some grated cheddar. Served up with seasonal freshly picked steamed green veg on the side – on this occasion french beans, mange tout and broad beans.

Eaten al fresco to stay cool. And speaking of staying cool, let’s add some Roxy Music to the ADK Playlist: