Categories
Breakfast Desserts Recipes Snacks

Pumpkin Spice Muffins

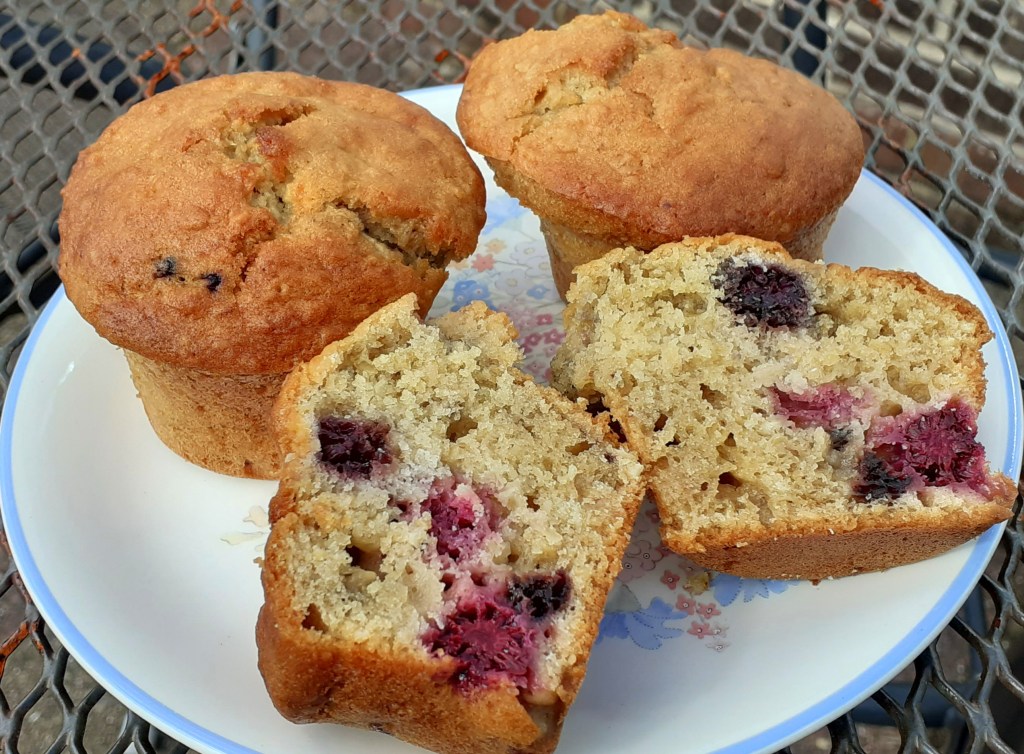
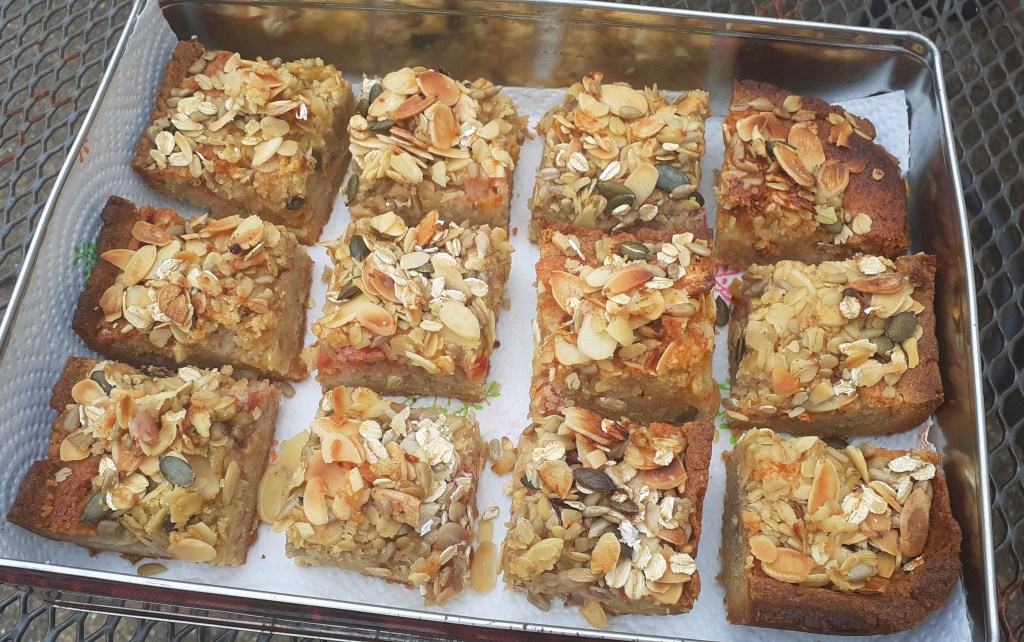
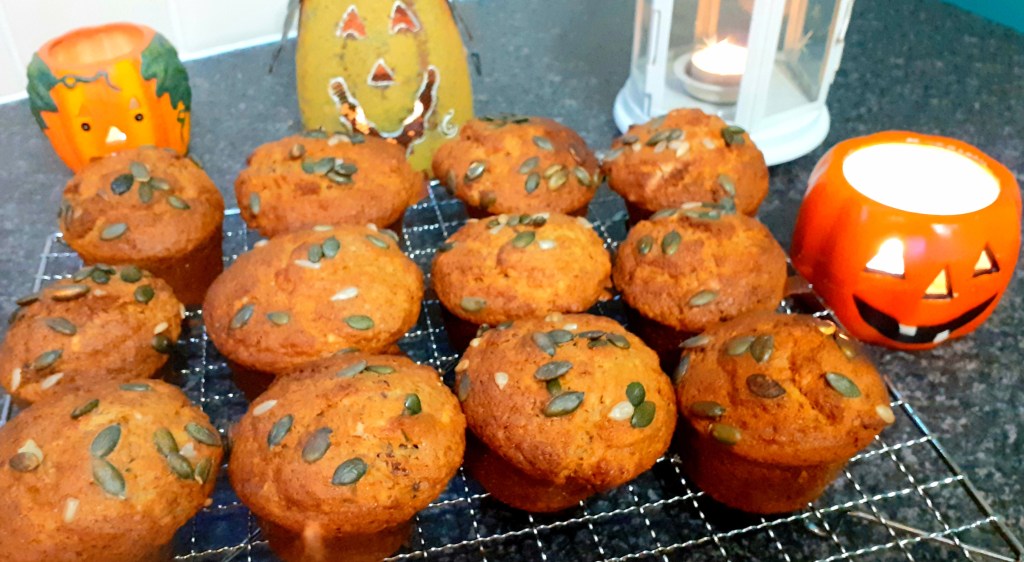
A feature of autumn is having lots of weird coloured and wonderful shaped pumpkins and squashes on our vegetable stalls. This recipe uses one of these to bring sweetness and moist texture to a set of freshly baked muffins. I recently made these on Halloween (as my photo shows!), but they are just as enjoyable for an autumn-themed breakfast, dessert or a snack with tea or coffee.

Servings

This will make 12 muffins.

Timings

10 mins to chop the squash, and 30 mins to roast it. The rest of the prep can be done while the squash is roasting, and the muffins will then take 25 mins to bake at 180C.

You Will Need

  • Pumpkin, butternut or other squash, peeled with seeds and pith removed, and cut into chunks. You will need 250g of chunks.
  • 255g self-raising flour
  • 1 tsp bicarbonate of soda
  • half tsp salt
  • 2tsp mixed spice
  • 140g caster sugar
  • 1 egg
  • 150ml milk
  • 2 tablesp runny honey
  • 90 ml vegetable oil
  • 50 g dried fruit
  • 50g chopped mixed nuts
  • a few handfuls of pumpkin and sunflower seeds to garnish

Method

  1. Spread the chunks of squash out on a baking tray, drizzle with oil, and roast in an oven at 180C for 30 mins.
  2. While the squash is roasting, prepare a muffin tin or mould.
  3. In a bowl, sift together flour, bicarb, salt, spices and sugar. Add the nuts and dried fruit and stir well.
  4. In a separate bowl, mix the egg, milk, oil and honey.
  5. When the squash has finished roasting, remove from the oven. The chunks should be charred and caramelised at the edges. Lift them on to a plate and set aside to cool for 10 mins.
  6. Whirl the squash chunks in a food processor with blade fitted, till you have a puree. This process should also help the squash to cool further.
  7. Scrape the squash puree into the egg mixture and stir. Then add the egg mixture to the dry ingredients and stir well to combine.
  8. Spoon the combined mixture into the muffin tin or mould. Sprinkle a few pumpkin and sunflower seeds on top of each muffin. Bake in the oven, still at 180C, for 25 mins until golden.

Customise it!

Cut down on time to bake the muffins by roasting the squash earlier, perhaps when you already have the oven on cooking something else. Puree it and set aside to cool, then use as stated. Feel free to substitute other types of nuts and seeds as you prefer.

Musical choice for this post comes from Inspiral Carpets. I have just obtained tickets to see the band on tour in London next spring. I’m excited about this – I have grown to really like their music in the last few years but haven’t seen them before. I especially like the 60s sounding farfisa organ played by Clint Boon. They have lots of great tracks but this one seems particularly appropriate to the season – She Comes in the Fall.

Categories
Bakes Desserts Recipes

Austrian Apple Cake

It’s a great pleasure to introduce our latest guest post this week on A Different Kitchen. My good friend, and accomplished cook, Eva, shares with us an old family recipe from her native Austria. Eva treated me to a generous slice of this recently (see my photos) and it was delicious!

Hi, this is an old family recipe of mine from Austria, where I grew up. It’s special to me as it reminds me of my childhood. Mum used to make this cake for when we had friends round for coffee. It’s a recipe that was passed down from one of her aunts to my Mum. Also, this is a typical Austrian “fruit cake” where you use the fruits according to the season, especially plums, apricots, pears or cherries.

Ingredients

160g unsalted butter

160g sugar

160g self raising flour

3 eggs

Zest of half a lemon

2-3 spoons of dark rum

3 cooking or dessert apples

Flaked almonds

Icing sugar for dusting

Method

Beat butter, sugar and egg yolks in a bowl until fluffy and pale in colour. Add the lemon zest and rum, then add the flour. Whisk the egg whites till fairly stiff and fold into the mixture. Put the cake mixture into a baking tin. I used a spring form cake tin of 23cm diameter. Then peel the apples and cut into thin slices and arrange them on top of the cake. Sprinkle with flaked almonds and bake in the oven at 180C (fan oven) for about 45 minutes.

Finish with a dusting of icing sugar before serving!

My choice of musical track for adding to Kevin’s ADK Playlist is the “Hallelujah Chorus” from the Messiah by Georg Friedrich Händel. I sung this piece many years ago when I first joined a choir in this country and thoroughly enjoyed it then. Many years later and with a different choir I sung it again at Winchester Cathedral, which was so special and one of my best moments in life. I find the Messiah totally exhilarating and uplifting which makes it one of my favourite pieces.

Categories
Bakes Blog Snacks

Selkirk Bannock

Until recently, I had never heard of the Selkirk Bannock. That’s all changed since a friend of the family brought us one back as a gift from a holiday in the Scottish Borders. Delicious it is, too!

According to legend, Queen Victoria visited Sir Walter Scott’s granddaughter at Abbotsford in 1867, and was served a Selkirk Bannock made by local baker Robbie Douglas. As a result the Bannock became famous and fashionable throughout Scotland, and is still made today to Robbie’s original recipe.

A rich but lightly textured fruit loaf packed with sultanas, my first impression was the malty, slightly sticky soft crust giving off a scent of scotch whisky. According to the ingredients list, however, there is no whisky included in the mix.

It is eaten simply – sliced and spread with butter. Toast it and let the butter melt (see my photo), and it is even more delicious.

It fully deserves its place in Scotland’s great culinary tradition.

Accordingly, for musical inspiration, I’ve chosen a modern day anthem from Scottish duo Craig and Charlie Reid, better known as the Proclaimers. I was amused to read recently that an interviewer once asked Craig and Charlie how they first met (eh, they are identical twins).

I know how challenging it can be to meet my daily target of 10,000 steps. Maybe, however, with a good few slices of Selkirk Bannock with butter in me for sustenance, I too could manage 500 miles?


Categories
Bakes Recipes

Blackberry, Oat & Yoghurt Muffins

The end of summer/start of autumn is a great time of year for fresh blackberries. You may find them in supermarkets and farm shops, and some farms will let you pick your own. Best of all though is that they grow plentifully in the wild in hedges in public places and country parks, and can usually be picked free of charge.

Nutritionists will say that they are good for our overall health in various ways, such as being a source of Vitamin C and antioxidants, which protect our body cells.

I recently went on a walk to pick some in a nearby country park. I have included a photo of my haul of two filled plastic containers. My Fitbit told me afterwards that I had earned 52 active zone minutes from the exercise, which shows how blackberries can be good for our health in more ways than one!

There are many ways to use blackberries. A favourite of mine is as a topping on muesli.

I have also used them recently in a blackberry, coconut and almond traybake.

Probably my favourite though is the muffins, shown in my main photo, where they are combined with rolled oats and natural yoghurt, The muffins can be enjoyed for breakfast, as a lunchtime snack, a picnic dessert, or indeed at any time.

Servings

Ths will make 12 muffins.

Timings

15 mins to make, 25 mins in the oven at 180C.

You Will Need

  • 200g plain flour
  • 1 and a half tsp baking powder
  • half tsp salt
  • 85g rolled oats
  • 240 ml natural yoghurt
  • 1 tsp bicarbonate of soda
  • 1 egg, beaten
  • 120g light brown sugar
  • 90ml milk
  • 90ml vegetable oil
  • 140g fresh blackberries

Method

  1. Preheat the oven to 180C and prepare a muffin tray/container. I use a flexible silicone plastic mould that requires no greasing. This makes it especially easy to pop out the muffins when they are baked.
  2. Wash and dry the fresh blackberries. Lay them on a dish.
  3. Weigh out the flour and sprinkle a few tablespoons over the blackberries, turning them so they are coated in the flour. This will help stop them sinking to the bottom of the muffin mixture as they are baking.
  4. Mix together the rest of the flour, baking powder and salt in a bowl.
  5. In a separate bowl, stir together the oats, yoghurt and bicarb of soda. Let this stand for a minute, then add the beaten egg, sugar, milk and veg oil.
  6. Pour the oat/yoghurt mix into the flour mix and stir to combine. Add the flour-coated blackberries in the final few strokes.
  7. Spoon the combined mixture into the muffin tray and bake for 25 mins.
  8. Remove from the tray/mould when the muffins have slightly cooled, and let cool fully on a wire tray.

Customise it!

Missed the blackberry season? Don’t worry – substitute another fresh berry, such as raspberry or blueberry, and the muffins will be nice also.

If you do venture into the countryside to go blackberry picking, here’s a topical track from The Farmer’s Boys to get you in the mood.

Categories
Desserts Recipes

Plum and Almond Crumble Squares

Those following on Twitter (@differentkitch) may recognise the above photo from my tweet earlier in the week. It shows a batch of lovely Victoria Plums, which have recently come into season and are appearing on our market stalls. This post shows how I turned them into Plum and Almond Crumble Squares.

I researched some plum recipes, with the general idea that I felt they would be great in a traybake. I settled upon one in BBC Good Food and, as usual, modified it to my liking.

The Squares have several layers, beginning with a biscuity base. On top of this is an egg custardy/almond/ bakewell pudding type layer, and then the subtle taste of the chopped plums. The main area where I modified the recipe was on the topping, adding rolled oats, pumpkin seeds and sunflower seeds to flaked almonds. This makes a crumble finish which is totally loaded, adding a toasted crunch as it bakes.

Servings

This will make 16 square slices (4 had already been eaten when the above photo was taken!)

Timings

Total prep time about 25 mins, total cooking time about 1 hr – 1hr 10mins.

You Will Need

  • 250g baking spread
  • 225g caster sugar
  • 300g ground almonds
  • 140g plain flour, plus an additional 25g
  • 2 eggs
  • 1 teaspoon mixed spice
  • 1 teaspoon baking powder
  • 7 plums, stones removed and cut into slices
  • 50g flaked almonds
  • 50g rolled oats
  • 25g pumpkin seeds
  • 25 g sunflower seeds

Method

  1. Grease and line a baking dish with baking paper. My baking dish was 20cm square. Cut one piece that extends across the base and two opposite sides, leaving a little overhanging on each side. Paste a strip on each of the two remaining sides.
  2. Put the baking spread, sugar and ground almonds in a food processor with blade fitted. Pulse until it is mixed.
  3. Remove the mix from the food processor and reserve half of it aside. Put the other half back in the processor with the 140g flour, and mix till it forms a dough.
  4. Remove the dough and flatten it out with a rolling pin on a floured surface. You will not be able to lift it up in one piece (like a pastry base) but, as it gets flatter, lift it in pieces and gradually place these in the base of the baking dish. Press it down with the back of a spoon and distribute it so that it covers all of the base and at least about half way up the sides. It will all meld together as it bakes.
  5. Fill the base with a piece of crumpled up baking paper and baking beans, and place in the oven to bake blind at 180C for 10 – 15 mins. The edges of the base should be beginning to brown.
  6. While the base is in the oven, make the filling. Into the food processor goes the reserved half of the spead/sugar/almond mix. Add the 2 eggs, the 25g flour, mixed spice and baking powder. Pulse it to form a creamy batter.
  7. Remove the base from the oven and add the batter on top. Then gently press the sliced plums into the top of the batter so that they remain visible. Make sure that they are evenly spread across the whole of the cake – when it is cut into squares you want each one to contain plums. Bake in the oven, still at 180C for 25 mins.
  8. In a bowl, mix the flaked almonds, oats, and the two types of seeds. Give them a good swirl so that they are well mixed up together.
  9. Remove the dish from the oven and sprinkle the topping over. As with the plums, ensure even coverage. Gently press the nuts, oats and seeds towards the batter mix, so that they will adhere to it, and not fall off when it is cut!
  10. Place back in the oven for another 25 mins. After about 20 mins, check it and insert a skewer in the centre. If it comes out clear, it is baked. If it has some uncooked batter on it, put back in for another 5 – 10 mins and keep an eye on it.
  11. When baked to your satisfaction, remove and leave aside to cool in the tin. When cool, the base will have set and you should be able to lift it out in one piece, by gripping the two overhanging sides of the baking paper liner.
  12. Put on a board and cut into 16 squares. I find a serrated (bread) knife is better for cutting through the sides of the crust, so that these doesn’t crumble. Any other sharp knife will cut through the bottom of the base.

Customise it!

You could add other types of nuts and seeds to the crumble topping – whatever you fancy really. Just make sure you press the pieces gently towards the batter so that they adhere to the cake. Some of the crumble topping will still fall off and flake into your hand as you bite into it, but that is all part of the fun and indulgence of eating it. It’s food to make you feel good!

Categories
Mains Recipes

Summer Greens Quiche with Stilton and Ricotta

Summer green vegetables are reaching their peak just now, and this quiche brings out the best in them. Fetch a crop from the garden or market stall, and mix with creamy ricotta and salty blue cheese in this fresh and vibrant quiche.

Servings

Makes 4 generous slices, or 6-8 average ones!

Timings

About 15 mins initially to prepare the pastry, and another 15 mins to prepare the filling including steaming the veg. Baking time is an initial 10 minutes for the case alone, then 45-50 mins for the filled quiche.

You Will Need

For the pastry

  • 115g plain flour
  • 115g wholemeal flour
  • 100g soft margarine
  • a pinch of seasalt
  • a pinch of paprika
  • a few drops of cold water

For the filling

  • Approx 180g fresh green veg (I used broccoli, french beans, runner beans and mange tout)
  • about 3 spring onions
  • 3 large eggs
  • 130g ricotta cheese
  • 50g stilton cheese
  • twist of black pepper

Method

  1. Grease a 20cm flan dish with some margarine or spread. I like to line the base with a circle of greaseproof paper in addition, as I find it helps to remove the quiche once baked.
  2. Make the pastry by sieving the two flours into a food processor fixed with blade, along with the margarine cut into cubes. Pulse until it resembles fine breadcrumbs. Add a few drops of water and pulse again until you have a ball of pastry whirling around the blade. Take it out, pat into a ball and wrap in clingfilm, placing it in the fridge to stay cool.
  3. Prepare the veg. Trim the ends off the beans and cut into 2-3cm lengths. Trim the ends of the mange tout, and cut any leaves and tough stalks off the broccoli.
  4. Put the veg into a steamer over boiling water for about 10 mins.
  5. While the veg is steaming, turn on the oven and set to 180C. Take the pastry from the fridge and roll out with a rolling pin to a size that will fit the flan dish. Carefully place it into the dish. Leave any pieces overhanging at the edges for the moment. Prick the base with a fork in 5 or 6 places. Place it back in the fridge while the oven is getting up to temperature.
  6. Remove the veg from the steamer and drain in a colander. Set on one side.
  7. With the oven up to temperature, remove the pastry dish from the fridge. Crumple a square of greaseproof paper with your hands and place it in the dish. Fill the paper with baking beans, spreading them out with your fingers so they cover the whole of the base and are gently pressed up to the sides. Place in the oven for 10 mins.
  8. While the pastry base is baking, top and tail the spring onions and cut into 2-3cm lengths. Chop the stilton roughly into cubes. It will crumble a bit as you do.
  9. Mix the eggs and ricotta in a jug, and give it a few twists of black pepper.
  10. Remove the pastry dish from the oven and carefully lift the paper and baking beans into a separate bowl to cool. Don’t worry too much about any pastry overhanging the edges – it will drop off as it bakes, either at this stage or the next one.
  11. Spread the steamed veg across the pastry base, and crumble the stilton over it. Carefully pour the egg and ricotta mix into the pastry base, making sure it gets into all the little cavities between the veg. Dot over the chopped spring onions, making sure they are lightly pushed into the mixture so they don’t burn.
  12. Bake in the oven, still at 180C, for about 45 – 50 minutes. The mixture should have risen and the top should be slightly browned. Remove and leave to cool in the dish.
  13. When cool, chop into slices and serve!

Customise it!

Main opportunity for going freestyle here is in the choice of veg. Sticking broadly to the theme of seasonal green/garden veg, you can use whatever you have to hand – perhaps introduce some greens, spinach, kale or chard. Herbs will also go well. Any combination should work, but keep it to a total of around 180g so as not to overfill.

You can also use any other crumbly blue cheese in place of stilton e.g. Dorset Blue Vinney. If you’re short of time, or don’t want to bother making the pastry, then you can use some ready made shortcrust pastry.

Categories
Blog Top Tips

Accidents Will Happen!

I love following the Gods of Cookery and getting great inspiration from their books and TV shows. However, have you ever noticed that, whether it is Nigella, Delia, Hugh or any of our many other heroes, they seem to have one thing in common: everything always goes to plan? It’s a far cry from my daily experience. Don’t get me wrong – I can produce some fairly decent meals, but every once in a while I encounter a kitchen disaster.

Pastry and baking is a case in point. At one time in my development it was always touch and go whether the amazing creation I had slaved over would leave the dish in one piece, after emerging from the oven. I made the mistake of believing the manufacturer’s claim that came with the dish – we clearly had different ideas of what was meant by the term ‘non-stick’.

I thought I had cracked it when I invested in what was promoted as a state of the art tray, using technology developed by astronauts as part of the space programme. My disappointment was obvious, however, when it became clear that significant parts of the underside of my cake had become welded to the tray. A chisel would have been a more appropriate serving utensil than a cake slice.

Perhaps I should have been more sceptical about that claim. Haven’t they got any work to get on with at the Space Station? Aren’t they supposed to be analysing rock samples, or out fixing satellites or something? What were they doing – knocking up a nice Victoria Sponge? Was it somebody’s birthday?

I soon put in place a workaround for my next bake, involving a cut and paste exercise. I don’t mean that in the IT sense, it was a literal cut and paste using scissors and greaseproof paper. I smeared fairly cheap margarine over the base and sides of the tray, then measured and cut a strip of paper the right width and length to cover the base and two facing sides. The bit left over was then already the right width to cut two ribbons to stick to the two remaining sides. Hey presto, a truly non-stick traybake dish.

If this sounds like some kind of kitchen origami exercise, that’s because it’s exactly what it was. I still use this as a workaround – it gives me the confidence to proceed with making my cake mixture in the knowledge that nothing else can surely go wrong. Can it?

The moral is not to be deterred when things go wrong – it happens to all of us. Cue the next track for the ADK Playlist, channelling the wise words of Elvis Costello…