Categories
Mains Recipes

Nut Roast

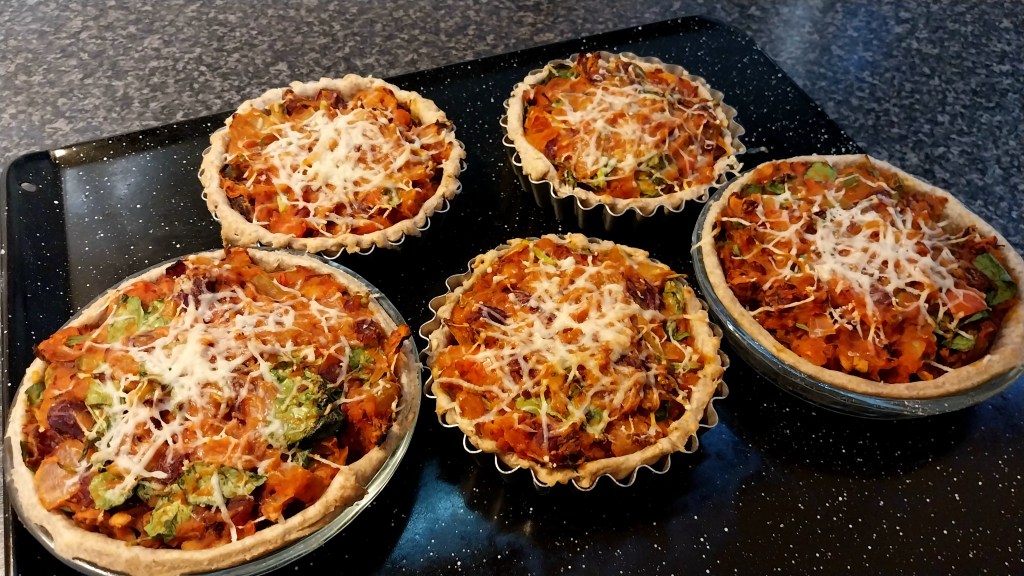
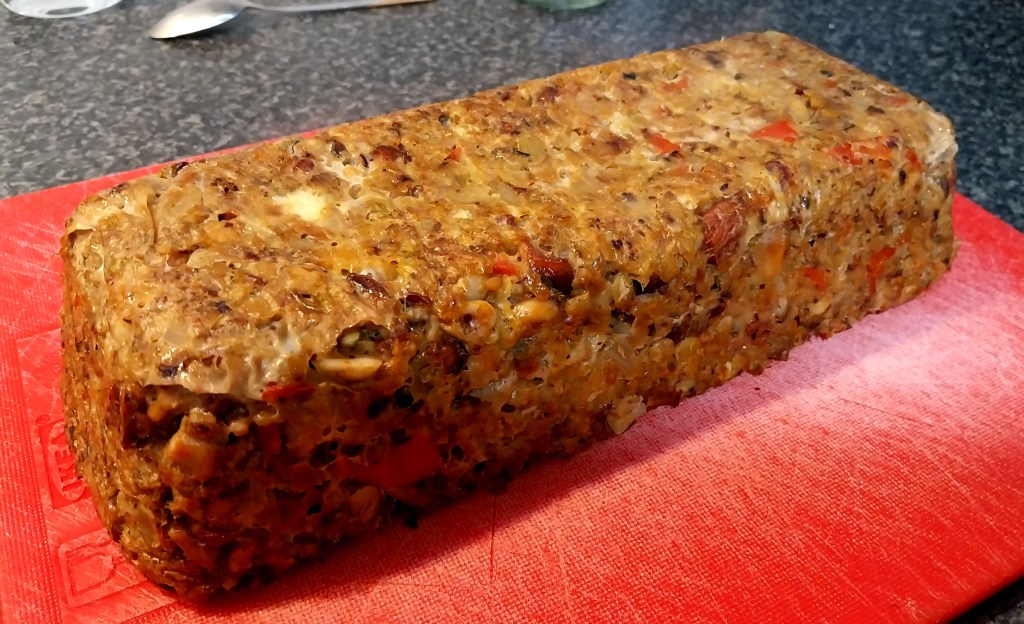
Toasted on the outside and packed to the core with creamy, crunchy nuts, red lentils and softened veg. If you’re looking for a vegetarian mains to grace the centre of your table this winter, this delicious, homemade Nut Roast is hard to beat.

Servings

6 adult servings of 2 generous slices each.

Timings

30 mins to prepare and 50 mins to roast in a fan oven at 160C.

You Will Need:

  • 150g chopped mixed nuts
  • 1 onion
  • 2 celery sticks
  • 1/2 a red pepper
  • 1/2 a yellow pepper
  • 6 – 7 chestnut mushrooms
  • oil
  • 1 clove garlic
  • 75g red lentils
  • a good squelch of tomato ketchup
  • 300ml boiling water
  • 1 tbsp vegemite
  • 75g wholemeal breadcrumbs
  • 75g mature cheddar cheese, grated
  • sea salt and black pepper
  • 2 medium eggs

Method

  1. Switch a fan oven on to 160C. Grease a 1 litre loaf dish and line it with baking paper.
  2. Spread the nuts on a baking tray and place in the oven once its reached its temperature.
  3. While the nuts are roasting, place the onion, celery, pepper and mushrooms in a food processor with blade fitted. Blitz to small pieces.
  4. Heat some oil in a large frying pan and crush in the garlic. Add in the blitzed veg and stir. Leave to gently soften.
  5. Once the nuts have roasted for 10 mins, remove from the oven and roughly chop in a food processor with blade fitted. Scrape into a large bowl and set aside.
  6. Chuck the lentils into the frying pan with the veg. Dissolve the vegemite in the boiling water and pour into the pan with the ketchup. Bring to the boil, then reduce to a simmer for about 15mins. The liquid will reduce as the lentils soften.
  7. Add the breadcrumbs and grated cheddar to the nuts and mix in.
  8. Leave the pan of veg and lentils to cool slightly for 5 mins, then add to the bowl with the nuts, breadcrumbs and cheese. Twist in a little sea salt and black pepper to your taste. Crack in the eggs and mix thoroughly.
  9. Spoon the mixture into the prepared loaf dish and compact it down with the back of a spoon. Cover with foil and place in the oven for 30mins. Then remove the foil and leave it in the oven for another 20 mins.
  10. Remove and set aside for 10 – 15 mins before inverting onto a chopping board. The nut loaf should ease out of the upturned dish, and look something like my main photo at the top of the post.
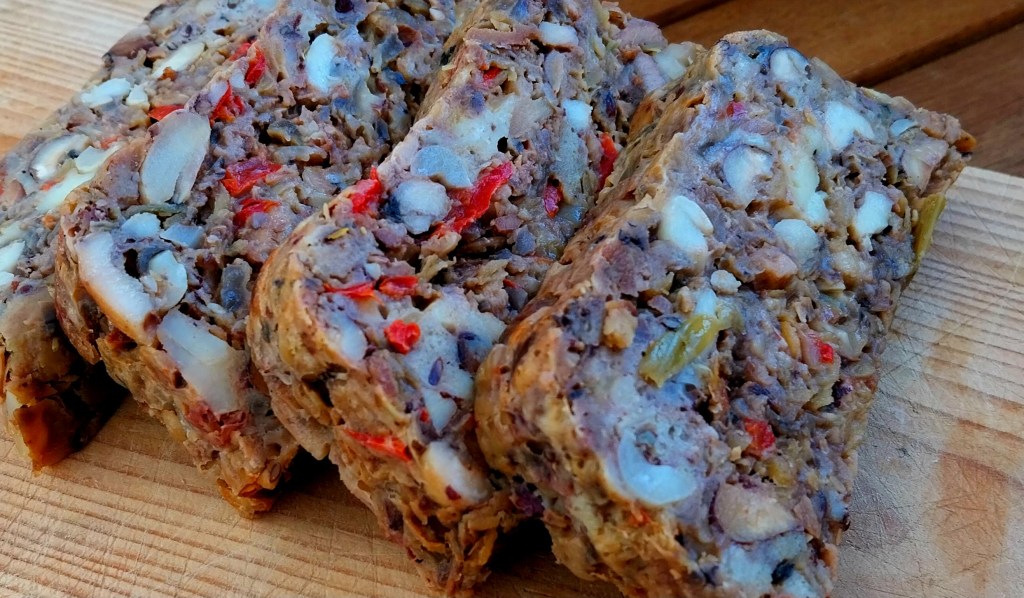
  11. You can cut slices straight away, but it will become progressively easier to cut clean slices as it cools. Slices can be reheated if necessary by microwaving for 30 – 60 seconds.

Customise It!

Try adding in fresh herbs, or shreds of cavalo nero. Swap some or all of the cheddar for crumbled blue cheese.

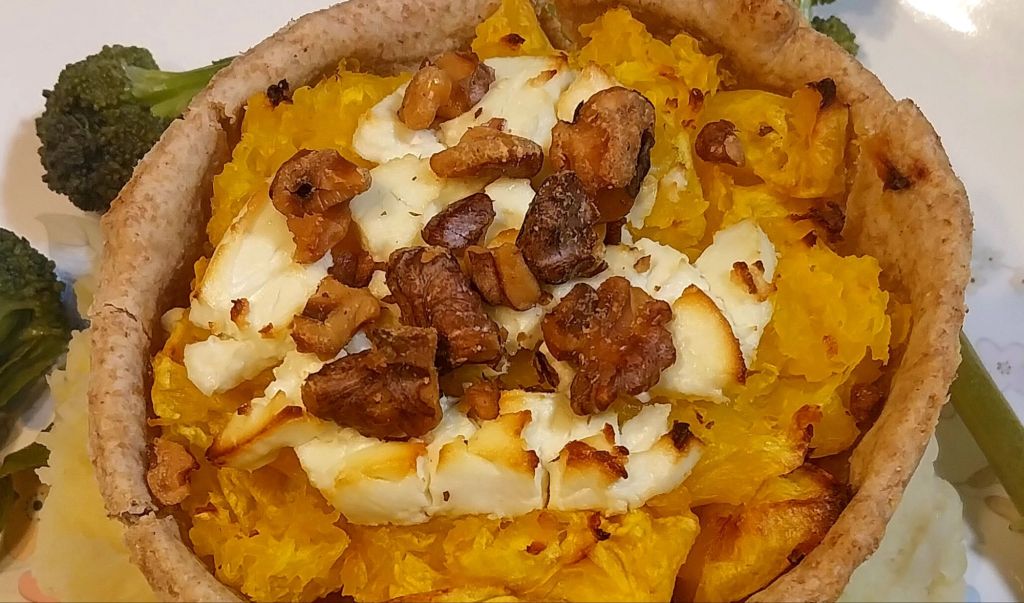
Serve it with some green veg and a simple sauce made from a can of chopped tomatoes, garlic and chopped onion. If you’d prefer to save on effort, serving with condiments like ketchup or relish is fine.

Exciting musical news this week is that one of my favourite bands has been announced as headliner at next year’s Victorious Festival. I have already seen Queens of the Stone Age live 4 times and am very keen to make it 5. I’ll be hoping a surprise gift ticket may find its way to me under the Christmas Tree this year! I expect they will play this one: Queens of the Stone Age with Sick, Sick, Sick.

Categories
Blog

Autumn Escape

Our motorhome has been back in action this week, on an autumn trip to Cranborne Chase, in England’s south-west.

The area is designated as a National Landscape, which is the new official name given to what were formerly called Areas of Outstanding Natural Beauty.

The name may have changed, but the landscape certainly hasn’t – not for hundreds of years in fact. This makes it a perfect environment for long country walks across an expansive, rolling green terrain. Gentle climbs take you up high to reveal dazzling views, while paths weave their way through water meadows with clear trickling, bubbling streams past ancient mills. There aren’t many people around and it is really quite remote. Am I painting a clear enough picture here?

It is particularly special this time of year because, as everyone knows, the countryside generally looks even better with autumn colours.

My main photo at the top of the post shows Philipps House, dating from the early 19th Century. It is at the centre of the massive grounds of Dinton Park, which is fully open to public access. We had very clear skies, and from the highest points it was possible to see the spire of Salisbury Cathedral to the east.

The intricate network of footpaths and bridleways takes in some very old buildings and traditional pubs. This photo shows St. Mary’s Church in Dinton village, dating from the 12th Century.

This photo was taken on a walk through woods and across fields to Baverstock, where St. Editha’s Church is located. It has been here since the 15th Century, and provided a perfect lunchtime picnic spot.

We pitched our motorhome in a small site in the middle of some woods, and spent the week off-grid with no electric hook-up. It is just as well the skies were clear and the sun shone as, along with our gas tank, we were rather reliant on that solar panel on the roof 🙂 .

In such a remote location, with no shops anywhere around within walking distance, we planned in advance and took a week’s worth of food and drink. Home-made butternut chilli soup helped keep us warm in the evening.

Quiches made the week before and warmed up in the gas oven came in very handy – those 10k treks certainly give one an appetite!

The solar powered battery helped keep my phone charged overnight, which meant I could still listen to the David Bowie Playlist I’d downloaded to my phone from Spotify. No first world problems here, mate 🙂 .

I can’t quite believe that it in just a few months it will be 50 years since the release of Young Americans, which is probably my fave album of his. Here’s a great track from it: Right.

There is one more motorhome trip planned for 2024, so watch this space for developments.

Categories
Bakes Recipes

Monkey Nut Biscuits

Credit for this latest bake goes to my wife, Lesley, who refined the recipe and patiently shelled a bag of roasted monkey nuts in the process.

Monkey nuts are peanuts still in their shell, which means the nuts have no salt or anything else added. Combine them with a good quality peanut butter (the one we used has one ingredient: peanuts), and you get biscuits with a fresh, nutty taste. They have a soft textured centre and a crisp outer. You’ll find these are best enjoyed warm and eaten within a day or so.

Servings

This will give 3 batches of dough, each batch making 12 biscuits. You can freeze the mixture or keep it in the fridge for a week. That way you can have a biscuits snack ready in about 20 mins after thinking about it. 

Timings

10 mins to prepare and another 10 mins to bake in a fan oven at 180C.

You Will Need:

  • 120g butter or margarine
  • 150g crunchy peanut butter
  • 50g shelled peanuts, roughly chopped
  • 85g soft brown sugar
  • 1 large egg
  • 350g self-raising flour

Method

  1. Preheat your oven to 180°c . Prepare a flat baking tray with some greaseproof paper.
  2. In a large bowl, cream the butter, peanut butter and sugar together until completely combined. 
  3. Add the egg and mix in.
  4. Sift in the flour. Add the chopped peanuts and mix to make a dough, use your hands at the end to combine into a ball.
  5. Roll the dough into balls (about 1 tbsp of dough per ball) and place onto your baking sheets. Press each ball with  a fork to create a cross pattern which flattens the dough.
  6. Bake in your pre-heated oven for 8-10 minutes until golden.
  7. Transfer to a wire rack to cool completely, they slide off the baking paper beautifully.

Here’s a great track from The Specials that is right on theme: Monkey Man.

Categories
Bakes Recipes

Pumpkin Spice Traybake

Treat yourself this Halloween! There’s nothing tricky in the making of this traybake – a delicious, sweet and spicy sponge, laced with freshly roasted pumpkin puree and topped with crunchy, honey-coated pumpkin seeds.

These guys were just dying to try it. They’ll tell you – it’s a monster hit 🙂

Servings

Makes 16 slices.

Timings

40 mins to peel, chunk and roast the pumpkin. 15 mins to prepare the traybake and then 30 mins to bake at 180C in a fan oven.

You Will Need

  • 1 medium-sized pumpkin or other squash
  • oil to drizzle for roasting
  • 3 large eggs
  • 200g vegetable oil
  • 140g light muscovado sugar
  • 250g self-raising flour
  • 1tsp bicarb of soda
  • 2 tsp ground cinnamon
  • 1tsp ground ginger
  • 1tsp grated nutmeg
  • runny honey to drizzle
  • a handful of pumpkin seeds

Method

  1. Turn a fan oven on to 180C. Cut and peel the pumpkin into chunks – you will need around 200g. Place on a baking tray and drizzle with oil. Put in the oven for 30 mins until softened and a little caramelised at the edges.
  2. Grease and line a traybake tin – mine used is 22cm square.
  3. Crack the eggs into a bowl, and add in the oil and sugar. Mix with an electric whisk until thickened.
  4. Sieve in the flour, bicarb and spices, and fold in with a spatula to incorporate.
  5. Once the pumpkin chunks are roasted, tip them into a food processor with blade fitted, and blitz to a puree. This will also help the pumpkin to cool. Add the puree to the bowl and stir to mix in.
  6. Tip the mixture into the lined traybake tin and level with a spoon. Place in the oven for 30 mins or until nicely browned, and a skewer inserted in the centre comes out clean.
  7. For the last 5 mins of baking, sprinkle the pumpkin seeds over and drizzle with honey.
  8. Remove from the oven and leave to cool in the tray. Transfer to a board and cut into slices.

Customise It!

Don’t just save the pumpkin seeds for the topping – chuck another handful into the mixture along with some chopped nuts.

Have fun this Halloween, eat well and don’t let the boogeyman get you! Here’s Echo & the Bunnymen with People Are Strange.

Categories
Mains Recipes

Butternut, Goat’s Cheese & Walnut Tartlets

Out at a restaurant recently, I spotted rosary goat’s cheese tartlet on the menu, and thought it sounded interesting. It was delicious – mixing the soft, slightly acidic creaminess of goat’s cheese with caramelised onion in a short, biscuity pastry base. I came away inspired to try making my own – always a sign that I’ve enjoyed a good meal.

For my version, I decided to pair the creamy goat’s cheese with toasted walnuts, over an autumnal-coloured base of wholemeal shortcrust pastry and sweet, roasted butternut squash.

I was pleased with the result, in particular how well the tastes of the goat’s cheese and toasted walnuts complement each other, so am sharing it here. I’ll say more below on options for sides, to serve it up as an attractive vegetarian mains.

You’ll need 4 tartlet or shallow mini-pie dishes – the ones I used are each about 11cm diameter.

Servings

Enough here for 4 tartlets.

Timings

30 mins initially to roast the butternut and prepare the pastry. 10 mins to assemble the tartlets, and another 25 mins to bake them.

You Will Need:

  • half a large butternut squash, peeled and cut into small chunks
  • olive oil to drizzle
  • 125g plain flour
  • 100g plain wholemeal flour
  • pinch of salt
  • 100g butter
  • several drops of cold water
  • 1 rosary goat’s cheese
  • 60g walnuts

Method

  1. Turn on a fan oven to 180C. Spread the butternut squash chunks on a baking tray and drizzle with olive oil. Add to the oven once it’s up to temp, and leave for 30 mins.
  2. Next, make the pastry. Sieve the flours and salt into a food processor bowl, with blade fitted. Cut the butter into chunks and add in, pulsing the mix a few times till it resembles breadcrumbs.
  3. Pour in a few drops of water and pulse again. Repeat until the pastry comes together and is whirling round the bowl in one large ball, with the blade.
  4. Remove to a floured surface and finalise shaping it into a roundish ball. Wrap in cling film and put in the fridge for 10 mins.
  5. Take the tartlet dishes and spread with oil or butter, so that they won’t stick. Remove the pastry from the fridge and roll out to about 1/2cm thickness on a floured surface. Cut off a round or square that will cover one of the tartlet dishes. Drape over the dish, then press down and trim the edge for a neat finish. Repeat with the other 3 tartlet dishes.
  6. Remove the butternut from the oven. It should be soft and a little charred at the edges. Press down all over with a fork to make it into a soft, orange mash.
  7. Scoop forkfuls of butternut mash into the tartlet pastry bases, and spread it out towards the edges. Arrange 2 – 3 discs of rosary goat’s cheese on top. Place in the oven for 20 – 25 mins.
  8. For the final 5 mins of baking, remove the tray from the oven and sprinkle the walnut pieces on top. Press down gently into the soft cheese so that they hold in place.
  9. Remove from the oven when they’re looking like mine in the main photo above – you want the butternut and goat’s cheese discs to be browning and caramelising at the edges, but not burning.

Customise It!

I served the tartlets warm on a bed of celeriac mash, with steamed purple sprouting broccoli on the side. Any seasonal veg will work well as an accompaniment. You could also drizzle some baby potatoes with oil and add a few twists of seasalt, putting them on a roasting tray in the oven alongside the tartlets. You can also enjoy them cold with a salad, and maybe some leaves scattered over.

Music-wise, I’ve been very encouraged recently by the comments Robert Smith’s been making in the media about playing some gigs again next year. I’m a long time fan of The Cure since seeing them in their very early days supporting Siouxsie & the Banshees. There is also a new album fully due out next month, which I’m looking forward to. For now, here’s a classic from their early days: The Cure with Jumping Someone Else’s Train.

Categories
Bakes Recipes

Panela & Cacao Nib Muffins

I’ve been keen to try out a new ingredient I discovered on my recent travels, while visiting Cornwall’s Eden Project.

Panela is a block of totally unrefined raw sugar cane. Produced in Colombia, it retains the good nutrients and vitamins that are naturally present, but usually screened out by the refining process. It is reported therefore to be a healthier alternative to even unrefined brown sugar. Used in baking, it adds a golden colour (see my main photo above) and natural caramel, or toffee, flavour.

Panela was featured in the Eden Project’s Rainforest Biome, as a good example of organic and sustainable, small scale farming in South America. It’s available to purchase in their shop, sourced (of course) from the original producers on fair trade terms (I’ve since found that it can also be purchased via the internet).

I decided to keep the rainforest theme going in these muffins, by combining it with organic cacao nibs bought from a local refillery. Bitter, chocolatey, crunchy and naturally low in sugar, cacao nibs come with their own good mix of nutrients.

It all makes these some of the healthiest muffins I’ve featured yet on A Different Kitchen. And they’re delicious.

Servings

Makes 12 muffins.

Timings

15 mins to prepare, 25 mins to bake at 160C in a fan oven.

You Will Need:

  • 280g plain flour
  • 3 tsp baking powder
  • 1/2 tsp sea salt
  • 100g grated panela
  • 70g dried fruit
  • 1 egg
  • 150ml milk
  • 90ml rapeseed oil
  • 60g cacao nibs

Method

  1. Switch on a fan oven to 160C. Prepare a muffin tin or mould.
  2. Sieve the flour, baking powder and salt into a bowl. Stir in the dried fruit so it is evenly coated in the flour.
  3. Place another bowl on a weigh scale. Pick up the brick of panela and coarsely grate it into the bowl until you have around 100g. Add it to the flour. Originally I thought I would slice off a 100g piece, then grate it. However, the block of panela is so solid it is impenetrable by a knife!
  4. In another bowl, crack the egg and mix it with the oil and milk.
  5. When the oven has reached temperature, pour the egg mixture into the flour and combine. Spoon into the muffin tin or mould.
  6. Finally, stud the cacao nibs into the surface of the muffins, pushing them down gently so they adhere to the mixture.
  7. Place in the oven for 25 mins or until evenly browned.

Customise It!

If you are unable to source panela, then the best unrefined brown sugar you can find, such as muscovado, will do nicely. I included the soft dried fruit to complement the crunch of the cacao nibs and add interest to the texture. My choice was organic dried cranberries but you can use sultanas if you prefer.

Have you come across, or maybe even used, panela? I’ll be interested to hear in the comments.

Here’s a track from an album I’ve been rediscovering since returning from holiday. I really enjoyed The B-52s’ Cosmic Thing when it was first released, but haven’t played it in years. A few listens have reminded me how many brilliant tracks it contains. Here’s one of them: The B-52s with Roam.

Categories
Blog Snacks

Cornish Cream Tea

A cream tea is a must when visiting Cornwall. There are plenty of cafes offering it, wherever you go. This one we enjoyed while visiting the town of St. Ives.

It’s a very simple and delicious meal: freshly baked scones, halved and spread with Cornish clotted cream and fruit jam. Served up, of course, with a pot of tea.

A debate rages about whether the jam or the clotted cream should be spread first – I’m a firm fan of the clotted cream providing the under layer, and then topping off with the jam, as my photo above shows.

For this meal, we actually bought a bag of scones that were fresh from the oven, in the St. Ives Bakery (the just baked aroma in the shop was heavenly). We also bought a tub of Rodda’s clotted cream, and took these back to our motorhome pitch, on a site perched up on the edge of St. Ives, with views over the bay.

We already had a jar of locally made mixed fruit jam that we’d bought earlier on our travels, in Boscastle.

St. Ives is a beautiful coastal town. At low tide you can walk into the main port across the expansive golden beaches.

At high tide also, there are many vantage points for enjoying the views.

As you can see, the sun was shining, so we sat al fresco and enjoyed this classic lunch. With Cornish Tea, naturally.

Talking about clotted cream gives me a natural link to this track by the original supergroup, for adding to the ADK Playlist. This is Cream with Badge. Take it away, Eric!

Categories
Bakes Desserts Recipes

Blackberry & Apple Crumble with Custard

You want comfort food? Here you go!

As my recent posts show, I’ve been making the most of blackberry season, and the generous bounty of juicy, fresh fruit burgeoning on our local hedgerows (see It’s Blackberry Time!).

This dish sees them combined with windfall apples that have tumbled on to the lawn from the trees in our garden, and topped with crumble. Serve it warm with a dollop of vanilla custard. And relax!

Servings

6 adult portions.

Timings

25 mins to prepare, and another 25 mins to bake at 180C.

You Will Need:

  • 4 large eating apples
  • 350g blackberries
  • 85g plain flour
  • 85g wholemeal flour
  • 85g butter
  • 85g caster sugar

Method

  1. Switch on a fan oven to 180C.
  2. Prepare the crumble by combining the flour, butter and sugar in a bowl. Rub together between the fingers until it resembles breadcrumbs in texture. Set aside.
  3. Put the blackberries in another bowl and place in the microwave on full power for 5 – 6 mins until soft and juicy. Remove and squeeze the juice through a sieve into a bowl, leaving the pips and pulp behind (to be discarded).
  4. Peel and slice the apples, discarding the cores. Scatter across the base of a casserole dish, then cover with the blackberry juice. Sprinkle the crumble mixture on top. Place in the oven at 180C for 25 mins.
  5. While the crumble is cooking, make up some custard using a store cupboard mix like Bird’s, following the instructions on the packaging.
  6. Serve the crumble warm in a bowl, with a swirl of yellow custard alongside.

Customise It!

Cooking apples can be used in place of the eating variety, but you will need to sprinkle over a few large spoonfuls of sugar to counter the bitterness. Replace around 30g of the wholemeal flour with oats if you wish, to give the crumble an added oaty, biscuity taste.

I had thought of featuring another Oasis track here today, but after yesterday’s controversial concert ticket sale I reckon everyone’s heard enough of Noel and Liam just for the moment. Let’s hope the Man City front line this season isn’t as sluggish as the Ticketmaster website, eh lads?

Disco has been taking its place at this year’s Summer Proms at the Royal Albert Hall in London, with full orchestral backing and being televised by the BBC. Here’s one of the tracks that’s been performed really well: Yvonne Elliman with If I Can’t Have You.

Categories
Bakes Recipes

It’s Blackberry Time!

Late August is the time when lots of free, fresh fruit starts ripening up on our local hedgerows – the joys of blackberry picking are here!

For me, this usually involves stowing a large sealed plastic box in the pannier of my bike, and heading off into our nearby country park. It is relatively easy there to find a quiet spot where the berries are glinting high up in the late summer sun, turning all those solar rays into vitamin C.

This week I brought home just over 300g from a half hour session. I like to bake with them when they’re still fresh, so aim to complete the transition from hedgerow to cake in under 3 – 4 hours. Solar powered baking, if you like.

I decided to make the Blackberry and Coconut Crumble Squares that I’ve featured previously on A Different Kitchen. You can see this week’s batch in my photo at the top of the post, and again below.

It’s a favourite in our household, and there is really only a short window of a few weeks every year in which this traybake can be made fresh – so why not? Just follow the above link to find the recipe.

I kept a few berries back as I like to have them topped over oats, nuts and seeds as a breakfast dish, with some milk and honey. Grating or chopping in some apple, fresh from our trees in the garden, is the perfect complement.

There may well be more blackberry recipes over the next few weeks, so stay tuned.

Choice of music today can really only be from one band – the long-awaited Oasis reunion tour has finally been announced. Along with probably the other 65 million people who live in the UK, I shall be on the Ticketmaster site this weekend trying to get a ticket before they all sell out – wish me luck!

Then it’s a case of waiting until next summer to see the concerts. That’s presuming Noel and Liam haven’t fallen out again by then, of course…

Here they are at their Beatles-influenced best, with Whatever.

Categories
Bakes Recipes

Dorset Apple Squares

Having invited friends over this week for coffee and cake in the garden, I was keen to bake something tasty and seasonal for us all to enjoy. The previous few days had been spent down in Dorset (home of the famous Dorset Apple Cake), which started me thinking, as the apple trees in the ADK garden are now laden with fruit (see below). With a bit of help from a recipe on BBC Good Food, the idea for this traybake slowly came together.

Servings

Makes at least 16 squares.

Timings

15 mins to prepare, 45 mins in a fan oven at 160C.

You Will Need

  • 400g apple
  • half a lemon
  • 220g butter, softened
  • 250g caster sugar
  • 4 eggs
  • 350g self-raising flour
  • 2 tsp baking powder
  • ground cinnamon and dark brown sugar, to sprinkle

Method

  1. Grease a baking tray and line with baking paper. The one I used is 22cm square. Switch the oven on to 160C.
  2. Peel and finely chop the apple. Place in a bowl and squeeze the lemon over. Stir so that the apple is coated in the lemony juice.
  3. Place the butter and caster sugar in a separate bowl and cream with an electric mixer. Crack in the eggs and mix.
  4. Sieve in the flour and baking powder, and fold in with a spatula, so that there are no dry ingredients.
  5. Tip in about 75% of the chopped apple and stir to incorporate.
  6. Spoon the mixture into the prepared baking tray and level with the back of a metal spoon. Sprinkle over a dusting of ground cinnamon, and then crumble over the dark brown sugar. Gently press in the remaining pieces of apple.
  7. Place in the oven at 160C for 45 mins, by which time a skewer inserted in the middle should come out dry.
  8. Remove and leave in the tin for 10 mins, before transferring to a wire rack to cool. Cut into 16 squares.

Customise It!

Use mixed spice or grated nutmeg in place of the cinnamon if you wish. Enjoy a square on its own to accompany a tea or coffee, or with a few dollops of cream or natural yoghurt alongside.

I heard this track on the radio recently, and was impressed by its fresh and distinctive sound. This is Sub Focus with Off the Ground.