Categories
Desserts Recipes

Cherry, Mascarpone & Biscotti Dessert

Here’s a Valentine’s Day dessert that you will love. Layers of bittersweet cherries, creamy mascarpone cheese and crumbled almond biscotti combine in a bowl of deliciousness that is both smooth and crunchy.

In fact, don’t just keep it for Valentine’s Day – this is so good it will wow your dinner guests any day of the year.

Servings

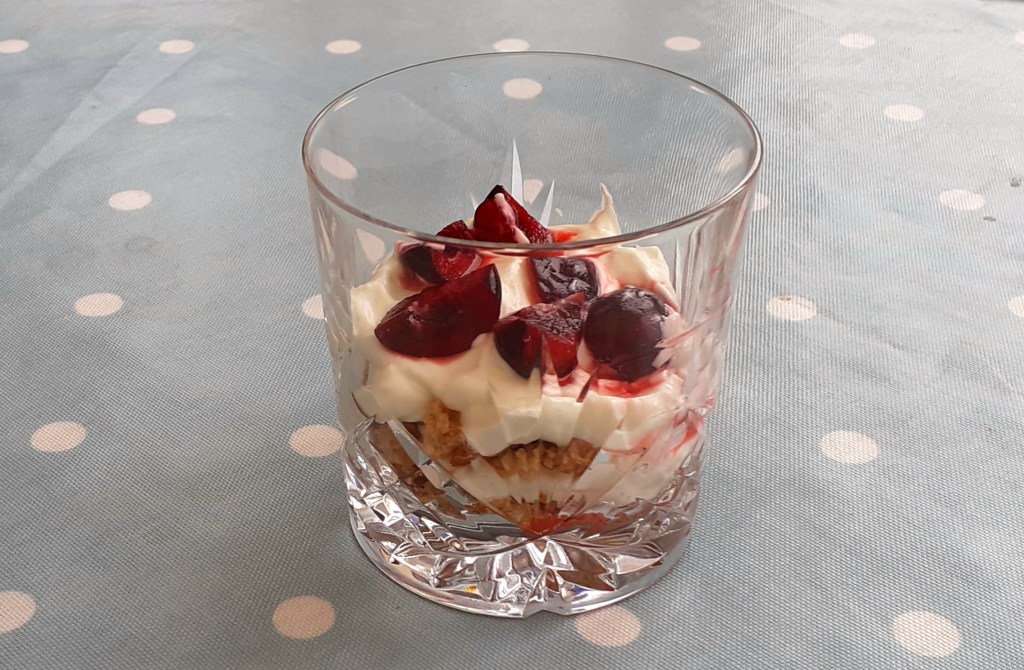
This will make 4 individual desserts like the one shown above.

Timings

20 mins to prepare the 3 component layers in advance, then a further 5 mins to combine.

You Will Need

  • 180g cherries, chopped into quarters with stones removed
  • 2 tsp icing sugar
  • Juice of half a lemon
  • 150g mascarpone cheese
  • 150g greek yoghurt
  • 1 tsp vanilla extract
  • 100g almond biscotti
  • glass tumblers to serve

Method

  1. Put the cherries in a bowl with 1 tsp icing sugar and the lemon juice. Give it a good stir so that all the cherries are coated in sugary juice. Set aside for 10 mins to soak, while you prepare the rest.
  2. In a separate bowl, mix together the mascarpone, yoghurt, the other tsp icing sugar and vanilla. I used an electric mixer to make sure the thick mascarpone was integrated with the thinner yoghurt.
  3. Put the biscotti in a bag and crush it to rough crumbs with a rolling pin. This is fun, so give it a good bash and take out all your frustrations!
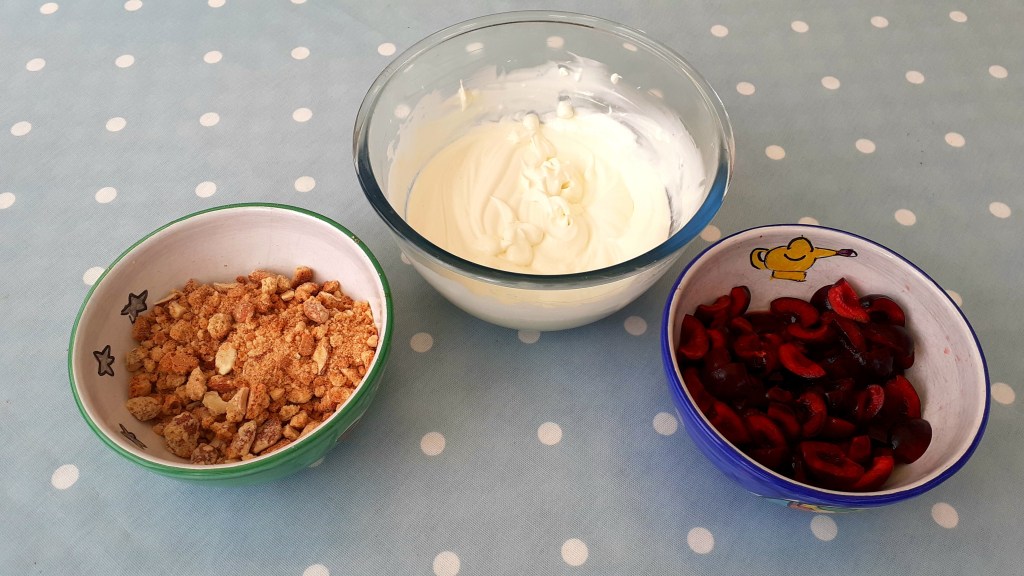
  4. Steps 1 – 3 can be done well in advance of serving. My photo above shows the three component parts, ready to be layered.
  5. The next steps should be taken no more than 2 hours before serving. This is so that the crushed biscotti retains its crunch and does not go soggy. Noone wants soggy biscotti.
  6. Put half the crushed biscotti in a layer across the bottom of each of the glasses. Top with a layer of half of the mascarpone mix, then half the cherries.
  7. Follow this with one further layer of the remaining biscotti, the mascarpone, and finally the cherries on top.
  8. Serve. The layering means that as you dig down into the glass with your spoon, you mix it up and get a taste of all the parts together.

Customise It!

I am a fan of the classic taste combination of cherry and almond, hence this recipe. However, you can experiment with other types of biscuits – amaretti or biscoff would work well. Equally, you could substitute other fruit for the cherries – maybe raspberries and blueberries, or a mix of both.

Time for a Valentine’s themed track on our ADK Spotify Playlist. Here is some early Simple Minds with Love Song.

Categories
Blog Desserts

Peach Melbourne

Peaches are in season in Australia right now, and plentiful in the shops. It’s no surprise therefore that, just as Wimbledon has strawberries and cream, the Australian Open has Peach Melbourne.

The Australian Open, the first tennis major tournament of 2023, is under way at the moment, and is a pretty big deal here in Melbourne. I’ve spent a couple of days at it this week and, aside from watching the tennis, have enjoyed its Peach Melbourne signature treat.

It is of course a play on Peach Melba, the dish created in the Victorian era by a French chef, in honour of the Australian soprano, Nellie Melba. Melba was a stage name that she took from her home town of Melbourne.

The three key ingredients are ice cream, fresh peaches, and raspberries. At the Australian Open, it is served (sorry, couldn’t resist that one) as a tub of whirled vanilla ice cream, covered with a drizzle of pureed fresh peaches, and topped with pieces of dried raspberries (see my main photo).

It is lovely to taste – especially the fresh peach sauce – and a welcome respite from the heat. The temperature hit 37C one day this week, and play on the outdoor courts had to be suspended. I would not be surprised if the tennis players all headed to the Peach Melbourne outlet to cool down.

Regular followers will know that I featured on ADK some ice cream creations made with my own ice cream maker, a few months back during the UK summer. I haven’t made this peach dish before but will definitely be giving it a go when I get home. Watch out for a future post.

As for the tennis, I have really enjoyed seeing the game played up close by world class players. The first day we bought a ground pass, which gives access to all of Melbourne Park, except for the 4 show court arenas. You can wander around and see who is playing, then stand or sit at a match and watch it for as long as you wish, before moving on to another. You can go fetch a coffee (or Peach Melbourne) whenever you choose, or take a deckchair on a central green watching the action on a big screen.

The atmosphere is relaxed and informal off court, if fiercely competitive on. The setting is spectacular, with the skyline of Melbourne’s Central Business District (CBD) rising above the courts.

I liked being able to watch a match from a spectator gallery to the side of the court. The customary view on TV is from a raised camera position at the end of the court, but sitting to the side brings home much more effectively the speed and power with which the game is played at this level.

It’s also fun spotting any famous players taking their turn on the outside courts. The biggest name we saw there was the number 3 seed, Stefanos Tsitsipas, see below.

I knew he was a top men’s singles player, but hadn’t realised he also played doubles with his brother. There is a large Greek community in Melbourne, so the boys were receiving enthusiastic support from the fans.

It’s also possible to watch the tennis for free on a big screen, by joining these Melburnians below, at the nearby AO Hilltop – a fan fest site with decent drinks and food.

On our second day, we had evening tickets for the biggest of the show courts, the Rod Laver Arena – a lovely birthday present from my son. It was very exciting making our way to the famous 15,000 seat arena, below.

In a tense game, we saw the USA’s Seb Korda inflict a shock defeat on the number 7 seed, Daniil Medvedev.

Our session ended just after midnight – not quite as late as Andy Murray endured this week, finishing at 4am the next morning! With this in mind, our latest addition to the ADK Playlist is in honour of the gallant, battling Scot who overcame the odds to progress to the next round. This is Faron Young with It’s Four in the Morning.

Categories
Blog Desserts

Wish Upon a Cupcake

Have you ever had an issue arise while staying in an Airbnb? I’m pleased to say this one, on our current stay in Australia, had a very happy ending.

Our suspicions were raised about ten minutes after switching on the oven, and finding that it simply wasn’t heating up. Were we doing something wrong? Was there a magical button on the control panel that we were stupidly failing to press? Everything else about the apartment had been perfect, so surely the issue lay with us?

A note to the host followed, seeking help and advice. This led to a visit by her to check it out, only to conclude that, yes, the oven was indeed broken. A technical repair visit would be required and, it being nearly Christmas, the visit could not be arranged before next week, after we have moved on to our next place.

Another first world problem! For a few days we would not be able to warm a pizza, or heat up a quiche. What would we do? Aghhh!

Thankfully, the host made a very prompt and kind gesture by way of apology. She informed us that, as a measure of goodwill, a substantial gift voucher was waiting for us behind the counter at local cake deli, Wish Upon a Cupcake.

We paid a visit there the next day and were impressed. My photos show some of the cakes available in the shop. They are all baked on the premises here in Watsonia, a suburb of Melbourne.

Here is the selection we chose with our gift voucher. We were very satisfied.

You see, despite the best of intentions, things just sometimes go wrong, and it really isn’t worth getting worked up about it. Most things can be resolved through prompt, effective service. Nearly everything can be made better with cake.

Even the little buddha in the apartment’s back garden seemed to approve.

So there you are – for Christmas time, a story to warm the heart. Even if it didn’t warm our kitchen.

This coming week, they’re forecasting temperatures rising to around 29C as we move out by the beach on Mornington Peninsula, where we’ll be joined by a wider group of family and friends in the lead-up to our Australian Christmas. Time for a feelgood song! Here’s Walking on Sunshine by Katrina & The Waves.

Categories
Bakes Desserts Recipes

Coffee and Walnut Cake

It’s a great pleasure to introduce our latest guest post this week on A Different Kitchen. My good friend, and master baker, Kelvin, shares with us his recipe for Coffee and Walnut Cake. He has treated me to a slice of this and I can confirm it is delicious, with a creamy coffee coating and a walnut crunch.

Hi, this is a cake that I have made a few times now. It has always been very popular with my family, and I have developed it to take account of their feedback. In particular, I have added more coffee cream filling to coat the top and sides of the cake (not just the middle), and more walnuts. This latest version was well-received at my wife’s birthday party recently. My little 3 year-old grand-daughter liked it a lot, having a second slice and asking for me to make her next birthday cake. A satisfied customer indeed!

Timings

15 mins to prepare, and around 40 mins to bake.

Servings

I used a 24cm diameter size baking tin, enough for around 16 generous slices.

You Will Need

For the Cake

  • 225g softened butter
  • 225g caster sugar
  • 4 eggs
  • 275g self-raising flour
  • 1 teaspoon (tsp) baking powder
  • 4 tablespoons (tbs) milk
  • 2 tsp vanilla essence
  • 80g walnuts (chopped)
  • 1 tbs instant coffee granules with 1 tbs boiled water

For the Filling

  • 150g softened butter
  • 400g icing sugar (sifted through a mesh sieve)
  • 4tsp milk
  • 2tsp instant coffee granules with 2tsp boiled water
  • 50g walnuts halved for decorating the top of the cake.

Method

For the Cake

  1. Grease cake tin with a thin layer of butter and pre-heat a fan oven to 160C.
  2. Beat the eggs well in a cake bowl until fluffy. Add butter, sugar, finely chopped walnuts, flour, baking powder, milk and vanilla essence. Dissolve the coffee granules in the boiled water, and add to the bowl once cooled. Mix well.
  3. Spread mixture evenly into the cake tin.
  4. Bake until ready in oven for 30/40 mins. Check to make sure it is no longer moist inside.

For the Filling

  1. Beat softened butter and gently add filtered icing sugar (and when all icing sugar added) add milk. Dissolve the coffee granules in 2tsp water, and add when cooled. Beat together until smooth.
  2. After the cake has cooled, cut it into half. Inside one half thinly spread filling. Place other half on top and cover with the remainder of the filling and around the sides (as shown in the photo).  
  3. Finish by decorating halved walnuts over icing on top of cake.
  4. Keep in the fridge to harden the icing.
  5. Take out of the fridge 30 mins before serving.
  6. Slices can be frozen to retain freshness.

My choice of musical track for adding to Kevin’s ADK Playlist is The Sounds of Silence by Simon and Garfunkel. I particularly like this version, recorded live. The wonderful harmonies, the lyrics and the simple accompaniment on acoustic guitar combine to make this a favourite song of mine.

Categories
Breakfast Desserts Recipes Snacks

Pumpkin Spice Muffins

A feature of autumn is having lots of weird coloured and wonderful shaped pumpkins and squashes on our vegetable stalls. This recipe uses one of these to bring sweetness and moist texture to a set of freshly baked muffins. I recently made these on Halloween (as my photo shows!), but they are just as enjoyable for an autumn-themed breakfast, dessert or a snack with tea or coffee.

Servings

This will make 12 muffins.

Timings

10 mins to chop the squash, and 30 mins to roast it. The rest of the prep can be done while the squash is roasting, and the muffins will then take 25 mins to bake at 180C.

You Will Need

  • Pumpkin, butternut or other squash, peeled with seeds and pith removed, and cut into chunks. You will need 250g of chunks.
  • 255g self-raising flour
  • 1 tsp bicarbonate of soda
  • half tsp salt
  • 2tsp mixed spice
  • 140g caster sugar
  • 1 egg
  • 150ml milk
  • 2 tablesp runny honey
  • 90 ml vegetable oil
  • 50 g dried fruit
  • 50g chopped mixed nuts
  • a few handfuls of pumpkin and sunflower seeds to garnish

Method

  1. Spread the chunks of squash out on a baking tray, drizzle with oil, and roast in an oven at 180C for 30 mins.
  2. While the squash is roasting, prepare a muffin tin or mould.
  3. In a bowl, sift together flour, bicarb, salt, spices and sugar. Add the nuts and dried fruit and stir well.
  4. In a separate bowl, mix the egg, milk, oil and honey.
  5. When the squash has finished roasting, remove from the oven. The chunks should be charred and caramelised at the edges. Lift them on to a plate and set aside to cool for 10 mins.
  6. Whirl the squash chunks in a food processor with blade fitted, till you have a puree. This process should also help the squash to cool further.
  7. Scrape the squash puree into the egg mixture and stir. Then add the egg mixture to the dry ingredients and stir well to combine.
  8. Spoon the combined mixture into the muffin tin or mould. Sprinkle a few pumpkin and sunflower seeds on top of each muffin. Bake in the oven, still at 180C, for 25 mins until golden.

Customise it!

Cut down on time to bake the muffins by roasting the squash earlier, perhaps when you already have the oven on cooking something else. Puree it and set aside to cool, then use as stated. Feel free to substitute other types of nuts and seeds as you prefer.

Musical choice for this post comes from Inspiral Carpets. I have just obtained tickets to see the band on tour in London next spring. I’m excited about this – I have grown to really like their music in the last few years but haven’t seen them before. I especially like the 60s sounding farfisa organ played by Clint Boon. They have lots of great tracks but this one seems particularly appropriate to the season – She Comes in the Fall.

Categories
Desserts Recipes

Passion Fruit and Lime Pots

I made these recently to share with friends as a dessert after a dinner party. They look good, taste fresh and tangy with a hint of sweet and sour, are a little different from the norm, and not that difficult to make. They can also be prepared well in advance of mealtime. It is a Mary Berry recipe originally, so thanks to Mary for the inspiration!

My recent photo post on Twitter for this dish received a new record number of likes for A Different Kitchen, so I’m sharing the full recipe here.

Timings

20 mins to prepare, at least two hours to set in the fridge.

Servings

This will make six pots.

You Will Need

  • 6 passion fruits
  • juice of 1 lime
  • 600ml double cream
  • 100g caster sugar

Method

  1. Tip the cream and sugar into a saucepan. Heat and stir until the sugar has dissolved, then step up the heat and boil for 3 minutes. Remove from the heat.
  2. Halve 5 of the passion fruits and scoop out the juice and seeds. Whirl the juice and seeds in a food processor with blade fitted, until smooth. Push through a sieve so that you have a smooth juice, and discard the seeds.
  3. Add the passion fruit juice to the warm cream and sugar mixture, so that the cream will start to thicken.
  4. Add the lime juice also to the mixture, and stir in so that it thickens further.
  5. Pour the mixture into six ramekins and let cool. Once cooled, place in the fridge to set for at least 3 hours.
  6. When ready to serve, cut the remaining passion fruit in half and scoop out the juice and seeds. Scatter this across the surface of the 6 pots, and serve.

The musical accompaniment to this dish should be smooth, mellow and sophisticated, with just a hint of an edge to reflect the combination of sweet and sour. I’ve opted for a band getting a lot of play recently in the ADK kitchen, and that is Massive Attack, here with the excellent vocals of Tracey Thorn. Enjoy Protection.

Categories
Bakes Desserts Recipes

Austrian Apple Cake

It’s a great pleasure to introduce our latest guest post this week on A Different Kitchen. My good friend, and accomplished cook, Eva, shares with us an old family recipe from her native Austria. Eva treated me to a generous slice of this recently (see my photos) and it was delicious!

Hi, this is an old family recipe of mine from Austria, where I grew up. It’s special to me as it reminds me of my childhood. Mum used to make this cake for when we had friends round for coffee. It’s a recipe that was passed down from one of her aunts to my Mum. Also, this is a typical Austrian “fruit cake” where you use the fruits according to the season, especially plums, apricots, pears or cherries.

Ingredients

160g unsalted butter

160g sugar

160g self raising flour

3 eggs

Zest of half a lemon

2-3 spoons of dark rum

3 cooking or dessert apples

Flaked almonds

Icing sugar for dusting

Method

Beat butter, sugar and egg yolks in a bowl until fluffy and pale in colour. Add the lemon zest and rum, then add the flour. Whisk the egg whites till fairly stiff and fold into the mixture. Put the cake mixture into a baking tin. I used a spring form cake tin of 23cm diameter. Then peel the apples and cut into thin slices and arrange them on top of the cake. Sprinkle with flaked almonds and bake in the oven at 180C (fan oven) for about 45 minutes.

Finish with a dusting of icing sugar before serving!

My choice of musical track for adding to Kevin’s ADK Playlist is the “Hallelujah Chorus” from the Messiah by Georg Friedrich Händel. I sung this piece many years ago when I first joined a choir in this country and thoroughly enjoyed it then. Many years later and with a different choir I sung it again at Winchester Cathedral, which was so special and one of my best moments in life. I find the Messiah totally exhilarating and uplifting which makes it one of my favourite pieces.

Categories
Blog Desserts Snacks

Take Me to the Beach

We spent the long bank holiday weekend by the beach at Branksome. The weather is still great here, and it was easy to swim in the sea each day. On the final day the breaking surf was a little too choppy for my liking, so I settled for going in knee high, and a barefoot run along the shore, stepping and splashing through the lapping waves.

One of the many pleasures in a trip to the beach is an ice cream from the kiosk. On this occasion, I noticed that they were stocking the new Vegan Magnum, and decided to give it a try. It’s a dairy-free version of the legendary ice cream on a stick. I’m not vegan, but I am always open to trying new foods and have enjoyed a number of vegan desserts in the past.

I wasn’t sure what to expect – the Magnum I consider to be no less than a modern design classic, and I did wonder if messing around with its ingredients may turn out to be a disaster. I was thinking of what happened when Coca Cola decided to update a famous soft drink that everyone had grown up loving, only to have to yield to popular opinion and go back to making it by the original recipe.

I have to say I was pleasantly surprised. In fact, it is quite difficult to point out the differences in a blind taste. The Vegan version still has a delicate chocolate couverture, made from coconut oil and cocoa butter, that fragments indulgently as you bite into it. The underlying ice cream, made from pea protein with vanilla, is sweet and velvety, and not at all (as I had feared) unduly coconut tasting. The only real difference I could pinpoint is slightly less richness to the creamy taste, but not in any way that would put me off buying another.

Dairy-free alternatives to foods have been growing in popularity for some time. A relevant factor in this is concern about the contribution made by the livestock industry to climate warming, and consumption of water at a time of increasing drought. Many believe a vegan diet brings health benefits and is kinder to animals.

What is clear is that anyone who is vegan can now enjoy a Magnum when they visit the beach, a theme park or go on any other great day out: a wonderful contribution to the cause of equality of opportunity.

I’m hoping there will yet be a few more trips to the beach before the summer is through. That will probably mean a few more Vegan Magnums to come, as I make the most of our Pure Shores.

Take Me to the Beach!

Categories
Desserts Recipes

Plum and Almond Crumble Squares

Those following on Twitter (@differentkitch) may recognise the above photo from my tweet earlier in the week. It shows a batch of lovely Victoria Plums, which have recently come into season and are appearing on our market stalls. This post shows how I turned them into Plum and Almond Crumble Squares.

I researched some plum recipes, with the general idea that I felt they would be great in a traybake. I settled upon one in BBC Good Food and, as usual, modified it to my liking.

The Squares have several layers, beginning with a biscuity base. On top of this is an egg custardy/almond/ bakewell pudding type layer, and then the subtle taste of the chopped plums. The main area where I modified the recipe was on the topping, adding rolled oats, pumpkin seeds and sunflower seeds to flaked almonds. This makes a crumble finish which is totally loaded, adding a toasted crunch as it bakes.

Servings

This will make 16 square slices (4 had already been eaten when the above photo was taken!)

Timings

Total prep time about 25 mins, total cooking time about 1 hr – 1hr 10mins.

You Will Need

  • 250g baking spread
  • 225g caster sugar
  • 300g ground almonds
  • 140g plain flour, plus an additional 25g
  • 2 eggs
  • 1 teaspoon mixed spice
  • 1 teaspoon baking powder
  • 7 plums, stones removed and cut into slices
  • 50g flaked almonds
  • 50g rolled oats
  • 25g pumpkin seeds
  • 25 g sunflower seeds

Method

  1. Grease and line a baking dish with baking paper. My baking dish was 20cm square. Cut one piece that extends across the base and two opposite sides, leaving a little overhanging on each side. Paste a strip on each of the two remaining sides.
  2. Put the baking spread, sugar and ground almonds in a food processor with blade fitted. Pulse until it is mixed.
  3. Remove the mix from the food processor and reserve half of it aside. Put the other half back in the processor with the 140g flour, and mix till it forms a dough.
  4. Remove the dough and flatten it out with a rolling pin on a floured surface. You will not be able to lift it up in one piece (like a pastry base) but, as it gets flatter, lift it in pieces and gradually place these in the base of the baking dish. Press it down with the back of a spoon and distribute it so that it covers all of the base and at least about half way up the sides. It will all meld together as it bakes.
  5. Fill the base with a piece of crumpled up baking paper and baking beans, and place in the oven to bake blind at 180C for 10 – 15 mins. The edges of the base should be beginning to brown.
  6. While the base is in the oven, make the filling. Into the food processor goes the reserved half of the spead/sugar/almond mix. Add the 2 eggs, the 25g flour, mixed spice and baking powder. Pulse it to form a creamy batter.
  7. Remove the base from the oven and add the batter on top. Then gently press the sliced plums into the top of the batter so that they remain visible. Make sure that they are evenly spread across the whole of the cake – when it is cut into squares you want each one to contain plums. Bake in the oven, still at 180C for 25 mins.
  8. In a bowl, mix the flaked almonds, oats, and the two types of seeds. Give them a good swirl so that they are well mixed up together.
  9. Remove the dish from the oven and sprinkle the topping over. As with the plums, ensure even coverage. Gently press the nuts, oats and seeds towards the batter mix, so that they will adhere to it, and not fall off when it is cut!
  10. Place back in the oven for another 25 mins. After about 20 mins, check it and insert a skewer in the centre. If it comes out clear, it is baked. If it has some uncooked batter on it, put back in for another 5 – 10 mins and keep an eye on it.
  11. When baked to your satisfaction, remove and leave aside to cool in the tin. When cool, the base will have set and you should be able to lift it out in one piece, by gripping the two overhanging sides of the baking paper liner.
  12. Put on a board and cut into 16 squares. I find a serrated (bread) knife is better for cutting through the sides of the crust, so that these doesn’t crumble. Any other sharp knife will cut through the bottom of the base.

Customise it!

You could add other types of nuts and seeds to the crumble topping – whatever you fancy really. Just make sure you press the pieces gently towards the batter so that they adhere to the cake. Some of the crumble topping will still fall off and flake into your hand as you bite into it, but that is all part of the fun and indulgence of eating it. It’s food to make you feel good!

Categories
Desserts Recipes

Heatwave

There seems to be no sign of our UK summer heatwave relenting: new record temperatures, and forecast to stay very hot again this weekend. On top of that, we are now (in my region) officially in drought, so alongside all the good advice we’re getting to plan ahead, stay out of the sun, drink water etc, we are now instructed not to use hosepipes for watering gardens and washing cars, to protect our river levels. All very sensible, of course.

Now I have some good advice of my own to impart: make strawberry ice cream.

There you go – some practical, free public health guidance that I am pretty certain you will not be receiving from any official government agency. Don’t mention it – you’re welcome.

To enjoy the cooling effects, just follow the steps below.

Servings

This will make around 1kg, so usually enough for 9-10 servings.

Timings

15 mins prep and 35 mins churning.

You Will Need

  • an electric ice cream maker
  • 400g fresh strawberries
  • juice of half a lemon
  • 220g granulated sugar
  • 220ml full fat milk
  • 400ml double cream
  • 1 teaspoon vanilla extract

Method

  1. Ensure the drum of the ice cream maker is completely frozen. I leave mine in the freezer for 24 hours before making.
  2. Chop the strawberries and combine in a bowl with the lemon juice and 70g of the sugar. Cover and leave in the fridge for at least 2 hours.
  3. Remove from the fridge and strain through a sieve, saving the pink liquid. Mash half the strawberries and mix with the liquid, keeping the other half aside.
  4. In a separate bowl, combine the milk and the rest of the sugar. Whisk until the sugar has dissolved, and then stir in the mashed strawberries and vanilla extract. Cover and leave in the fridge for at least 2 hours.
  5. Remove from the fridge and pour into the drum of the ice cream maker. Proceed to churn for 35 mins. Add the remaining chopped strawbs during the last 5 mins of churning.
  6. Switch off, and scrape into a plastic container. Seal and place in the freezer to set for at least 2 hours.
  7. Place 2-3 scoops in a bowl, serve with a piece of shortbread if you like.

    Find a shady spot and enjoy – ideally with this seasonal track from The Jam on your headphones.