Categories
Bakes Blog

VE Day 80 Scones

This week we’ve seen lots of events taking place across the UK, commemorating the 80th Anniversary of VE Day. VE Day is the day on 8th May 1945 when the Allied Nations’ Victory in Europe was confirmed, marking the end of World War Two across the continent.

The King, Queen and Royal Family have led the way, ensuring that the sacrifice made by so many is remembered. We’ve had the sharing of personal memories of veteran survivors in this week’s media, the lighting of beacons and special services in churches and cathedrals. There have been some timely messages, reminding the modern world that peace is hard won and should never be taken for granted.

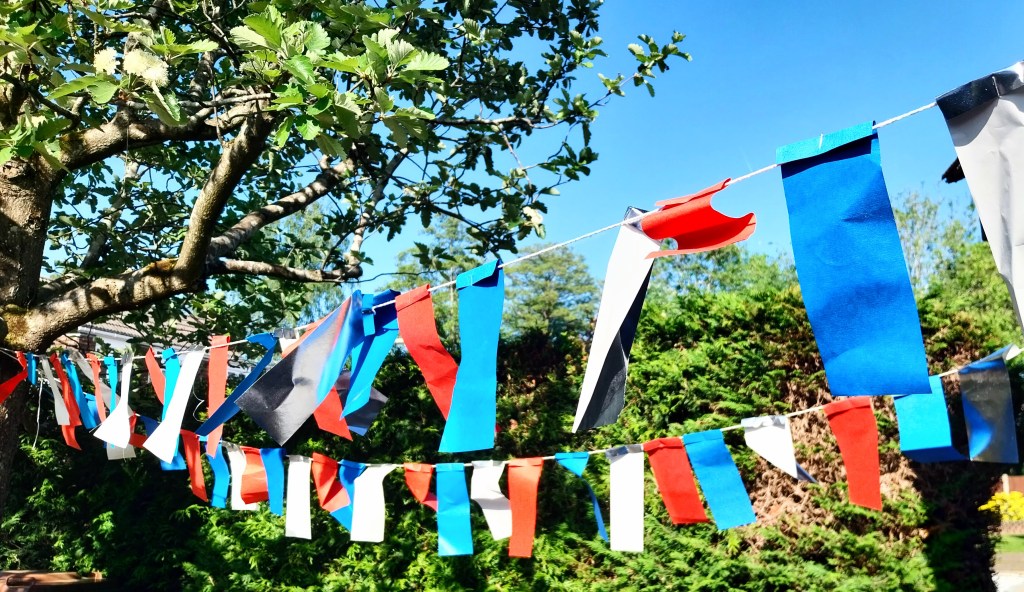
The nation has been encouraged to join in through organising street and garden parties locally. Our local street party was well-attended, with lots of houses and gardens decorated with red, white and blue bunting, glinting in the early summer sun.

My contribution was some home-made scones, halved and topped with Cornish clotted cream and strawberry jam. The recipe I used is one of my stand-bys, already posted here on A Different Kitchen from a previous street party celebration, to mark the Coronation of our new King in May 2023: see Coronation Scones.

I’m pleased to say the scones went down well with the neighbours. In Britain, it seems we can always rely on the power of a large pot of tea and some home-made scones to bring communities together 🙂 .

I was chatting to an older gent who actually remembers VE Day – he was 4 years old in 1945 and has a vivid recollection of all the children in the neighbourhood sitting down together for some party food and drink. He said there were street parties everywhere. After going up to bed, he watched from the upstairs window as the adults carried on into the evening. It is difficult nowadays for us to imagine how much of a relief it must have been, to have finally brought an end to the bombings, the blackouts, and the long years of suffering and hardship of War.

Is VE Day being marked where you are? If so, in what way? I’ll be really interested to hear.

Here are Elbow, all the way from Manchester, with One Day Like This.

Categories
Bakes Recipes

Easter Choc Egg Biscuits

Easter is a special time in the food treats calendar. I always like to explore the array of innovative egg-themed confections that become available in the shops. No excuse is needed to enjoy the satisfying taste of chocolate this time of year (not that I need an excuse any other time of the year, to be fair 🙂 ).

Here’s a fun and fairly simple way to knock out some home-made biscuits for the holidays, incorporating a pack of chocolate mini eggs. Great fun to make and delicious to eat – they make an eggs-cellent addition to your holiday treat cupboard.

Servings

Makes 12 biscuits.

Timings

10 mins to prep, 30 mins to chill the dough, and 15 mins to bake at 160C in a fan oven.

You Will Need:

  • 250g butter, softened at room temperature
  • 140g caster sugar
  • 1 egg yolk
  • 2 tsp vanilla extract
  • 300g plain flour
  • 100g chocolate mini eggs

Method

  1. Beat the butter and sugar together in a mixing bowl with a wooden spoon.
  2. Add the egg yolk and vanilla extract and mix in again.
  3. Sieve over the plain flour.
  4. Roughly chop the chocolate mini eggs with a knife and add to the mix.
  5. Now comes the real fun part – having made sure you’ve washed your hands, roll up your sleeves and get in there with both sets of fingers to squidge it all together into a biscuit dough. Place the dough in the fridge for 30 mins to chill.
  6. Switch on a fan oven to heat up to 160C.
  7. Pull off a piece of the dough and roll between the palms of your hands into a ball. Repeat 12 times to make a dozen biscuits. Place each ball on a metal tray lined with baking paper, flattening the top slightly with the palm of your hand. Space them out on the tray, as they will flatten and spread as they bake.
  8. With the oven up to temp, place the tray in the oven for up to 15 mins. Keep an eye on them and let them bake until they’ve reached your preferred level of doneness, whether that be soft and chewy or a little more toasted and crisped. Everyone is different, so do what works for you.
  9. Remove and transfer the biscuits to a wire rack to cool (as shown in my photo at the top of the post). They will be soft when fresh from the oven, and will firm up gradually as they cool. The biscuits will keep for 2 – 3 days in a sealed container.

Customise It!

Most forms of chocolate can be used in place of the mini eggs if you wish. You could also substitute some chopped nuts for some of the chocolate.

In search of a seasonally named track for the ADK Playlist, I turned to Patti Smith’s Easter album. However, good though it is, I’ve decided to go with my favourite Patti Smith track, which is taken from her Wave album, instead. Here’s Patti with Frederick.

Categories
Bakes Recipes

Carrot, Orange & Walnut Cake

The humble carrot is cheap and in plentiful supply in our shops at the moment. So, I thought, what better time to bake up a carrot cake?

There are already a whole host of carrot cake recipes out there, so I read through a few before deciding how I would approach mine.

I was looking to make a single tier traybake, incorporating mixed spice, sultanas and walnuts alongside the carrot, topped off by a cream cheese frosting with the tang of orange zest.

I actually found a Mary Berry recipe that was more or less what I had in mind, so was largely influenced by that. Cheers, Mary! My only real deviation was to throw a handful of sultanas into the cake mix, as I really like the added juiciness they bring.

I was pleased with the results – that’s it in my photo at the top of the post – and it has gone down well in the ADK household.

The orange cream cheese frosting is irresistible. I strongly advise dipping your little finger in once it’s made, scooping some up for a preliminary taste test before spreading the rest on the cake. Believe me, you won’t regret it.

Servings

This will give you around 16 slices.

Timings

30 mins to prepare, 40 mins to bake at 160C in a fan oven. Make the frosting while the cake is baking and allow 5 mins more to apply it when the cake has cooled.

You Will Need

For the Cake

  • 225g self-raising flour
  • 2 tsp baking powder
  • 1 tsp ground cinnamon
  • 1 tsp mixed spice
  • 150g light brown sugar
  • 50g chopped walnuts
  • 50g sultanas
  • 2 eggs
  • 150 ml vegetable oil
  • 1 tbsp milk
  • 200g coarsely grated carrot

For the Orange Cream Cheese Frosting

  • 100g unsalted butter
  • 200g cream cheese
  • 250g icing sugar
  • 1 tsp vanilla extract
  • zest of 1 orange
  • handful of chopped walnuts

Method

  1. Grease and line a traybake tin. The one I used is 22cm square. Switch a fan oven on to 160C.
  2. Sieve the flour, baking powder, cinnamon and mixed spice into a bowl. Sprinkle in the sugar, chopped nuts and sultanas.
  3. Mix the eggs, oil, milk and grated carrot in a separate bowl.
  4. When the oven is up to temp, pour the wet ingredients into the dry and mix thoroughly with a spatula until no dry ingredients are showing. Scrape into the traybake tin and level. Put in the oven for 35 – 40 mins.
  5. While the cake is baking, make the orange cream cheese frosting. Place the butter, cream cheese, icing sugar, vanilla and orange zest in a bowl and whisk with an electric mixer until thick and creamy. Place the bowl in the fridge until required.
  6. Check if the cake is fully baked – the top should be browning and a skewer inserted in the middle come out dry. If it is, take from the oven and set aside to cool in the tin.
  7. Once cool, remove carefully from the tin and spread the orange cream cheese frosting all over. Top with the chopped walnuts.
  8. Cut into slices and serve.

Customise It!

Swap in some chopped toasted pecans for the walnuts if you wish. Frosted toppings like this often look good with a sprinkle of edible blue cornflower petals, if you have them. They are more about visual effect and presentation, though, rather than adding to the taste.

Here’s a song that came on Spotify while this traybake was in the oven. I hadn’t come across it for a while, and remembered how good it was, so here it is: Birmingham post-punk band The Au Pairs with It’s Obvious.

Categories
Bakes Recipes

Spiced Fruit & Rooibos Traybake

Here’s a fresh and fruity traybake to welcome the first signs of spring. Dried mixed fruit is plumped up by infusion in freshly brewed Rooibos (or Redbush) tea. Dark brown sugar and mixed spice ensure a deep rich colour and satisfying warmth.

The tea blend I used is one called Kalahari that I picked up in the Tea Emporium in Bath, on one of our motorhome trips down to the west country. It mixes Rooibos leaves with orange peel, lemongrass, and specks of marigold and thistle flowers. It looks beautiful and makes a lovely, refreshing caffeine-free drink. Here it is:

I’m pleased to say it can now also be enjoyed in cake form! No Kalahari? No problem – other blends of Rooibos (flavoured or plain) can be used just as well.

Servings

This should give you around 16 slices.

Timings

Prep took me around 30 mins, including soaking the dried fruit in the tea. Bakes in a fan oven at 160C for 40 mins.

You Will Need:

  • 75ml tea made up with Rooibos leaves and boiling water
  • 160g mixed dried fruit – I used sultanas, candied peel and glace cherries
  • 180g butter, softened
  • 160g dark brown sugar
  • 3 large eggs
  • 200g self-raising flour
  • 1 tsp mixed spice (nutmeg, cinnamon, coriander seed, clove, pimento and ginger)
  • 3 tbsp dark brown sugar for sprinkling

Method

  1. Grease and line a tray bake tin. The one I used is 22cm square.
  2. Place your assortment of dried mixed fruit in a bowl.
  3. Make up a pot of tea using the Rooibos leaves and boiling water. Using a tea strainer, measure out 75 ml and pour it over the dried fruit. Stir and set aside (see the photo just above, showing my fruit soaking in the Rooibos tea).
  4. Put the sugar and softened butter in another bowl, and whisk together with an electric mixer until nice and creamy.
  5. Crack in each egg one at a time, and whisk in. Sprinkle in a little of the flour each time to avoid curdling.
  6. Sieve in the rest of the flour and the mixed spice. Whisk again to combine.
  7. Turn a fan oven on to 160C.
  8. Drain the mixed dried fruit with a sieve, catching the tea to retain in a separate bowl. Tip the fruit into the cake mixture and whisk in.
  9. Add in as much of the retained tea as necessary to bring the cake mix to the right consistency. You should be able to pick up a spoonful and slowly but surely let it slide back off the spoon, into the rest of the mix with a plop! I used most of the retained tea in mine.
  10. Give it a final whisk then scrape into the prepared tin with a spatula. Spread out into the four corners and level the top.
  11. Finally, sprinkle the dark brown sugar topping over the cake with your fingers.
  12. Place in the oven at 160C for 40 mins. Check after about 30 mins – if a skewer in the middle comes out dry then it’s done.
  13. Leave to cool and cut into slices. They will keep in a tin for a few days but, seriously, they will all be eaten by then anyway!

Customise It!

You can use a different combination of mixed dried fruit if you wish, or if that’s what you have in the cupboard – currants, dried apricots and so on should work fine.

Rooibos leaves that come with different natural flavourings to mine will be ok. If you like plain Rooibos to drink then use that. I sometimes have Rooibos with a dash of vanilla extract, and that would make an interesting combo for using here.

The weather is due to be fine this weekend, so I’m getting out into the garden today to enjoy our first real sun and warmth of 2025, with a pot of Rooibos and a slice of traybake. Time to relax and enjoy the silence.

Speaking of which, it’s currently the 35th anniversary of the release of the classic Violator album by Depeche Mode, which I plan to listen to again in the garden on my headphones. So, let’s add this track to the ADK Playlist: Enjoy the Silence.

Categories
Bakes Recipes

Spiced Plum & Almond Bakewells

It’s Valentine’s Day, and here’s a sweet treat you’ll love.

Recently we received a delicious present from a family friend – a jar of her home made Spiced Plum jam. Rich with soft plums in a silky, sweet coating and laced with the delicate influence of star anise, it deserved some special treatment.

I liked the idea of pairing it with almond, so have used it here as the jammy foundation for these bakewell slices. Never mind if you don’t have any spiced plum – ordinary plum or raspberry jam will do a perfectly fine job. Try to use home made though, as it gaves the cake that extra personal touch!

Servings

This made 16 bakewell slices.

Timings

30 mins to prepare, 10 mins to blind bake the pastry base at 180C, and 40 mins to bake the whole traybake at 160C (fan oven).

You Will Need:

For the Pastry Base

  • 125g plain flour
  • 100g plain wholemeal flour
  • pinch of salt
  • 100g butter or baking spread
  • a few drops of cold tap water

For the Sponge Filling

  • 150ml veg oil
  • 100g ground almonds
  • 100g self-raising flour
  • 1tsp baking powder
  • 160g caster sugar
  • 1tsp almond extract
  • 4 eggs
  • 25g flaked almonds
  • 5 – 6tbsp fruit jam

Method

  1. Grease a traybake tin – the one I used is 20cm square – and line with baking paper.
  2. Sieve the plain flours and salt into a food processor with blade fitted. Chop the butter/spread into cubes and add in. Pulse a few times until it resembles fine breadcrumbs. Add in a few drops of water and blitz. Repeat until the ingredients are fully combined and you have a ball of pastry dough whirling around inside the processor bowl.
  3. Roll out the pastry dough on a floured surface until it is roughly the size of the tin, including the sides. Carefully transfer to the tin and gently press down against the bottom and sides. Trim the edges as necessary with a knife to make a neat edge. Place the tin and pastry in the fridge and turn on a fan oven to 180C.
  4. While the pastry is chilling, and the oven warming up, make the sponge filling. Sieve the self-raising flour into a baking bowl. Add in the oil, baking powder, sugar, ground almonds, eggs and almond extract. Whisk with an electric mixer till combined into a smooth batter.
  5. When the oven is up to temp, remove the pastry and tin from the fridge. Line with a large, crumpled piece of baking paper and fill with ceramic baking beans. Place in the oven for 10 mins.
  6. After 10 mins, remove the tin and pastry from the oven, and turn the heat down to 160C. Remove the baking paper and beans, and spoon in the jam, spreading it evenly over the pastry base and into all 4 corners.
  7. Pour the sponge batter on top of the jam and smooth out to make even. Sprinkle the flaked almonds evenly all over the top, and place in the oven for 35 – 40 mins.
  8. Remove from the oven and check it is fully baked – a skewer inserted in the centre should come out with no wet batter showing. Leave aside to cool in the tin.
  9. Carefully transfer to a board and chop into slices. These will keep for 2 – 3 days, though they will all be snaffled up without delay, I assure you.

Customise It!

In addition to using your favourite fruit jam, you can feel free to use ready made or ready rolled pastry if you wish.

For Valentine’s Day I have chosen a track for the ADK Playlist written by that old punk romantic, Pete Shelley. This blog has a special relationship with his band, of course, taking its name from the title of their first album, the seminal Another Music in a Different Kitchen. This track is actually from their third album, but I’ve been playing it recently while making these bakewells, and realising how good it sounds. So here they are: Buzzcocks with You Say You Don’t Love Me.

Categories
Bakes Recipes

Spiced Cranberry Muffins

This year’s home baked Christmas Cake has gone down well in the ADK household – so much so that we are now down to the final few crumbs on the serving plate. How to fill the gap, I wondered, and maybe also use up some of the tasty ingredients left over from making it?

We still had some currants, golden sultanas, glace cherries and mixed candied peel in the cupboard. There was also the last of the juicy red cranberries, left over from making the sauce I’d been merrily ladling on to my roast turkey.

Too good to waste, of course, so they’ve all ended up in these New Year muffins. I’ve incorporated cinnamon and nutmeg to add to that seasonal feel of deep midwinter, so cosy up and enjoy.

Servings

Makes 12 muffins.

Timings

15 mins to make, 20 mins to bake in a fan oven at 160C.

You Will Need

  • 280g plain flour
  • 3 tsp baking powder
  • half tsp salt
  • 1 tsp ground cinnamon
  • 1 tsp grated nutmeg
  • 120g caster sugar
  • 1 egg
  • 110g fresh cranberries, coarsely chopped in a food processor
  • 20g currants
  • 20g sultanas
  • 20g glace cherries
  • 20g chopped mixed candied peel
  • 240ml milk
  • 90ml veg oil

Method

  1. Prepare a muffin tin or mould. Switch on a fan oven to 160C.
  2. Sieve the flour, baking powder and salt into a bowl. Stir in the cinnamon, nutmeg and sugar.
  3. In a separate bowl, combine the egg, chopped cranberries, milk and oil. Stir in the currants, sultanas, glace cherries and candied peel.
  4. Pour the wet ingredients into the dry, and stir so that no dry ingredients are visible.
  5. Spoon the mixture into the tin/mould, and bake for 20 mins.
  6. Remove to a wire rack to cool.

Customise It!

Basically, the rule here is that if it might have gone in your Christmas Cake, and is sitting left over in the cupboard, then it’s good enough for the muffins! Swap in raisins for some of the currants or sultanas, for example. Chop up some nuts and add them in. I didn’t go so far as to feed in a teaspoon of brandy but, hey, why not try it? If mixed spice is all you have, then use it in place of the cinnamon and nutmeg.

First musical selection of 2025 is from Sophie Ellis-Bextor. I enjoyed her New Year’s Eve Disco shown on TV here. She performed Groovejet and Murder on the Dancefloor, both of which I have always rated, and also this one, which I don’t think I’d heard before. It is a paean to the classic Sheila B. Devotion track, Spacer, so can’t really go wrong. Here’s Sophie with Crying at the Discotheque.

Categories
Bakes Recipes

Monkey Nut Biscuits

Credit for this latest bake goes to my wife, Lesley, who refined the recipe and patiently shelled a bag of roasted monkey nuts in the process.

Monkey nuts are peanuts still in their shell, which means the nuts have no salt or anything else added. Combine them with a good quality peanut butter (the one we used has one ingredient: peanuts), and you get biscuits with a fresh, nutty taste. They have a soft textured centre and a crisp outer. You’ll find these are best enjoyed warm and eaten within a day or so.

Servings

This will give 3 batches of dough, each batch making 12 biscuits. You can freeze the mixture or keep it in the fridge for a week. That way you can have a biscuits snack ready in about 20 mins after thinking about it. 

Timings

10 mins to prepare and another 10 mins to bake in a fan oven at 180C.

You Will Need:

  • 120g butter or margarine
  • 150g crunchy peanut butter
  • 50g shelled peanuts, roughly chopped
  • 85g soft brown sugar
  • 1 large egg
  • 350g self-raising flour

Method

  1. Preheat your oven to 180°c . Prepare a flat baking tray with some greaseproof paper.
  2. In a large bowl, cream the butter, peanut butter and sugar together until completely combined. 
  3. Add the egg and mix in.
  4. Sift in the flour. Add the chopped peanuts and mix to make a dough, use your hands at the end to combine into a ball.
  5. Roll the dough into balls (about 1 tbsp of dough per ball) and place onto your baking sheets. Press each ball with  a fork to create a cross pattern which flattens the dough.
  6. Bake in your pre-heated oven for 8-10 minutes until golden.
  7. Transfer to a wire rack to cool completely, they slide off the baking paper beautifully.

Here’s a great track from The Specials that is right on theme: Monkey Man.

Categories
Bakes Recipes

Pumpkin Spice Traybake

Treat yourself this Halloween! There’s nothing tricky in the making of this traybake – a delicious, sweet and spicy sponge, laced with freshly roasted pumpkin puree and topped with crunchy, honey-coated pumpkin seeds.

These guys were just dying to try it. They’ll tell you – it’s a monster hit 🙂

Servings

Makes 16 slices.

Timings

40 mins to peel, chunk and roast the pumpkin. 15 mins to prepare the traybake and then 30 mins to bake at 180C in a fan oven.

You Will Need

  • 1 medium-sized pumpkin or other squash
  • oil to drizzle for roasting
  • 3 large eggs
  • 200g vegetable oil
  • 140g light muscovado sugar
  • 250g self-raising flour
  • 1tsp bicarb of soda
  • 2 tsp ground cinnamon
  • 1tsp ground ginger
  • 1tsp grated nutmeg
  • runny honey to drizzle
  • a handful of pumpkin seeds

Method

  1. Turn a fan oven on to 180C. Cut and peel the pumpkin into chunks – you will need around 200g. Place on a baking tray and drizzle with oil. Put in the oven for 30 mins until softened and a little caramelised at the edges.
  2. Grease and line a traybake tin – mine used is 22cm square.
  3. Crack the eggs into a bowl, and add in the oil and sugar. Mix with an electric whisk until thickened.
  4. Sieve in the flour, bicarb and spices, and fold in with a spatula to incorporate.
  5. Once the pumpkin chunks are roasted, tip them into a food processor with blade fitted, and blitz to a puree. This will also help the pumpkin to cool. Add the puree to the bowl and stir to mix in.
  6. Tip the mixture into the lined traybake tin and level with a spoon. Place in the oven for 30 mins or until nicely browned, and a skewer inserted in the centre comes out clean.
  7. For the last 5 mins of baking, sprinkle the pumpkin seeds over and drizzle with honey.
  8. Remove from the oven and leave to cool in the tray. Transfer to a board and cut into slices.

Customise It!

Don’t just save the pumpkin seeds for the topping – chuck another handful into the mixture along with some chopped nuts.

Have fun this Halloween, eat well and don’t let the boogeyman get you! Here’s Echo & the Bunnymen with People Are Strange.

Categories
Bakes Recipes

Panela & Cacao Nib Muffins

I’ve been keen to try out a new ingredient I discovered on my recent travels, while visiting Cornwall’s Eden Project.

Panela is a block of totally unrefined raw sugar cane. Produced in Colombia, it retains the good nutrients and vitamins that are naturally present, but usually screened out by the refining process. It is reported therefore to be a healthier alternative to even unrefined brown sugar. Used in baking, it adds a golden colour (see my main photo above) and natural caramel, or toffee, flavour.

Panela was featured in the Eden Project’s Rainforest Biome, as a good example of organic and sustainable, small scale farming in South America. It’s available to purchase in their shop, sourced (of course) from the original producers on fair trade terms (I’ve since found that it can also be purchased via the internet).

I decided to keep the rainforest theme going in these muffins, by combining it with organic cacao nibs bought from a local refillery. Bitter, chocolatey, crunchy and naturally low in sugar, cacao nibs come with their own good mix of nutrients.

It all makes these some of the healthiest muffins I’ve featured yet on A Different Kitchen. And they’re delicious.

Servings

Makes 12 muffins.

Timings

15 mins to prepare, 25 mins to bake at 160C in a fan oven.

You Will Need:

  • 280g plain flour
  • 3 tsp baking powder
  • 1/2 tsp sea salt
  • 100g grated panela
  • 70g dried fruit
  • 1 egg
  • 150ml milk
  • 90ml rapeseed oil
  • 60g cacao nibs

Method

  1. Switch on a fan oven to 160C. Prepare a muffin tin or mould.
  2. Sieve the flour, baking powder and salt into a bowl. Stir in the dried fruit so it is evenly coated in the flour.
  3. Place another bowl on a weigh scale. Pick up the brick of panela and coarsely grate it into the bowl until you have around 100g. Add it to the flour. Originally I thought I would slice off a 100g piece, then grate it. However, the block of panela is so solid it is impenetrable by a knife!
  4. In another bowl, crack the egg and mix it with the oil and milk.
  5. When the oven has reached temperature, pour the egg mixture into the flour and combine. Spoon into the muffin tin or mould.
  6. Finally, stud the cacao nibs into the surface of the muffins, pushing them down gently so they adhere to the mixture.
  7. Place in the oven for 25 mins or until evenly browned.

Customise It!

If you are unable to source panela, then the best unrefined brown sugar you can find, such as muscovado, will do nicely. I included the soft dried fruit to complement the crunch of the cacao nibs and add interest to the texture. My choice was organic dried cranberries but you can use sultanas if you prefer.

Have you come across, or maybe even used, panela? I’ll be interested to hear in the comments.

Here’s a track from an album I’ve been rediscovering since returning from holiday. I really enjoyed The B-52s’ Cosmic Thing when it was first released, but haven’t played it in years. A few listens have reminded me how many brilliant tracks it contains. Here’s one of them: The B-52s with Roam.

Categories
Bakes Desserts Recipes

Blackberry & Apple Crumble with Custard

You want comfort food? Here you go!

As my recent posts show, I’ve been making the most of blackberry season, and the generous bounty of juicy, fresh fruit burgeoning on our local hedgerows (see It’s Blackberry Time!).

This dish sees them combined with windfall apples that have tumbled on to the lawn from the trees in our garden, and topped with crumble. Serve it warm with a dollop of vanilla custard. And relax!

Servings

6 adult portions.

Timings

25 mins to prepare, and another 25 mins to bake at 180C.

You Will Need:

  • 4 large eating apples
  • 350g blackberries
  • 85g plain flour
  • 85g wholemeal flour
  • 85g butter
  • 85g caster sugar

Method

  1. Switch on a fan oven to 180C.
  2. Prepare the crumble by combining the flour, butter and sugar in a bowl. Rub together between the fingers until it resembles breadcrumbs in texture. Set aside.
  3. Put the blackberries in another bowl and place in the microwave on full power for 5 – 6 mins until soft and juicy. Remove and squeeze the juice through a sieve into a bowl, leaving the pips and pulp behind (to be discarded).
  4. Peel and slice the apples, discarding the cores. Scatter across the base of a casserole dish, then cover with the blackberry juice. Sprinkle the crumble mixture on top. Place in the oven at 180C for 25 mins.
  5. While the crumble is cooking, make up some custard using a store cupboard mix like Bird’s, following the instructions on the packaging.
  6. Serve the crumble warm in a bowl, with a swirl of yellow custard alongside.

Customise It!

Cooking apples can be used in place of the eating variety, but you will need to sprinkle over a few large spoonfuls of sugar to counter the bitterness. Replace around 30g of the wholemeal flour with oats if you wish, to give the crumble an added oaty, biscuity taste.

I had thought of featuring another Oasis track here today, but after yesterday’s controversial concert ticket sale I reckon everyone’s heard enough of Noel and Liam just for the moment. Let’s hope the Man City front line this season isn’t as sluggish as the Ticketmaster website, eh lads?

Disco has been taking its place at this year’s Summer Proms at the Royal Albert Hall in London, with full orchestral backing and being televised by the BBC. Here’s one of the tracks that’s been performed really well: Yvonne Elliman with If I Can’t Have You.