Categories
Mains Recipes

Super Sunday Pasta Bake

Sunday teatime in my household presents something of a challenge: I like to have a home-cooked dinner for the family, but also enjoy watching the live football on Sky Sports’ Super Sunday. Especially so this week just gone, when the featured match is a big one, between Liverpool and Man United.

So I have developed a solution: Super Sunday Pasta Bake. All of the chopping and prep can be done in 15 minutes, at half-time. Then, when the final whistle is blown, it is just a case of throwing the ingredients together and into the oven. Twenty five minutes later, we have a Sunday dinner, and I haven’t missed any of the live action.

Granted, if you are a Man U fan, you may have wanted to slip out to the kitchen early on Sunday during the second half, to escape witnessing that 7 – 0 mauling by Liverpool.

Anyway, if you’re ready to pay attention, I’ll begin the tactics talk….

Servings

This will serve 4 people.

Timings

As indicated, 15 mins at half-time to prep, then 10 mins to combine at full time. The dish then goes in the oven for 15 mins to bake at 180C.

You Will Need

  • 1 cauliflower
  • 200g pasta penne
  • olive oil
  • 1 clove garlic
  • 4 rashers streaky bacon
  • 1 onion
  • 5 – 6 mushrooms
  • 1 green pepper
  • 60g butter
  • 75g plain flour
  • 500ml semi-skimmed milk
  • 100g mature cheddar cheese

Method

Half-Time

  1. Break the head of cauliflower into even-sized florets, and place in a bowl of water.
  2. Weigh out the penne and add to the bowl. Set aside.
  3. Chop the bacon, onion, pepper and mushrooms and place on a covered plate. Top and tail the garlic clove so it’s ready for crushing.

Full-Time

  1. Boil a kettle. Drain the cauli and penne, and place in a sauce pan covered in the boiling water. Bring to the boil again, then simmer for 10 mins.
  2. Switch on the oven at 180C. Lightly grease a baking dish with a swig of the oil.
  3. Put the rest of the oil in a wok or frying pan, and warm it on the hob. Add the crushed garlic clove, and when the oil sizzles, tip in the bacon and the veg.
  4. Melt the butter in the microwave, then stir in the flour to make a paste. Add in the milk, and return to the microwave on high for 2 mins. Keep checking it every 30 seconds or so to make sure it isn’t boiling over. It will soon begin to thicken, and should be lump-free.
  5. Stir the sauce with a hand whisk and give it further 30 second bursts as necessary in the microwave to thicken. Remove from the microwave, grate in all but a handful of the cheddar, and stir to combine.
  6. By this stage, the cauli and penne should have had 10 mins to simmer, and the bacon and veg softened in the pan. As if by magic, the oven should be coming up to temperature.
  7. Drain the cauli and penne and spread out in the baking dish. Spread the bacon and veg on top, then cover in the cheese sauce. Sprinkle the reserved handful of grated cheese over the top, and put into the oven for 15 mins.
  8. If you wish, go back for 15 mins and see what pundits, Jamie and Gary are making of the match just gone!
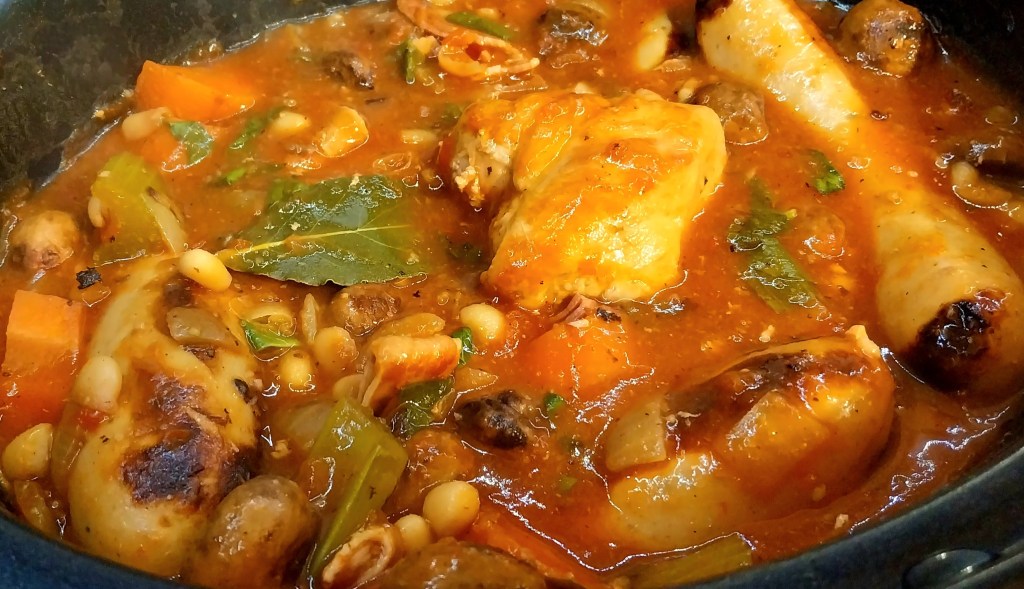
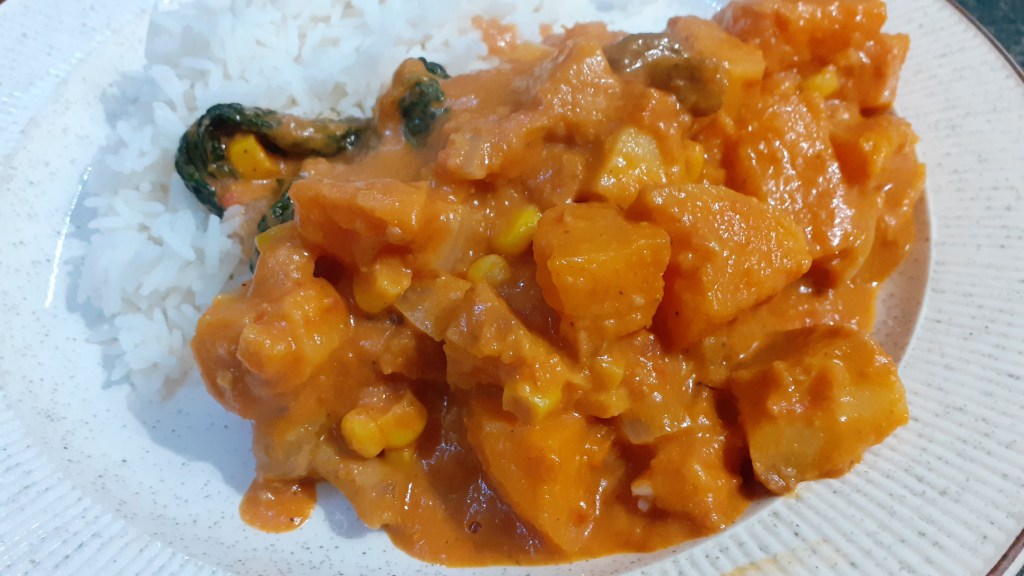
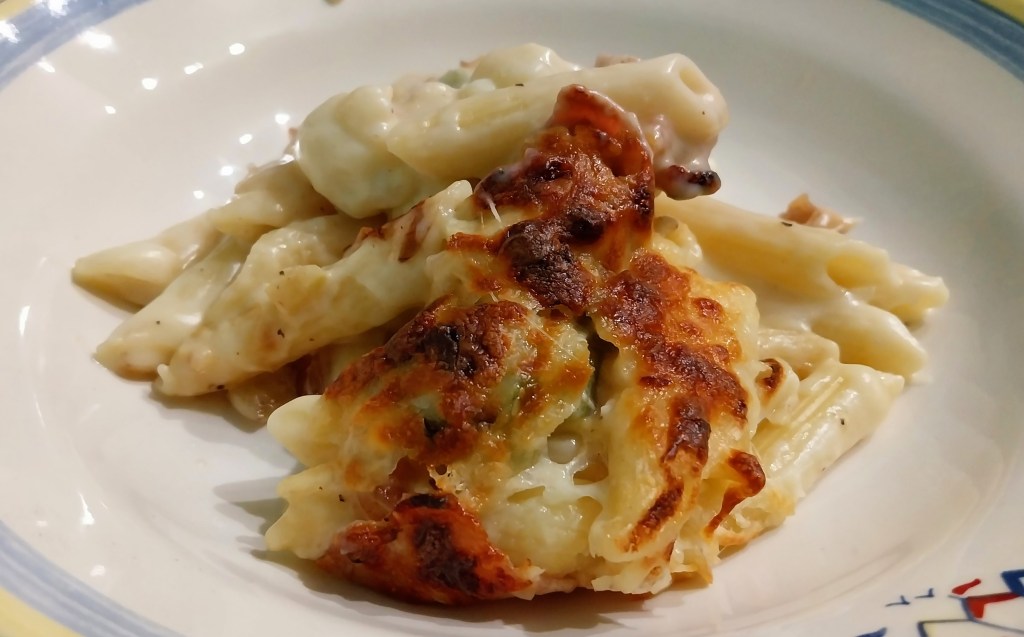
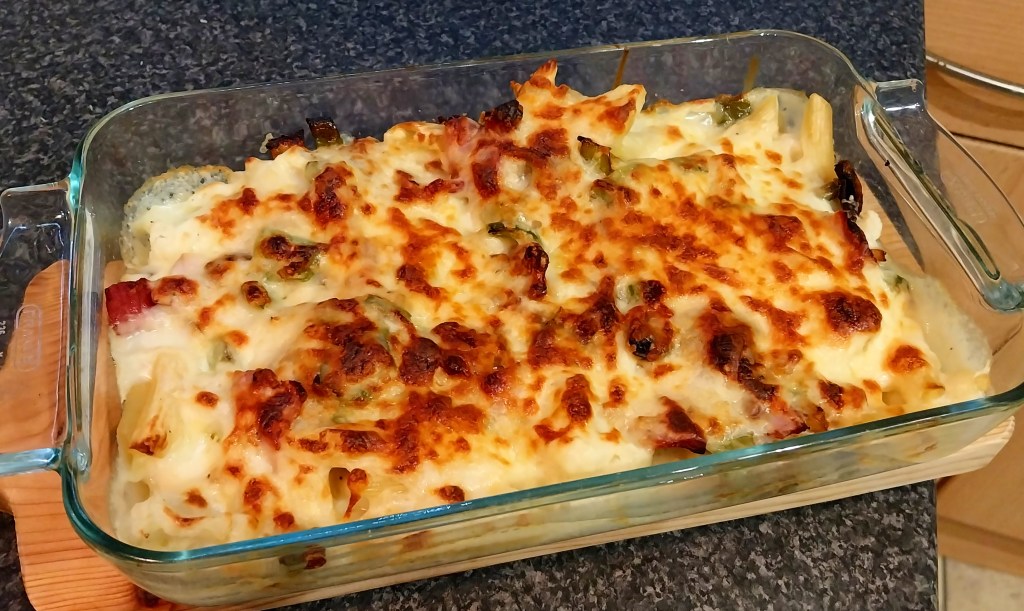
  9. It should then look like the photo below. Spoon into bowls, which should look like the picture at the top of this post.

Customise it!

Within the basic structure of the dish, there is lots of scope to play around with the ingredients. Vary up the veg by replacing the cauli with broccoli, and leek in place of the onion. Add more colour with a different pepper, or go vegetarian by adding chopped nuts in place of the bacon. Blue cheese will go well in the sauce.

More new music now for the ADK Playlist, courtesy of Leftfield. The massively influential dance band are back with a new album, This Is What We Do, which is definitely worth a listen. Here is one of my favourite tracks from it, Full Way Round.

Categories
Mains Recipes

Cassoulet

This week, positive scenes in the news have inspired me to come up with a dish that brings together some British and European ingredients. It looks like we may now be getting back to being on (at least) speaking terms with our lovely neighbours across the Channel in Brussels.

My take on Cassoulet, the classic French stew, combines British seasonal winter veg, German Bratwurst, and French white wine. It’s a fine taste of cross-border goodwill and co-operation – Rishi and Ursula would love it!

There are many different cassoulet recipes, and most contain garlic, poultry (usually chicken or duck), sausages, a ham or bacon, a pulse (e.g. cannellini or haricot beans), stock and white wine. Outside of these, there is scope to use your imagination, what is in season or (erm, a consideration in some parts of Britain at the moment) what is actually in stock in the shops.

Servings

There should be enough here for 6 generous servings.

Timings

About 20 -25 mins to prepare. It then simmers away on its own for 2 – 3 hours.

You Will Need

  • 4 chicken breasts
  • 6 Bratwurst (or any other good pork sausages)
  • 12 rashers streaky bacon
  • 1 onion
  • 2 celery sticks
  • 1 carrot
  • 100g button mushrooms
  • 400g can of chopped tomatoes
  • 400g can of cannellini beans
  • 300ml chicken stock
  • 200ml white wine
  • torn basil leaves
  • 1 bayleaf
  • 2 tbsp cornflour
  • 2 tbsp cold water

Method

  1. Prepare a large casserole dish or slow cooker to cook the cassoulet in.
  2. Cut each chicken breast in half, then shallow fry each in a frying pan or wok until browned. Transfer to the cassoulet dish.
  3. Chop the bacon and fry with the sausages till browned. Add to the cassoulet dish.
  4. Chop the onion, celery, carrot and mushrooms and add to the frying pan. Let the veg soften for a few minutes, then transfer to the cassoulet dish.
  5. In the warm frying pan, tip in the tomatoes, stock, wine and beans. Give them a stir and, when warm and combined (you guessed it) transfer to the cassoulet dish.
  6. Tear in the basil leaves and add a few twists of salt and black pepper. Dunk the bayleaf in the middle.
  7. Let it stew for 2 – 3 hours. I used an electric slow cooker, which sits simmering away in the corner of the kitchen. If you use a casserole dish, put it in the oven at 180C.
  8. When the cassoulet is cooked, combine the cornflour and water in a ramekin until fully dissolved. Pour into the cassoulet and stir to combine. You should see the sauce start to thicken straight away. It is then ready to serve.

Customise It!

As suggested above, provided you have the core elements that every cassoulet should have, you can feel free to play around. Slices of garlic sausage from the deli can take the place of the bacon, for example, and you can vary up the veg if you wish.

I served this with boiled waxy potatoes and steamed shredded cabbage – both of which are good at soaking up the sauce. Boiled rice is another good call.

Turning to the next track for the ADK Playlist, all this talk about European relations brings me to Kraftwerk. I saw them play a few years ago, in the Royal Albert Hall in London. There aren’t many bands who can go off stage half way through for a nice cup of tea, leaving four robots to play their instruments in their absence. The machines performed We Are the Robots, without any dip in quality.

This is one of my favourite tracks of theirs, taking us on an atmospheric journey from Paris, through Vienna to Berlin, on the Trans-Europe Express.

Categories
Bakes Recipes

Double Choc Cherry Muffins

Sometimes the unplanned, spur of the moment dishes can turn out to be the best!

I had half a pack of fresh black cherries left over from my Cherry, Mascarpone & Biscotti Dessert, and was looking for ideas on how to use them up. Spotting just over half a 100g bar of Lindt 70% dark chocolate in the kitchen cupboard, I soon had the answer.

Dark chocolate and cherries is a timeless combination that never ceases to please. This recipe delivers a double hit of chocolate, through the sponge mixture and the broken-up chunks.

The other ingredients involved here are all ones I usually have in the fridge or store cupboard. After about an hour, the family was tucking into fresh double choc cherry muffins, still warm from the oven.

Fancy some of that action? Read on…

Servings

This will make 12 muffins.

Timings

10 -15 mins to prepare while the oven is warming up, then 25 mins in the oven at 180C.

You Will Need

  • 255g plain flour
  • 2 tsp baking powder
  • half tsp bicarb of soda
  • half tsp salt
  • 110g sugar (caster or granulated)
  • 4 tbsp cocoa powder
  • 1 egg
  • 250ml milk
  • 90ml vegetable oil
  • 1 tsp vanilla extract
  • 60g dark chocolate broken into chunks
  • 60g black cherries, stones removed and cut into quarters

Method

  1. Switch on the oven and heat to 180C. Lay out a muffin tin or mould.
  2. While the oven is getting up to temperature, prepare the mixture.
  3. In a bowl, sieve together the flour, baking powder, bicarb, salt and sugar.
  4. Add in the cherries and choc chunks. Give it all a good stir so that the cherries and choc are coated in the dry mix.
  5. Break the egg into a separate bowl, and stir in the milk, oil and vanilla. Add to the dry ingredients and stir to incorporate, so that there are no dry ingredients visible.
  6. Spoon into the muffin tin/mould and put in the oven for 25 mins at 180C.
  7. Remove from the oven when done and leave to cool on a wire rack, before enjoying. They are great when still a little warm, and just as good when cool. They will keep for a couple of days in an airtight container (though they will probably all be gone before then!)

Customise it!

For an even smoother taste, replace the 90ml veg oil with 90g of butter, melted in a microwave. You could also introduce some chopped nuts along with the cherries and choc – go for 40g and reduce the cherries and choc chunks to 40g also.

The next track for the ADK Spotify Playlist is bang on theme, requiring no further explanation. This is Goldfrapp with Black Cherry.

Categories
Blog

Katie’s Vinyl Bar & Kitchen

For a lover of good food and great music, it really doesn’t get much better than having lunch at Katie’s Vinyl Bar and Kitchen.

This independent cafe in Gosport High Street has an impressive selection of 12″ vinyl LPs, and there is always one booming out from the record player at the end of the bar. When my son and I arrived for lunch, the chosen album was Humbug by the Arctic Monkeys, see below.

This great taste in music is further confirmed by the art and photographs on the walls, covering the Smiths, Specials, Elvis, Johnny Cash and many more. There is an art wall featuring drawings of Debbie Harry, Johnny Rotten, Thin Lizzy and more.

Food wise, the owners have had a lot of fun with the menu, with items on it given a musical title. For example, the burger menu contains the James Blunt (plain, no frills burger), and the Morrissey (a vegetarian burger – hey, meat is murder, remember?)

If it’s a cooked breakfast you’re after, you can choose between the Dubliners (Irish style, with soda bread) or the Proclaimers (Scottish style, with tattie scone). Springsteen fans can choose a Born in the USA, with American pancakes and syrup.

Those with a big appetite can opt for the Hank Marvin (because you better be starvin’).

My son ordered the Eye of the Tiger (tiger-striped grilled halloumi and avocado on toasted bagel). I chose the Florence and the Machine, shown in my main photo at the top of this post. It is Katie’s take on eggs florentine, with poached eggs, spinach and hollandaise sauce on toasted muffin.

The coffee is good and the prices reasonable. It does have a licence, and it’s great to see the bar supporting Gosport’s independent Powder Monkey Brewery, with two of their ales available on draught. There is also the ever popular Neck Oil from Beavertown.

Definitely worth a visit if you are down this way!

This post’s track for the ADK Spotify Playlist is one we listened to while waiting for our meal, and which I hadn’t heard in a while. This is the Arctic Monkeys from Humbug, with Crying Lightning.

Categories
Breakfast Mains Recipes

Bacon and Blueberry Pancake Stacks

A feast for Pancake Day that’s flippin’ marvellous!

I have made this a few times, having used the recipe in my Sunday Brunch Cookbook, from the makers of the Channel 4 show featuring Simon Rimmer and Tim Lovejoy (so a big ADK shout out to Simon and Tim!).

Fancy sweet blueberry pancakes interlaced with rashers of bacon and melted butter, topped with a soft poached egg and drizzle of maple syrup, with a few twists of black pepper? Read on…

Servings

There are 3 pancakes in a stack, and this will make 6 pancakes i.e. 2 servings

Timings

15 mins to prepare the pancake batter (which can be done in advance), and then 15 mins to cook.

You Will Need

  • 1 egg for the batter
  • 25g butter
  • 125ml semi-skimmed milk
  • 60g cottage cheese
  • 100g self-raising flour
  • 1tsp bicarbonate of soda
  • 25g caster sugar
  • 120g fresh blueberries
  • oil
  • 2 eggs for poaching
  • 6 rashers of streaky bacon
  • maple syrup to drizzle
  • black pepper
  • some slivers of butter

Method

  1. Begin by making the pancake batter: combine the egg, milk, and cottage cheese in a bowl. Melt the butter ( I give it 12 – 15 seconds in a small bowl in the microwave) and add it in.
  2. In a separate bowl combine the flour, bicarb and sugar, the sieve it into the egg mixture. Give it a good stir, and feel free to use a mixer or hand blender to remove any lumps, if you wish.
  3. Add in most (about 100g) of the blueberries. Make sure you do this after using your mixer or hand blender, as you want them to stay whole! Give it another good stir and set aside.
  4. Warm an oven to around 100C and put in a plate that you can use to keep the pancakes warm as you cook them.
  5. Rub the base of a frying pan with a piece of kitchen paper dipped in oil, so that it has a light coating all over. Put it on the hob to heat up.
  6. Ladle in around 2 heaped tbsp of the batter. It will spread out to form a pancake about 1cm deep and 10cm in diameter, though don’t expect it to be a perfect circle (and this doesn’t matter). See the first of my photos below.
  7. After a few minutes, when it’s looking like it’s firming up, insert a spatula underneath and carefully flip it over to cook on the other side. See the second of my photos below.
  8. When both sides are cooked to a golden brown, remove and set on the warming plate in the oven.
  9. Repeat steps 6 – 8 to make 6 pancakes in total.
  10. With all 6 pancakes made, lay out the rashers of bacon in the pan and cook till crisp and golden.
  11. While the bacon is frying, soft poach the eggs. I find about 4 mins, once the water has reached boiling point, is the right length of time for large size eggs.
  12. Remove the bacon to the warming plate when done.
  13. Take the poached eggs off the boil when done.
  14. On two plates, you can then assemble the stacks. Begin with one pancake, then lay a rasher of bacon on top. Add a sliver of butter, which will soon melt. Repeat with another two layers, placing the rasher of bacon at 90 degrees to the one below. This will help the top stay flat(tish), which assists when adding the egg topping.
  15. Carefully place a poached egg on top. Drizzle with maple syrup and give it a few twists of black pepper from a mill. Scatter the remaining blueberries around the plates. Hopefully it will resemble my main photo at the top of the post.
  16. Serve!

Customise it!

I wouldn’t change the core ingredients of sweetened blueberry pancakes, bacon and soft poached egg. However, you could drizzle honey rather than maple if you wish, and also sprinkle some chilli flakes.

Next track for the ADK Spotify Playlist is from The Snuts, a young indie band who hail from West Lothian in Scotland. I like their sound and think the vocalist, Jack Cochrane, has a great voice. These boys can go far! This is Hallelujah Moment.

Categories
Mains Recipes

Sweet Roasted Veg in Qatari Spices

This week I’ve had fun using the Qatari Spices mix I brought back from the Souq Waqif in Doha, which I visited on my travels there in November. For this recipe, however, you can use any good mix of curry powder.

By way of background, I visited Doha in November and enjoyed the football and party atmosphere of the World Cup. It was quite some experience, with people from 32 nations all over the globe rubbing shoulders together in one city, in friendship and harmony.

In a previous blogpost, I explained the bewildering range of spices I came across on sale at Doha’s old traditional market, the Souq Waqif. The mix I chose is a blend of 9 different spices, including red chilli, cumin, cardamom, ginger, turmeric and coriander, all ground into a beautiful yellow/orange powder. See my photo below, taken at the Souq.

In this dish, I decided to make a paste and combine it with seasonal vegetables that become sweeter when roasted, namely butternut squash, parsnip and green pepper.

Normally I would like to retain control over the individual spices I am using. However, when you have a good quality ready made blend put together by an expert that knows their spice combinations, it provides a basis for a reliably good meal, and is also a time saver.

Servings

This will make 4 servings.

Timings

25 – 30 mins to roast the veg, and then 10 mins to combine in the sauce. The rest you can do while the veg are in the oven.

You Will Need

  • a large roasting tray’s worth of chopped and deseeded butternut squash, chopped parsnip and chopped green pepper, spread out on one shallow layer and coated in 1tbsp oil
  • 1 tbsp oil for the wok
  • 2 – 3 tsp of Qatari Spices mix, or other curry powder
  • 1 onion
  • 1 garlic clove, crushed
  • a 5cm piece of root ginger, peeled and finely chopped
  • 1 400g can of chopped tomatoes
  • 1 400ml can of coconut milk
  • any other veg you have to hand for using up – I threw in a half-can of sweet corn, chopped scallions and some button mushrooms
  • boiled basmati rice for 4 people – for me this means around 200g

Method

  1. Heat the oven to 180C and put in the roasting tray with the veg for around 25 – 30 mins.
  2. Put the oil in a wok. When hot, add in the onion, garlic and ginger.
  3. After a minute, add in the spice mix, with a few drops of the tomatoes and the coconut milk. Stir it around in the wok to make a lovely spicy paste.
  4. If you are using button mushrooms like me, add them at this stage and let them sizzle for a minute or two.
  5. Pour in the rest of the tomatoes and coconut milk and stir. Turn up the heat so that it thickens and reduces.
  6. While the sauce is maturing, put the rice in a saucepan with boiling water and simmer for 10 mins or so, until the grains are just soft enough to bite through.
  7. When the veg is roasted, tip it all in to the wok, and stir so that it gets coated in the thick sauce.
  8. Drain the rice, and divide between 4 plates. Serve a few spoonfuls of the spicy veg curry alongside. See my main photo at the top of this post.

Customise it

The core ingredients are the sweet roast veg, and the spicy tomato/coconut curry sauce. As I’ve indicated, you can add in any other veg you have to hand and wish to use up – it all helps make your curry unique. You could also swap the rice for a pillau, home-made or ready-made, or some Naan or flatbread. Flat breads were especially popular in Qatar.

For the next track on our ADK Spotify Playlist, I’ve chosen another of the great new bands that are coming through just now. They’ve been deservedly lauded recently at the Grammys and the Brits. Here’s the Isle of Wight’s own Wet Leg, with Chaise Longue.

Categories
Desserts Recipes

Cherry, Mascarpone & Biscotti Dessert

Here’s a Valentine’s Day dessert that you will love. Layers of bittersweet cherries, creamy mascarpone cheese and crumbled almond biscotti combine in a bowl of deliciousness that is both smooth and crunchy.

In fact, don’t just keep it for Valentine’s Day – this is so good it will wow your dinner guests any day of the year.

Servings

This will make 4 individual desserts like the one shown above.

Timings

20 mins to prepare the 3 component layers in advance, then a further 5 mins to combine.

You Will Need

  • 180g cherries, chopped into quarters with stones removed
  • 2 tsp icing sugar
  • Juice of half a lemon
  • 150g mascarpone cheese
  • 150g greek yoghurt
  • 1 tsp vanilla extract
  • 100g almond biscotti
  • glass tumblers to serve

Method

  1. Put the cherries in a bowl with 1 tsp icing sugar and the lemon juice. Give it a good stir so that all the cherries are coated in sugary juice. Set aside for 10 mins to soak, while you prepare the rest.
  2. In a separate bowl, mix together the mascarpone, yoghurt, the other tsp icing sugar and vanilla. I used an electric mixer to make sure the thick mascarpone was integrated with the thinner yoghurt.
  3. Put the biscotti in a bag and crush it to rough crumbs with a rolling pin. This is fun, so give it a good bash and take out all your frustrations!
  4. Steps 1 – 3 can be done well in advance of serving. My photo above shows the three component parts, ready to be layered.
  5. The next steps should be taken no more than 2 hours before serving. This is so that the crushed biscotti retains its crunch and does not go soggy. Noone wants soggy biscotti.
  6. Put half the crushed biscotti in a layer across the bottom of each of the glasses. Top with a layer of half of the mascarpone mix, then half the cherries.
  7. Follow this with one further layer of the remaining biscotti, the mascarpone, and finally the cherries on top.
  8. Serve. The layering means that as you dig down into the glass with your spoon, you mix it up and get a taste of all the parts together.

Customise It!

I am a fan of the classic taste combination of cherry and almond, hence this recipe. However, you can experiment with other types of biscuits – amaretti or biscoff would work well. Equally, you could substitute other fruit for the cherries – maybe raspberries and blueberries, or a mix of both.

Time for a Valentine’s themed track on our ADK Spotify Playlist. Here is some early Simple Minds with Love Song.

Categories
Recipes Snacks

Smoked Paprika Popcorn

This week I’ve been looking to make a snack to enjoy while watching this weekend’s Superbowl. I always stay up for the game, even though it starts at around 11.30pm UK time, and continues into the early hours.

This year’s should be a particularly good match-up – the Philadelphia Eagles have had an outstanding season, but will face their toughest challenge yet against the Kansas City Chiefs. Even though the Chiefs have the talented Patrick Mahomes as quarterback, I’m predicting that the Eagles will be just too strong overall, and will take home the trophy. We shall soon see if I am right!

As it’s Superbowl weekend, I’m keen that my snack should follow an American theme. I also want it to be savoury, that can be enjoyed alongside a cold drink while watching the game.

This has led me to popcorn, a classic American snack. It’s a food that sometimes gets a bad press online, typically for being served smothered in refined sugar and hydrogenated fats, in large cardboard buckets and consumed in dark multiplex cinemas. Even in the home, microwave-ready popcorn also comes in for some criticism with concerns over chemicals used in its packaging.

However, as I am sure my lovely American foodie followers will point out, popping corn, prepared properly, is essentially a healthy snack! As a grain, it is high in fibre, low in calories and a good source of antioxidants.

So why not have a go at making some? It is inexpensive, quick and easy. I bought a 500g bag of popping corn in Sainsbury’s for £1.45, meaning the portion size below costs about 15p (or 18 cents) to make.

The smoked paprika drizzle ingredients are minimal, and cooking it from scratch means that you are in complete control over what and how much is added. This means it can be enjoyed as a relatively healthy snack. It is suitable for both vegetarians and vegans.

Will you be following the Superbowl? Feel free to leave any comments you wish at the foot of this post. Enjoy the popcorn, and enjoy the game!

Servings

This will make around 50g of popcorn, enough for two people as a Superbowl snack. If you’re expecting guests, especially hungry, or if the game goes into Overtime, just make extra!

Timings

10 mins to make in total (see, I told you it was quick).

You Will Need

  • 2 tbsp extra virgin olive oil
  • 50g popping maize corn
  • sea salt flakes
  • half to 1 tsp smoked paprika

Method

  1. Put a heat under a heavy pan with tight-fitting lid. Add in 1 tbsp of the oil and the golden corn. Spread the corn in a single layer across the bottom of the pan (see photo above).
  2. After a minute, pick up the pan and hold down the lid. Give it a good shake to ensure all the corn is coated in the oil. I actually do this a few times during the cooking process. Just make sure to keep that lid tight on the pan while doing so!
  3. After another few minutes, it will all start kicking off. The corn will begin to pop and bits will be pinging off the lid and walls of the pan. A drop of moisture inside each corn kernel causes it to explode when heated, making it jump around (hence the reason for the tight fitting lid).
  4. There are usually a few kernels that don’t pop, and the ones that have popped will toast nicely in the hot pan. After a few minutes the popping will slow down, and you can remove the pan from the heat.
  5. Pause for a moment to enjoy the delicious aroma of cooked and popped corn that will just have filled your kitchen.
  6. Tip the popcorn into a large sharing bowl and, while it is still warm, drizzle over the second tbsp of oil. Sprinkle over the sea salt and the smoked paprika. Give it a good stir so that all the corn gets coated.
  7. Finally, taste and add further seasalt or paprika, if required.
  8. Take the bowl (which should resemble my main photo at the top of this post) with your cold drink of choice, and retire to the TV room to enjoy the Superbowl.

Next track for the ADK Spotify Playlist is also Superbowl-inspired. It’s Rihanna’s turn to headline the Half Time Show this year. With no rain forecast for Arizona this Sunday, I wonder if she will still be bringing along her Umbrella? Let’s hope so!

Categories
Bakes Recipes

Lemon Drizzle Slices

After 2 flights, 26 hours in the air, 4 movies and at least 7 in-flight meals or snacks, I am now back home in the UK from my Australian trip.

I’ve also swapped a daily high temperature of around 30C in the Australian summer, for one of around 8C in the UK winter. If that sounds low in comparison, it is positively tropical given what friends and family have told me about the freezing weather here over December and January. Touch wood, we seem to have missed the worst of a very cold UK winter.

It’s good to be back in the ADK kitchen researching new dishes and listening to some new bands over the speakers on Spotify. There’s lots of exciting recipes and stuff to come over my next few posts, so stay tuned.

The first creation since my return is the Lemon Drizzle Slices shown above. I made these as a thankyou for our lovely neighbours who have been keeping an eye on our house while we have been away. Sweet and tangy, the cakes went down particularly well along with a glass of prosecco, sat in a warm living room sharing a few holiday snaps cast to the TV screen. Fancy having a go?

Servings

This will make 16 slices.

Timings

10 minutes to prepare, 15 – 20 mins in the oven. 5 mins to drizzle the lemon and another 5 mins to add the icing.

You Will Need

  • 70g softened butter
  • 120g caster sugar
  • 2 large eggs
  • 140g self-raising flour
  • 1 tsp baking powder
  • zest of a lemon
  • 1 tbsp lemon curd
  • 2 tbsp semi-skimmed milk
  • 30g granulated sugar
  • juice of a lemon
  • 70g icing sugar
  • 1 – 2 tbsp water

Method

  1. Grease a traybake pan 20cm x 20cm and line with baking paper.
  2. Heat the oven to 180C.
  3. Cream the softened butter and caster sugar with a mixer. Add in the eggs and whisk again.
  4. Sieve the flour and baking powder into the mixture. Add in the zest, lemon curd and milk. Stir to combine so there are no dry ingredients showing.
  5. Tip the mixture into the tin and place in the oven once it’s up to temperature. Bake for 15 – 20 mins, until the cake has risen and is golden. Pierce the middle with a skewer and, if there is no wet mixture on the skewer, it is done.
  6. Leave the cake in the tin, and pierce it all over in about 15 – 20 places to make tiny little holes. Mix the lemon juice and granulated sugar, then gently pour it over the cake, so that it seeps down into the holes. Take it slow as, if you pour too fast, it will flow off to the sides.
  7. Leave the soaked cake to cool completely, then remove it from the tin.
  8. Mix the icing sugar and water together, then spread over the cake. Leave it aside to set (I find placing it in the fridge helps the setting process).
  9. Once the icing is set, cut into slices and serve.

Customise it!

This recipe is already customised, to be fair, so there’s not too much more to suggest. It’s based on one by Paul Hollywood (thanks Paul), to which I have made a few tweaks – the main one being to use only one third the amount of icing that he does. I can only assume he likes his icing laid on nice and thick!

If you don’t want to make the icing, that’s ok – the cake is also fine to serve without it (see my photo below).

I’ve been discovering some great new music since my return, so will be featuring this on the ADK Playlist over the next few posts. Here’s the first: The WAEVE is the new venture by Graham Coxon (out of Blur) and Rose Elinor Dougall. They’ve just released their first album, and I love the bass guitar line on this track, called Kill Me Again. Stick with it – it kicks in after the first verse.

Categories
Blog Drinks

Paint Me Down (Under)

I want to share with you some of the great art in public places I’ve come across in Australia.

For reasons I can’t quite explain, my experiencing of art is inextricably connected with the consumption of coffee and pastries. Visit to a gallery? Sooner or later my wristwatch will be telling me it’s time to visit the coffee shop. Walking on a public art trail? I guarantee at some point there will be a minor detour to take in that nice, funky looking cafe over there. More about Australia’s cafe culture in a moment – let’s first take a look at some of the art.

I’ll start with the art deco entrance to Luna Park, Sydney’s retro amusement park that dates back to 1935, shown in my main photo above. It is a joy to behold – the huge grinning face is visible all the way from the other side of Sydney Harbour, getting progressively larger as you approach it on the ferry. If you look closely you will see visitors walking through the mouth to enter the amusement park, giving a sense of its vast scale.

My next photo below was taken at the graffiti wall which lines the promenade at Sydney’s famous Bondi Beach – a place where chic boutiques and upmarket cafes co-exist with the bohemian grunge of the local surfing community. Our visit here soon led to a visit to one such cafe (see, what did I tell you), from which we enjoyed the free entertainment provided by the surfers. This was easily the best surfing I have ever seen – well-poised riders catching a wave for a good 10 – 15 seconds before diving neatly into the water, then doing it all again.

Back in Melbourne, Hosier Lane is known as Spraycan Alley, making it a popular tourist attraction – see below. It is positioned in the Lanes and Arcades quarter chock full of fiercely independent cafes. A visit to at least one of these is inevitable (for me, that is) when in this part of town.

Indigenous art influences are strong wherever we go. The tall three-legged, two headed Angel (by artist Deborah Halpern) is situated in Birrarung Marr, the public park that stretches out along the River Yarra from Federation Square to the home of the Tennis Open.

Again in Melbourne, the whole of the ground floor of the Ian Potter Centre (free to enter) is given over to indigenous people’s art. The paint used is generally derived from rocks, minerals and clay, giving it an earthy feel, and a colour palette based around an ochre spectrum. The abstract designs and patterns evoke the meditational nature of the aboriginal philosophy known as the Dreaming. My photo below is an example, by artist Willie Gudabi.

And so to the world of coffee and pastry that I associate with these images. Cafe culture is big in Australia. They are nearly all independents – you will only very occasionally see a Starbucks or other chain. Baristas take their work very seriously, and the making of a hot drink has itself been elevated to something of an art form. I can honestly say I have never had a bad cup of coffee since arriving in Australia.

At first the coffee menus were like a different language, but I now understand my way around them. There is no such thing as an americano – it is a long black and, if you want it white, you ask for a small jug of milk (specifying whether it should be hot or cold, and dairy, oat or other) on the side. A batch brew is a filter coffee, and a cold drip is an iced version – usually a latte served over ice cubes and, in some places, a scoop of ice cream.

Cappucino and flat whites are as you would find in the UK but, surprisingly, decaff is nowhere to be found on the menus. Seemingly this is because the serious coffee aficionados do not consider it to be a credible option. While there is no doubt that Australia makes great coffee, I do think this is one area where the approach is a little out of step with modern times.

So boil the kettle, or fire up your espresso machine, and fetch a nice coffee while enjoying these images. Which one is your favourite and why? Please feel free to leave a message in the comments section below, if you like.

The title of this post has probably given away the latest track I’ve chosen for the ADK Playlist. Paint Me Down is not one of Spandau Ballet’s biggest hits, but I have always really liked Martin Kemp’s bass line, which kicks in right at the start and stays prominent thoughout. Take it away, lads..