Categories
Mains Recipes

Parmesan Kohlrabi Steaks

Kohlrabi is a great vegetable to cook with. It has a texture that’s been described as a cross between a turnip and a water chestnut, which sounds about right.

Quite often you will see it in recipes that treat it like the poor relation – consigned to the margins of a meal, as a side dish, or have it grated into a salad along with other ingredients.

I felt it deserved its place in the spotlight, so this dish sees it firmly centre stage (or should that be centre plate?) as the star attraction. The crisp, juicy and crunchy texture it retains when cooked makes it suitable as a main, especially for anyone on a vegetarian, vegan or plant-based diet. I hope you will find it lives up to its billing!

It is actually quite simple to make. Cut a large disc-shaped slice of the kohlrabi that is about 1 – 2cm in thickness from the widest point (the equator, if you know what I mean). Trim off the peel, then cut it into about 6 pieces. Go for irregular shapes – you want each steak to be individual and the whole dish not to look uniform. Also, work in a number of angles and corners – these will crisp and caramelise as they roast.

Briefly place the steaks in a shallow pan with a little oil. Fry each steak on both sides for about 2 – 3 mins, then transfer to a roasting dish and place in the oven, heated to 180C. Let them roast for 30 mins, flipping them over half-way through.

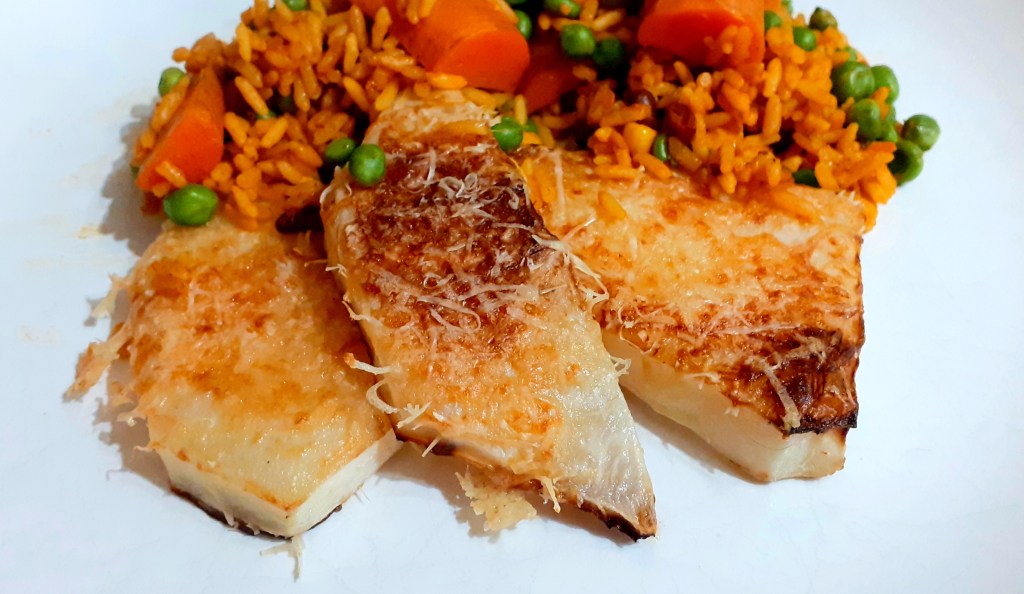
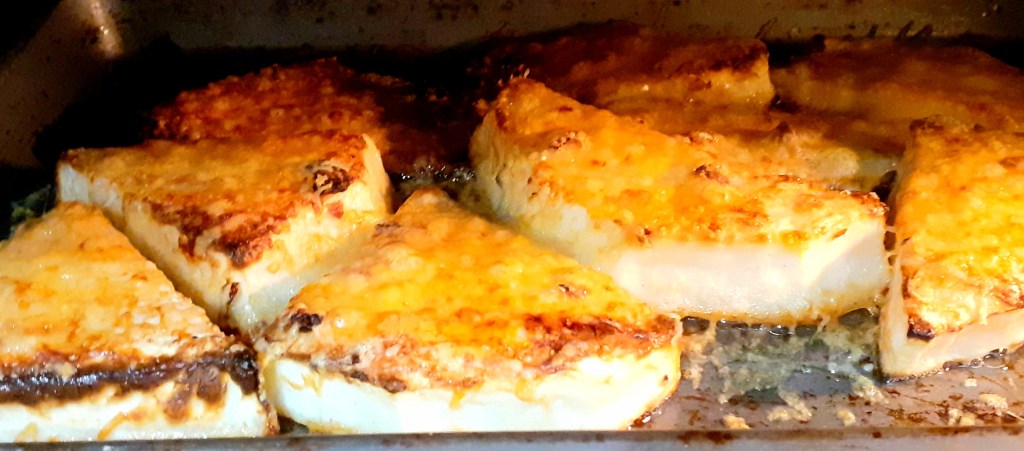
Remove the dish from the oven and grate 40g of parmesan cheese (or vegan alternative if desired) over the steaks. Place back in the oven for a further 10 mins and let the cheese melt. The steaks will be browning up nicely as the photo below shows (I couldn’t resist a sneak peek in the oven to see how they were doing).

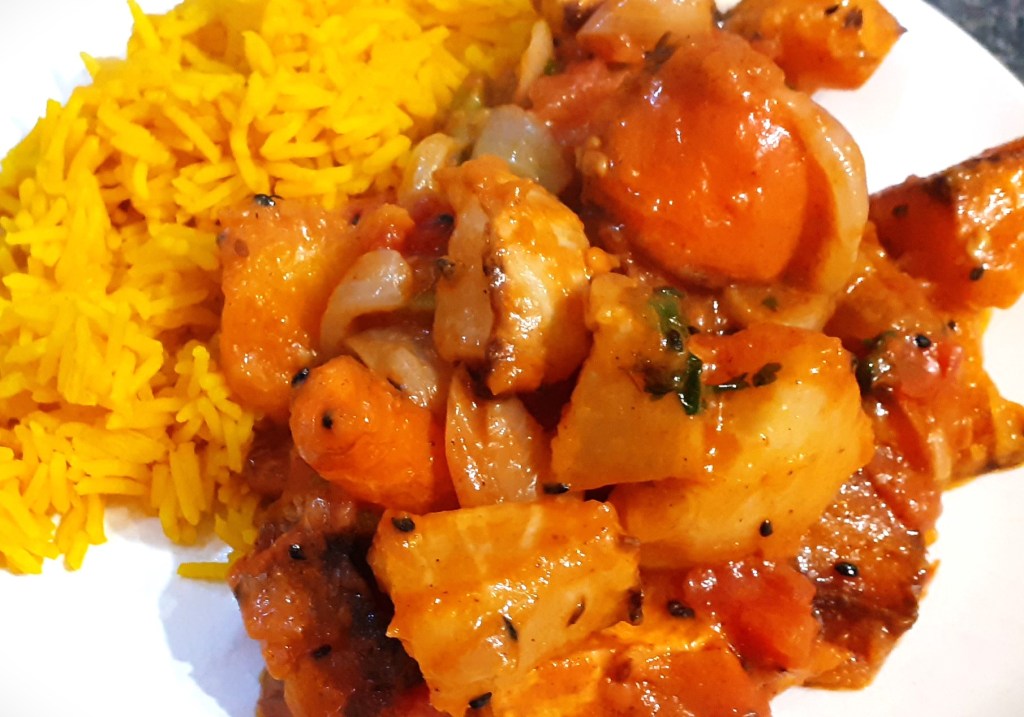
When complete, remove and serve with your choice of accompaniment. In my main photo you can see that I served this with savoury rice and steamed carrots. I served 3 steaks in one serving, making this a meal for 2.

If you like, you can make more servings, or have it again on another occasion, as you will only have used a fraction of that beautiful kohlrabi.

This is an exciting weekend for me, as I am setting off on my travels, spending the next couple of months in Australia, with some time in the Middle-East en route. I’ll be blogging here and tweeting (@differentkitch) along the way, so do please follow me on my journey. I welcome any comments and suggestions on places to visit and eat, food and drink I should try. This lovely track about global travel – Ramblin’ Man from Lemon Jelly – seems particularly appropriate today!

Categories
Mains Recipes

Sweet Potato, Kale and Chorizo Hash

This is a great midweek meal when the nights are closing in, and a dish that I find irresistible! I love the smell and crackle of the chorizo as it sizzles in the pan, and the vivid, contrasting colours. The bright orange of the sweet potato, and freshly picked green kale from the garden, combine to make this autumn on a plate.

Servings

This is a meal for two.

Timings

15 – 20 mins to prepare.

You Will Need

  • 400g sweet potatoes, peeled and chopped into chunks
  • 20g butter
  • about 80g fresh kale (for me this was 8 or 9 leaves)
  • 1 onion
  • 1 red pepper
  • 100g chorizo
  • 400g can of chopped tomatoes

Method

  1. Put the sweet potato chunks in a saucepan and bring to the boil. Reduce to a simmer for 15 mins.
  2. Chop the kale leaves into strips and place in a steamer over the saucepan. They will soften in the steam from the sweet potatoes as they cook.
  3. Separately, in a frying pan, add the onion and red pepper, chopped, along with slices of the chorizo. There is no need to add any oil or spices, as the chorizo will provide all the oil and flavouring you need.
  4. After 5 mins, add the chopped tomatoes to the frying pan and stir in.
  5. When the sweet potato has cooked, drain it and mash with the butter. Add it to the frying pan, along with the steamed kale.
  6. Give it all a good stir in the frying pan and turn up the heat. Turn the mixture over a few times with a broad spatula – you should try to get some parts of the hash crisped and browned. Serve when it has reached a level of charred-ness that suits your tastes!

Customise It!

Stick to the core of sweet potato, kale and chorizo, but beyond this add in other veg you like. Garden peas or sweetcorn would be fine, for example.

You can use any good chorizo sausage. The one I used is a British-made variety from the Cotswold Curer (see photo). I picked this up at Warwick Food Market when I was in the West Midlands for the Commonwealth Games, back in the summer.

Whatever chorizo you use, remember this is a hash – switch up the heat, get that spatula in there and make sections of it nice and crisp by flipping over and over.

Just like my favourite track from Hot Chip – the latest addition to the ADK Spotify Playlist:

Categories
Mains Recipes

Root Veg Curry

Continuing the recent theme of cooking with autumn vegetables, this dish brings together a variety of seasonal root veg in a subtle yet spicy curry that is suitable for both vegetarians and vegans. My meal, shown in the photo, used celeriac, mooli (or white radish), kohl rabi, carrot and parsnip, though other veg are available!

Servings

This will make enough to serve four.

Timings

10 mins to peel and chop the root veg, and 30 mins to roast. The rest of the prep can be done while the veg is roasting. Allow 10 mins more to combine and finalise.

You Will Need

  • a baking tray full of root vegetables, peeled and chopped into chunks. I used celeriac, mooli (white radish), kohl rabi, carrot and parsnip
  • oil to drizzle
  • 1 medium onion
  • 1 garlic clove, crushed
  • 1 fresh chilli, or 1 tsp chilli powder
  • 1 tsp cumin seeds
  • 1 tsp garam masala
  • 1 tsp nigella seeds
  • 500g passata
  • bunch of fresh coriander
  • 400ml can of coconut milk
  • rice to serve

Method

  1. Drizzle oil over the tray of chunked root veg and roast in the oven at 180C for 30 mins.
  2. While the veg is roasting, heat some oil in a saucepan and toss in the garlic and spices until sizzling. Then add in the onion.
  3. After a few minutes, add in the passata, Hold the bunch of coriander over the pan and, with scissors, cut in a generous amount.
  4. Let the passata and coriander cook for a few minutes.
  5. Add in the coconut milk and stir to combine. Cook for a further 5 – 10 mins. It will reduce slightly to give a thick, spicy sauce.
  6. When the root veg is roasted, scrape it into the saucepan and stir in.
  7. Serve with boiled rice.

Customise it!

Lots of scope to vary the veg. Butternut and other squash will work well in the roasting tray, also some chestnut mushrooms or peppers. Adjust the strength of the chilli and spices to suit your taste.

For musical choice, I have gone for a favourite track of mine, which also serves as an homage to the good people at our local community farm who harvest these lovely root vegetables from the soil – Can You Dig It by The Mock Turtles.

Categories
Breakfast Desserts Recipes Snacks

Pumpkin Spice Muffins

A feature of autumn is having lots of weird coloured and wonderful shaped pumpkins and squashes on our vegetable stalls. This recipe uses one of these to bring sweetness and moist texture to a set of freshly baked muffins. I recently made these on Halloween (as my photo shows!), but they are just as enjoyable for an autumn-themed breakfast, dessert or a snack with tea or coffee.

Servings

This will make 12 muffins.

Timings

10 mins to chop the squash, and 30 mins to roast it. The rest of the prep can be done while the squash is roasting, and the muffins will then take 25 mins to bake at 180C.

You Will Need

  • Pumpkin, butternut or other squash, peeled with seeds and pith removed, and cut into chunks. You will need 250g of chunks.
  • 255g self-raising flour
  • 1 tsp bicarbonate of soda
  • half tsp salt
  • 2tsp mixed spice
  • 140g caster sugar
  • 1 egg
  • 150ml milk
  • 2 tablesp runny honey
  • 90 ml vegetable oil
  • 50 g dried fruit
  • 50g chopped mixed nuts
  • a few handfuls of pumpkin and sunflower seeds to garnish

Method

  1. Spread the chunks of squash out on a baking tray, drizzle with oil, and roast in an oven at 180C for 30 mins.
  2. While the squash is roasting, prepare a muffin tin or mould.
  3. In a bowl, sift together flour, bicarb, salt, spices and sugar. Add the nuts and dried fruit and stir well.
  4. In a separate bowl, mix the egg, milk, oil and honey.
  5. When the squash has finished roasting, remove from the oven. The chunks should be charred and caramelised at the edges. Lift them on to a plate and set aside to cool for 10 mins.
  6. Whirl the squash chunks in a food processor with blade fitted, till you have a puree. This process should also help the squash to cool further.
  7. Scrape the squash puree into the egg mixture and stir. Then add the egg mixture to the dry ingredients and stir well to combine.
  8. Spoon the combined mixture into the muffin tin or mould. Sprinkle a few pumpkin and sunflower seeds on top of each muffin. Bake in the oven, still at 180C, for 25 mins until golden.

Customise it!

Cut down on time to bake the muffins by roasting the squash earlier, perhaps when you already have the oven on cooking something else. Puree it and set aside to cool, then use as stated. Feel free to substitute other types of nuts and seeds as you prefer.

Musical choice for this post comes from Inspiral Carpets. I have just obtained tickets to see the band on tour in London next spring. I’m excited about this – I have grown to really like their music in the last few years but haven’t seen them before. I especially like the 60s sounding farfisa organ played by Clint Boon. They have lots of great tracks but this one seems particularly appropriate to the season – She Comes in the Fall.

Categories
Mains Recipes

Autumn Veg Roast

The signs of autumn are now all around us. I’ve been enjoying some beautiful wooded walks amidst glorious shades of red and orange leaves. The days are getting cooler, and this coming weekend, in the UK, our clocks will be going back one hour, bringing in earlier, darker evenings.

This dish was inspired by the arrival in the ADK Kitchen of a wonderful harvest of autumn vegetables from our local community farm. You can see these spread out in the photo below: butternut squash, another (as yet unidentified!) variety of squash, parsnip, carrots, onions, celeriac and mooli (white radish). Also included in the crop was some broccoli, green beans and fresh butter beans.

There was too much to use in one dish, so I focused on the squashes and root veg, which I think are lovely roasted. I added a tomato and onion sauce, with a maverick ingredient – black olives. It is topped with a crisp crust of wholemeal breadcrumbs, grated cheese and chopped nuts.

The next photo shows the finished article, warm from the oven. Served with a nice glass of red wine, it makes a great comforting meal on an autumn evening, now that the nights are drawing in.

Timings

10 mins to prepare and chop the veg, which then roasts for 30 mins. The rest of the prep you can do while the veg are roasting. Allow a further 20 mins for the assembled dish to roast further.

Servings

This will serve 6 people.

You Will Need

  • A pyrex dish-ful of chopped seasonal veg: I used butternut squash, celeriac, parsnip and mooli, and added some chestnut mushrooms and red pepper
  • A sprinkling of herbes de provence
  • Some olive oil
  • A 500g carton of tomato passata
  • 1 onion
  • 1 clove of garlic
  • 75 g pitted black olives, whole or chopped
  • 5 or 6 slices of wholemeal bread chopped into crumbs
  • 75g grated cheddar cheese
  • 75g chopped mixed nuts

Method

  1. Chop enough veg to half fill the pyrex dish that you will use. The veg should be in chunks roughly about 2-3cm square. Tip them into a separate metal baking dish and sprinkle with the herbes de provence. Drizzle with olive oil and roast in the oven for 30 mins at 180C. Spread them so that they are in a single layer, and use a second metal dish if necessary.
  2. While the veg is roasting, chop the onion and add it to some hot olive oil in a saucepan, with the garlic clove, crushed. After a few minutes, tip in the passata and black olives, and mix. Let it bubble for around 10 mins so that it is slightly thickened in consistency.
  3. Separately, combine the breadcrumbs, grated cheese and chopped nuts in a bowl. Get your hands in there and give it all a good mix. You want the cheese to be intertwined with the other ingredients so that, when it melts, it will bind it all together into a crisp coating.
  4. When the veg has roasted, combine it with the tomato sauce, and pour into the pyrex dish. Pat it all down with the back of a spatula so there are no gaps.
  5. Sprinkle over the bread, cheese and nut crust, evening it out and patting it down with the backs of your fingers. Give it a final drizzle of olive oil.
  6. Cook in the oven for around 20 mins, or until the top is crisp and golden. With some ovens, it may help to give it a final 5 mins under the grill to crisp it up. Serve.

Customise it!

Lots of scope for customising here, starting with choice of veg. Really, you can use whatever is in season and whatever particular veg you prefer. There are many varieties of squash and root veg around this time of year, most of which benefits from roasting, helping it sweeten and caramelise on the outside and succulent to bite into.

With the crust topping, you can use other bread for the crumbs, and other cheese. Grated blue cheese would give it a lovely taste twist, as would some parmesan. The next time I make this I will include some pumpkin and sunflower seeds in the crusty mix.

You can omit the olives if they’re not your thing. I love them, and had the idea to include them in the sauce and serve the dish with a warmed, sliced black olive ciabatta (see my photo), which all worked really well.

The dish is suitable for vegetarians. To make it vegan, simply omit the grated cheese, though the topping will be a little looser. However, you could always use a vegan cheese. As ever, feel free to experiment!

This time of year also means that Halloween is approaching. I’ll be saying more about this in this coming weekend’s post, and hopefully having a little fun. For now, I’ll choose a track from a Halloween Playlist I have on Spotify, to share as musical accompaniment.

Cue Superstition by Stevie Wonder. Nothing more to say!

Categories
Mains Recipes

Kale and Potato Cakes

As summer slips away into autumn, the space in our garden occupied by sunshine-infused tomatoes and cucumbers is gradually giving way to curly kale.

Kale is highly regarded as a source of numerous vitamins and nutrients that keep our bodies healthy. It is also one of my favourite vegetables to cook with – watch out for some more kale dishes posted before this autumn is through!

This dish started out as a Mary Berry bubble and squeak-type recipe (thanks for the inspiration, Mary!), which I modified to take advantage of the copious amounts of fresh kale that have been appearing each day over our garden wall. I also added scallions/spring onions, which go down a treat.

I served the cakes with a rasher of good back bacon on top, along with a soft poached egg and a twist of chilli flakes. The cakes can be prepared in advance and shallow fried as required. They make a tasty and healthy midweek meal or weekend brunch.

Servings

This will make 8 cakes.

Timings

The first stage of preparing and boiling/steaming the veg (which can be done up to 24 hrs in advance) takes about 20 mins. Once slightly cooled, combining and shaping the cakes (which can also be done in advance) will take about another 10 – 15 mins. Allow 10 mins to shallow fry the cakes before serving.

You Will Need

  • 1kg potatoes – I used Maris Piper
  • 40g butter
  • 100g fresh curly kale
  • 1 tbsp wholegrain mustard
  • 50g cheddar cheese, grated
  • 3- 4 scallions/spring onions, finely chopped
  • 40 g plain flour
  • a few pinches of sea salt
  • oil for frying

Method

  1. Peel, chunk and boil the potatoes for 15 – 20 mins in water with a pinch of sea salt added. Drain well and leave in the warm saucepan to cool slightly – this will ensure that any excess moisture evaporates, leaving the potatoes dry.
  2. While the potatoes are cooking, place the kale in a steamer over the saucepan for about 10 mins. Remove the steamer and spread the kale out on some kitchen paper on a tray. With another piece of kitchen paper, pat the tops of the kale leaves to make them as dry as possible, then shred with a sharp knife.
  3. Add the butter to the warm potatoes and mash until smooth. Add in the shredded kale, scallions, cheese and mustard and combine well. Check the seasoning and give it another twist of sea salt if necessary.
  4. By this stage, the combined mixture should have cooled sufficiently to enable you to grab a handful and shape it into a pattie, or cake, the size of a burger.
  5. Sprinkle the flour on a plate and coat each cake on both sides.
  6. Shallow fry the cakes in the oil until brown and crispy on the outside, while soft in the middle.

Customise it!

I put some rashers of bacon in the pan to cook alongside the cakes, and poached some eggs at the same time. You can serve each cake with a rasher on top, and then a soft poached egg, topped with a twist of chilli flakes – see my photo.

For a veggie option, try chopped tomatoes on top, with or without the egg. Another good combo would be smashed avocado with egg and bacon. Be creative!

Choice of musical track is influenced by the gig tickets I managed to secure while working on this dish. I’m excited to say that next year I shall be seeing the Arctic Monkeys on their UK tour. Consequently, their music has been featuring quite heavily recently in the sounds playing in the ADK kitchen.

I am very interested to hear the new album which is due out in a few weeks’ time. I have always liked the band and saw them live on the AM tour at Earls Court, London in 2013. My favourite album of theirs is still Humbug. I liked the 2018 sci-fi influenced Tranquility Base Hotel and Casino album, though it was quite different from what they had done before. All in all, I’ll award it Four Stars Out of Five…

Categories
Blog Sides

Green Tomato Chutney

This week on A Different Kitchen we welcome our latest guest post. Our contributor is my wife Lesley, a keen gardener and cyclist, who has been making the most of this summer’s tomato harvest from our garden!

Hi. I grow Gardener’s Delight tomatoes, a really tasty cherry tomato. At the end of the season I usually compost the green ones when tidying up the garden for winter, having had a magnificent crop of warm juicy tomatoes when picked fresh. 

This year I decided it was more in keeping with my desire to reduce food miles and increase self-sufficiency  to convert the green tomatoes into chutney.  I inherited some vintage Kilner jars from my parents who used to make jam from gluts of fruit. The skill and desire to preserve a home-grown harvest has been handed down to me, even though I thought it was boring at the time.  This recipe was super easy to make and, as the following photo shows, we now have this rich sticky chutney to pair with cheese, ham and bread for much of the winter to come.  

This made just under a litre of chutney.  Here’s a ‘How to’:

Slice the green tomatoes and an onion. Sprinkle with the best salt you have and leave. The salt will draw liquid out of the tomato onion mixture, then discard by straining it. Don’t rinse the salt away, its all part of the salt/sweet/sour balance of the chutney. 

I used 200g muscovado sugar and half a litre of cider vinegar to my 1kg tomatoes to make it rich and tasty but any sugar and vinegar will do. I have windfall apples from my tree so I added about 4 medium-sized ones peeled and cored with a handful or 2 of sultanas or any similar dried fruit. Add in whatever spices you like. 

All this gets boiled up till it is pulpy and sticky  (about 1 hr) and then carefully spoon into the sterile jars that have been warming in the oven. I don’t have lids for these so have put greaseproof paper squares over the jar with an elastic band and popped it in the fridge once cool. 

I always say to my children when eating anything we have grown in our garden, “this was made from Hampshire sunshine”. Eating it will remind me of a ridiculously record breaking sunny summer, sheltering inside from the heat, watching cycling teams on TV dousing copious amounts of water over their heads in le Tour de France on punishingly hot roads. Being a keen cyclist, I have chosen this excellent Kraftwerk tune to go with my chutney. 

Categories
Mains Recipes

Chilli Mushroom with Lime & Sea Salt Buttered Veg

A roasted filled portobello mushroom makes a great vegetarian dinner. It holds its shape and texture when cooked and releases its juices when you cut into it with a knife. In this dish it is combined with summer veg served with melting slivers of butter infused with lime, sea salt and chilli flakes.

Servings

This will make one serving, so multiply up by however many mouths you are feeding (I’ll say more about this below!)

Timings

20 mins to make the vegetable chilli filling, then 20 mins in the oven to roast.

You Will Need

  • 1 stick celery
  • half an onion
  • 1 carrot
  • 1 tsp chilli powder
  • 1 tsp cumin seeds
  • half a red, green or yellow pepper
  • a little vegetable oil
  • 1 tablespoon of plain flour
  • half a 440g tin of kidney beans
  • 300g vegetable stock
  • 60g red lentils
  • 1 portobello mushroom
  • seasonal veg (e.g. green beans, carrots) for one, boiled or steamed
  • 40g butter, softened
  • zest and juice of half a lime
  • a few twists of sea salt
  • a few chilli flakes

Method

  1. Put the chilli powder and cumin seeds in some oil, until sizzling.
  2. Finely chop the onion, celery, carrot and pepper and shallow fry until softened.
  3. Take off the heat and sprinkle the flour over. Turn the veg over until it is coated in the flour.
  4. Add the stock and bring to the boil. When boiling, add the lentils and kidney beans. Put on the lid of the pan and simmer for 10 – 15 mins until the lentils have softened.
  5. Remove the lid and let the mix reduce through evaporation, until you have a soft, thick consistency.
  6. Remove the stalk from the centre of the mushroom, chop and set aside. Brush the mushroom all over with oil.
  7. Fill the mushroom with the chilli mix, topping it with pieces of the stalk, gently pressed down into the mix. Place on a metal tray and roast in the oven at 180C for 20 mins.
  8. While the mushroom is roasting, chop and boil or steam the seasonal veg.
  9. In a small bowl, mix the butter, lime zest and juice, sea salt and chilli flakes. Place in the fridge until serving.
  10. Serve up the roasted mushroom with the veg on the side. Slice off a few slivers of the butter and let melt over the veg.

Customise it!

Lots of scope for going off piste here, while sticking to the fundamentals of a roasted portobello mushroom, a chilli filling and seasoned butter for the veg. Swap in other types of lentil or pulse, and use some drops of tomato passata if you wish along with the stock. Choose whichever veg you prefer to serve on the side, and prepare it as you like it. Garlic goes well in both the chilli mix, and especially in the butter.

I’ve given the measurements to make one portion here. However, I would quite often make a larger pot of the vegetable chilli and serve some of it on other occasions, in a different way (e.g. with rice) or freeze some of it for a later date. Similarly, the seasoned butter is great with other foods, such as sweetcorn and fish, so I sometimes make a larger batch of that as well.

In other words, don’t be afraid to gross up the amounts. Stick to the instructions above and you’ll have a nice meal for one. Go larger and who knows – you may have enough to feed a Seven Nation Army. Cue the White Stripes!

Categories
Mains Recipes

Turkey, Feta and Courgette Burgers

I’m pleased to announce that we have another guest post on A Different Kitchen! It is by my sister Pamela, an experienced and talented cook whose meals I have enjoyed on numerous occasions. 

Hi. My featured meal is Turkey, Feta and Courgette Burgers. I have used this recipe many times. It’s healthy, tasty, easy and uses up some of the mint in our garden (you can see some of our mint bush in the photo). It is also useful if you have an abundant courgette (or zucchini) harvest, which some of you may be experiencing at this time of year.

Servings

Depending on your preferred size of burger, the recipe makes as many or as few burgers as you like!

Timings

10 mins prep, and 10 mins to grill.

You Will Need

  • 500g turkey breast mince
  • 1 large courgette, spiralised or cut into tiny cubes (I use a Kenwood mini chopper)
  • 100g feta crumbled
  • 2 crushed garlic cloves
  • half teaspoon chilli flakes
  • small bunch of mint, finely chopped
  • 1 teaspoon sumac powder
  • zest of an unwaxed lemon
  • 1 large egg beaten

Method

  1. Mix all the ingredients together in a large bowl with your hand and shape into burgers.
  2. Place these on a baking tray lined with tin foil and cover with cling film.
  3. Put these in the fridge to firm – the smell is amazing.
  4. At this stage you can also freeze the burgers – or some of them – for another day.
  5. Put the tray under a hot grill and cook the burgers for 8-10 minutes, gently turning, until golden brown. 
  6. Enjoy with a fresh salad. No burger baps required!

Well done Pam and thanks for sharing this delicious looking recipe.

The author of a guest post gets to choose a favourite track of theirs for adding to the ADK Playlist. Pam’s choice is Happy by Pharrell Williams. She saw him performing the song live and says it was brilliant!

Categories
Recipes Sides Starters

Chunky Guacamole

Here is another recipe that is ideal for outdoor summer eating. This avocado dish goes well as a starter with a barbecue, or side with a salad eaten al fresco, particularly if accompanied by an ice cold bottle of Mexican beer. It is based on a recipe for guacamole by those motorcycling masterchefs, those culinary cruisers, those grooming gastronomes (Ed: that’s enough alliteration, thank you) the Hairy Bikers.

Servings

This will make enough as a starter, or side, for 4.

Timings

10 mins to prepare, no cooking involved.

You Will Need

  • one mild chilli pepper, seeds removed
  • bunch of coriander leaves
  • two medium sized tomatoes
  • half a red onion
  • juice of half a lime, plus slice to garnish
  • 2 – 3 fresh avocados

Method

  1. Put the ingredients in a food processor with blade fitted, and blitz until well blended, but still with chunks of veg visible.
  2. Er, that’s it. Scrape into a bowl and serve.

Customise it!

Serve with tortilla chips or with veg crudites, like carrot and celery sticks. The idea of leaving it a little chunky is so that you can pick up some identifiable pieces of the veg, coated in the creamy green sauce. It’s important not to over pulse it in the food processor to the extent that you lose the chunks and it takes on the consistency of baby food!

Enjoy this while the sun is shining on us – it won’t last forever. ‘Avo’ nice day!