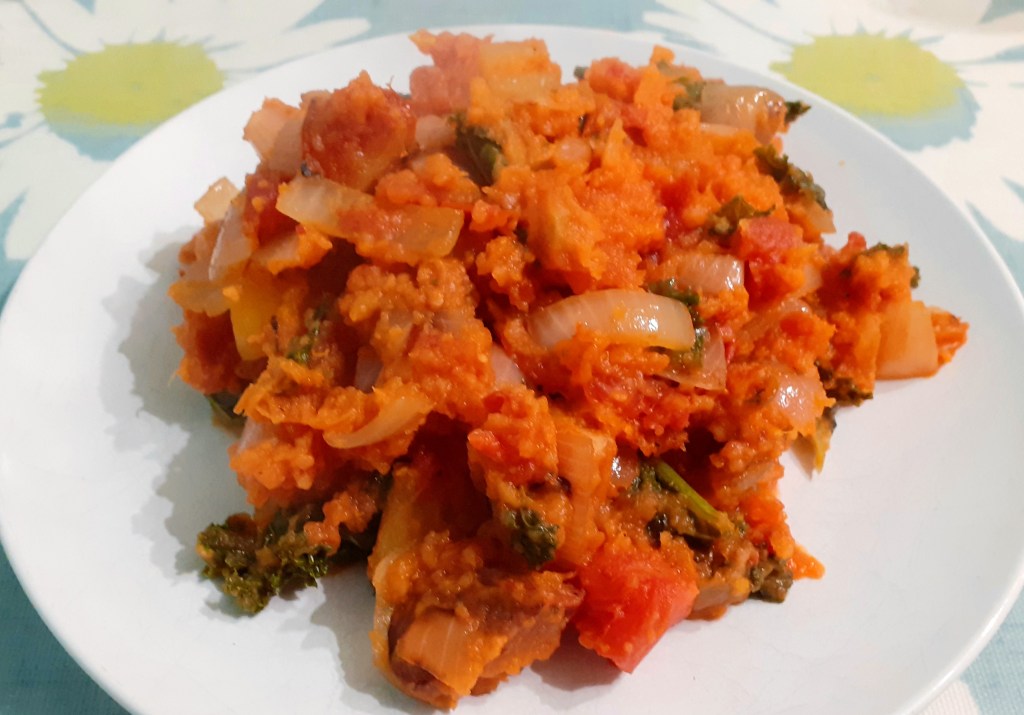
This is a great midweek meal when the nights are closing in, and a dish that I find irresistible! I love the smell and crackle of the chorizo as it sizzles in the pan, and the vivid, contrasting colours. The bright orange of the sweet potato, and freshly picked green kale from the garden, combine to make this autumn on a plate.
Servings
This is a meal for two.
Timings
15 – 20 mins to prepare.
You Will Need
400g sweet potatoes, peeled and chopped into chunks
20g butter
about 80g fresh kale (for me this was 8 or 9 leaves)
1 onion
1 red pepper
100g chorizo
400g can of chopped tomatoes
Method
Put the sweet potato chunks in a saucepan and bring to the boil. Reduce to a simmer for 15 mins.
Chop the kale leaves into strips and place in a steamer over the saucepan. They will soften in the steam from the sweet potatoes as they cook.
Separately, in a frying pan, add the onion and red pepper, chopped, along with slices of the chorizo. There is no need to add any oil or spices, as the chorizo will provide all the oil and flavouring you need.
After 5 mins, add the chopped tomatoes to the frying pan and stir in.
When the sweet potato has cooked, drain it and mash with the butter. Add it to the frying pan, along with the steamed kale.
Give it all a good stir in the frying pan and turn up the heat. Turn the mixture over a few times with a broad spatula – you should try to get some parts of the hash crisped and browned. Serve when it has reached a level of charred-ness that suits your tastes!
Customise It!
Stick to the core of sweet potato, kale and chorizo, but beyond this add in other veg you like. Garden peas or sweetcorn would be fine, for example.
You can use any good chorizo sausage. The one I used is a British-made variety from the Cotswold Curer (see photo). I picked this up at Warwick Food Market when I was in the West Midlands for the Commonwealth Games, back in the summer.
Whatever chorizo you use, remember this is a hash – switch up the heat, get that spatula in there and make sections of it nice and crisp by flipping over and over.
Just like my favourite track from Hot Chip – the latest addition to the ADK Spotify Playlist:
Continuing the recent theme of cooking with autumn vegetables, this dish brings together a variety of seasonal root veg in a subtle yet spicy curry that is suitable for both vegetarians and vegans. My meal, shown in the photo, used celeriac, mooli (or white radish), kohl rabi, carrot and parsnip, though other veg are available!
Servings
This will make enough to serve four.
Timings
10 mins to peel and chop the root veg, and 30 mins to roast. The rest of the prep can be done while the veg is roasting. Allow 10 mins more to combine and finalise.
You Will Need
a baking tray full of root vegetables, peeled and chopped into chunks. I used celeriac, mooli (white radish), kohl rabi, carrot and parsnip
oil to drizzle
1 medium onion
1 garlic clove, crushed
1 fresh chilli, or 1 tsp chilli powder
1 tsp cumin seeds
1 tsp garam masala
1 tsp nigella seeds
500g passata
bunch of fresh coriander
400ml can of coconut milk
rice to serve
Method
Drizzle oil over the tray of chunked root veg and roast in the oven at 180C for 30 mins.
While the veg is roasting, heat some oil in a saucepan and toss in the garlic and spices until sizzling. Then add in the onion.
After a few minutes, add in the passata, Hold the bunch of coriander over the pan and, with scissors, cut in a generous amount.
Let the passata and coriander cook for a few minutes.
Add in the coconut milk and stir to combine. Cook for a further 5 – 10 mins. It will reduce slightly to give a thick, spicy sauce.
When the root veg is roasted, scrape it into the saucepan and stir in.
Serve with boiled rice.
Customise it!
Lots of scope to vary the veg. Butternut and other squash will work well in the roasting tray, also some chestnut mushrooms or peppers. Adjust the strength of the chilli and spices to suit your taste.
For musical choice, I have gone for a favourite track of mine, which also serves as an homage to the good people at our local community farm who harvest these lovely root vegetables from the soil – Can You Dig It by The Mock Turtles.
The signs of autumn are now all around us. I’ve been enjoying some beautiful wooded walks amidst glorious shades of red and orange leaves. The days are getting cooler, and this coming weekend, in the UK, our clocks will be going back one hour, bringing in earlier, darker evenings.
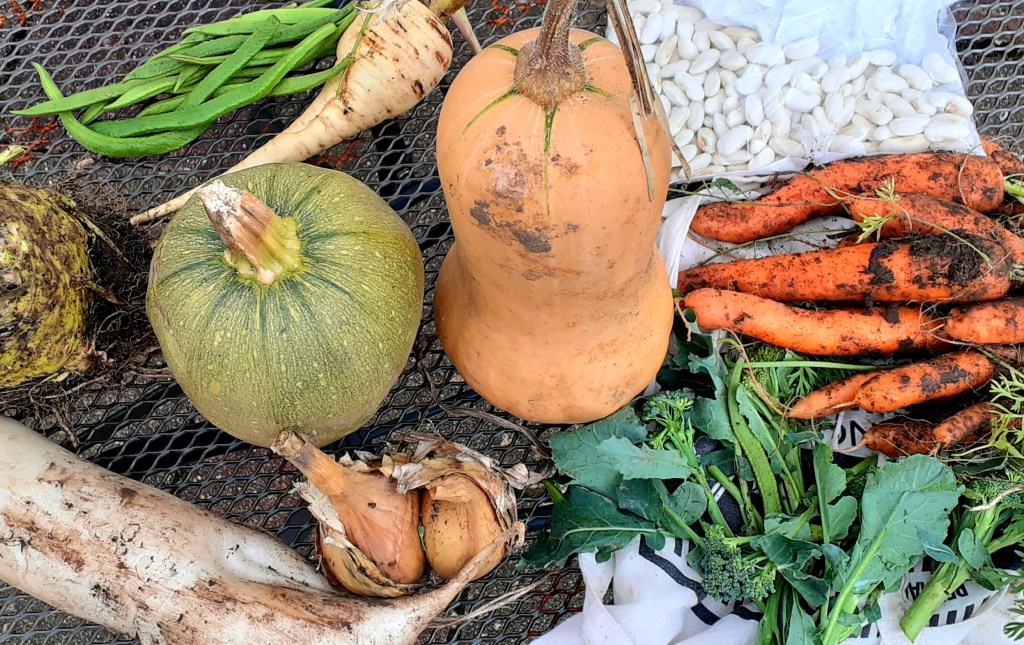
This dish was inspired by the arrival in the ADK Kitchen of a wonderful harvest of autumn vegetables from our local community farm. You can see these spread out in the photo below: butternut squash, another (as yet unidentified!) variety of squash, parsnip, carrots, onions, celeriac and mooli (white radish). Also included in the crop was some broccoli, green beans and fresh butter beans.
There was too much to use in one dish, so I focused on the squashes and root veg, which I think are lovely roasted. I added a tomato and onion sauce, with a maverick ingredient – black olives. It is topped with a crisp crust of wholemeal breadcrumbs, grated cheese and chopped nuts.
The next photo shows the finished article, warm from the oven. Served with a nice glass of red wine, it makes a great comforting meal on an autumn evening, now that the nights are drawing in.
Timings
10 mins to prepare and chop the veg, which then roasts for 30 mins. The rest of the prep you can do while the veg are roasting. Allow a further 20 mins for the assembled dish to roast further.
Servings
This will serve 6 people.
You Will Need
A pyrex dish-ful of chopped seasonal veg: I used butternut squash, celeriac, parsnip and mooli, and added some chestnut mushrooms and red pepper
A sprinkling of herbes de provence
Some olive oil
A 500g carton of tomato passata
1 onion
1 clove of garlic
75 g pitted black olives, whole or chopped
5 or 6 slices of wholemeal bread chopped into crumbs
75g grated cheddar cheese
75g chopped mixed nuts
Method
Chop enough veg to half fill the pyrex dish that you will use. The veg should be in chunks roughly about 2-3cm square. Tip them into a separate metal baking dish and sprinkle with the herbes de provence. Drizzle with olive oil and roast in the oven for 30 mins at 180C. Spread them so that they are in a single layer, and use a second metal dish if necessary.
While the veg is roasting, chop the onion and add it to some hot olive oil in a saucepan, with the garlic clove, crushed. After a few minutes, tip in the passata and black olives, and mix. Let it bubble for around 10 mins so that it is slightly thickened in consistency.
Separately, combine the breadcrumbs, grated cheese and chopped nuts in a bowl. Get your hands in there and give it all a good mix. You want the cheese to be intertwined with the other ingredients so that, when it melts, it will bind it all together into a crisp coating.
When the veg has roasted, combine it with the tomato sauce, and pour into the pyrex dish. Pat it all down with the back of a spatula so there are no gaps.
Sprinkle over the bread, cheese and nut crust, evening it out and patting it down with the backs of your fingers. Give it a final drizzle of olive oil.
Cook in the oven for around 20 mins, or until the top is crisp and golden. With some ovens, it may help to give it a final 5 mins under the grill to crisp it up. Serve.
Customise it!
Lots of scope for customising here, starting with choice of veg. Really, you can use whatever is in season and whatever particular veg you prefer. There are many varieties of squash and root veg around this time of year, most of which benefits from roasting, helping it sweeten and caramelise on the outside and succulent to bite into.
With the crust topping, you can use other bread for the crumbs, and other cheese. Grated blue cheese would give it a lovely taste twist, as would some parmesan. The next time I make this I will include some pumpkin and sunflower seeds in the crusty mix.
You can omit the olives if they’re not your thing. I love them, and had the idea to include them in the sauce and serve the dish with a warmed, sliced black olive ciabatta (see my photo), which all worked really well.
The dish is suitable for vegetarians. To make it vegan, simply omit the grated cheese, though the topping will be a little looser. However, you could always use a vegan cheese. As ever, feel free to experiment!
This time of year also means that Halloween is approaching. I’ll be saying more about this in this coming weekend’s post, and hopefully having a little fun. For now, I’ll choose a track from a Halloween Playlist I have on Spotify, to share as musical accompaniment.
Cue Superstition by Stevie Wonder. Nothing more to say!
As summer slips away into autumn, the space in our garden occupied by sunshine-infused tomatoes and cucumbers is gradually giving way to curly kale.
Kale is highly regarded as a source of numerous vitamins and nutrients that keep our bodies healthy. It is also one of my favourite vegetables to cook with – watch out for some more kale dishes posted before this autumn is through!
This dish started out as a Mary Berry bubble and squeak-type recipe (thanks for the inspiration, Mary!), which I modified to take advantage of the copious amounts of fresh kale that have been appearing each day over our garden wall. I also added scallions/spring onions, which go down a treat.
I served the cakes with a rasher of good back bacon on top, along with a soft poached egg and a twist of chilli flakes. The cakes can be prepared in advance and shallow fried as required. They make a tasty and healthy midweek meal or weekend brunch.
Servings
This will make 8 cakes.
Timings
The first stage of preparing and boiling/steaming the veg (which can be done up to 24 hrs in advance) takes about 20 mins. Once slightly cooled, combining and shaping the cakes (which can also be done in advance) will take about another 10 – 15 mins. Allow 10 mins to shallow fry the cakes before serving.
You Will Need
1kg potatoes – I used Maris Piper
40g butter
100g fresh curly kale
1 tbsp wholegrain mustard
50g cheddar cheese, grated
3- 4 scallions/spring onions, finely chopped
40 g plain flour
a few pinches of sea salt
oil for frying
Method
Peel, chunk and boil the potatoes for 15 – 20 mins in water with a pinch of sea salt added. Drain well and leave in the warm saucepan to cool slightly – this will ensure that any excess moisture evaporates, leaving the potatoes dry.
While the potatoes are cooking, place the kale in a steamer over the saucepan for about 10 mins. Remove the steamer and spread the kale out on some kitchen paper on a tray. With another piece of kitchen paper, pat the tops of the kale leaves to make them as dry as possible, then shred with a sharp knife.
Add the butter to the warm potatoes and mash until smooth. Add in the shredded kale, scallions, cheese and mustard and combine well. Check the seasoning and give it another twist of sea salt if necessary.
By this stage, the combined mixture should have cooled sufficiently to enable you to grab a handful and shape it into a pattie, or cake, the size of a burger.
Sprinkle the flour on a plate and coat each cake on both sides.
Shallow fry the cakes in the oil until brown and crispy on the outside, while soft in the middle.
Customise it!
I put some rashers of bacon in the pan to cook alongside the cakes, and poached some eggs at the same time. You can serve each cake with a rasher on top, and then a soft poached egg, topped with a twist of chilli flakes – see my photo.
For a veggie option, try chopped tomatoes on top, with or without the egg. Another good combo would be smashed avocado with egg and bacon. Be creative!
Choice of musical track is influenced by the gig tickets I managed to secure while working on this dish. I’m excited to say that next year I shall be seeing the Arctic Monkeys on their UK tour. Consequently, their music has been featuring quite heavily recently in the sounds playing in the ADK kitchen.
I am very interested to hear the new album which is due out in a few weeks’ time. I have always liked the band and saw them live on the AM tour at Earls Court, London in 2013. My favourite album of theirs is still Humbug. I liked the 2018 sci-fi influenced Tranquility Base Hotel and Casino album, though it was quite different from what they had done before. All in all, I’ll award it Four Stars Out of Five…
Basa is still a relative newcomer to our fishmonger stalls and markets. Being a good source of protein, rich in healthy omega 3 fats, and coming from a plentiful and sustainable supply, it certainly deserves our attention alongside the more traditional cods and herrings. You could even say it has earned its plaice (sorry, couldn’t resist that one). Being quite inexpensive and available in many supermarkets also helps.
I’ve cooked with it a few times and found that it tends to stay firm, holding its texture and shape where some other types of fish are more likely to fragment into flakes. This means it is quite receptive to marinades and toppings that add complementary tastes.
Servings
This will make a meal for two.
Timings
10 mins to prepare, 25 mins in the oven.
You Will Need
2 basa fillets
1 garlic clove
2-3 cm piece of root ginger
1 small green chilli
1 small red chilli
half a lemon
olive oil
black pepper
Method
Line a baking tray with foil and brush it with a little of the oil. This will ensure that you can remove the fish after cooking, to serve in one piece!
Lay the 2 fillets on the foil. Top with finely chopped garlic, ginger and chillis. Splash on the lemon juice and a drizzle of oil, with a few twists of pepper.
Cook in the oven at 180C for about 25 mins.
Customise it!
Stick with the holy trinity of garlic, ginger and chillis, but if you want to add some chopped spring onions that would be fine also. Fresh coriander (cilantro) would be excellent.
If you like fish with a buttery sauce, you could make up some of the lime and sea salt butter I made on this earlier post (see here, step 9) and melt some over the fish as you serve it. The lime and sea salt will work well with the chilli and ginger.
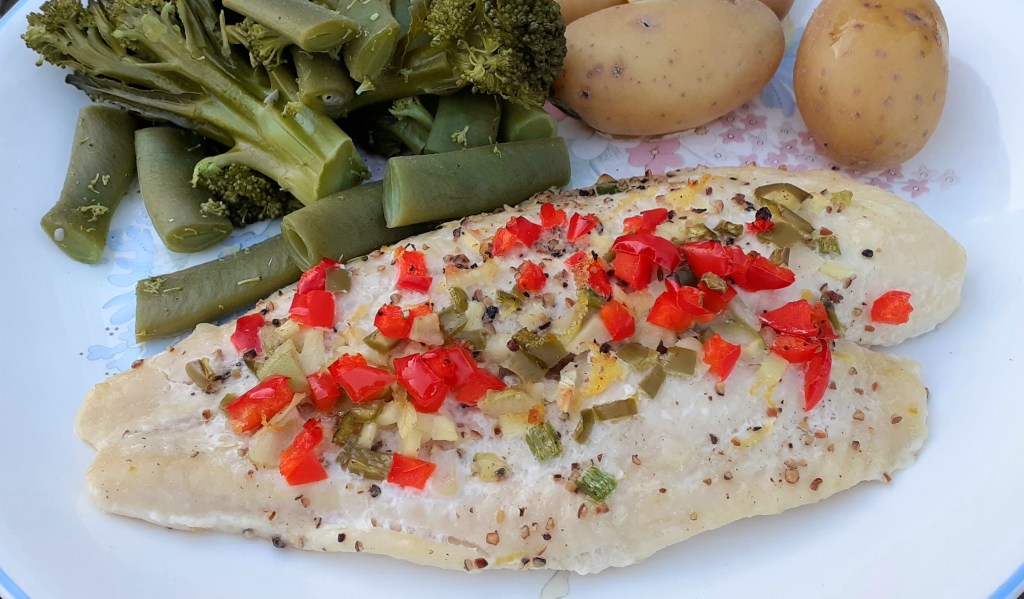
I served this with some new potatoes and steamed green veg, as the picture shows. I imagine it would also be really good with some stir fried veg or noodles, and a spicy sauce.
There are other Basa recipes around, but you will do well to beat this. Or, should I say, Beat Dis!
It’s an honour to add Bomb the Bass to the ADK Spotify Playlist.
A roasted filled portobello mushroom makes a great vegetarian dinner. It holds its shape and texture when cooked and releases its juices when you cut into it with a knife. In this dish it is combined with summer veg served with melting slivers of butter infused with lime, sea salt and chilli flakes.
Servings
This will make one serving, so multiply up by however many mouths you are feeding (I’ll say more about this below!)
Timings
20 mins to make the vegetable chilli filling, then 20 mins in the oven to roast.
You Will Need
1 stick celery
half an onion
1 carrot
1 tsp chilli powder
1 tsp cumin seeds
half a red, green or yellow pepper
a little vegetable oil
1 tablespoon of plain flour
half a 440g tin of kidney beans
300g vegetable stock
60g red lentils
1 portobello mushroom
seasonal veg (e.g. green beans, carrots) for one, boiled or steamed
40g butter, softened
zest and juice of half a lime
a few twists of sea salt
a few chilli flakes
Method
Put the chilli powder and cumin seeds in some oil, until sizzling.
Finely chop the onion, celery, carrot and pepper and shallow fry until softened.
Take off the heat and sprinkle the flour over. Turn the veg over until it is coated in the flour.
Add the stock and bring to the boil. When boiling, add the lentils and kidney beans. Put on the lid of the pan and simmer for 10 – 15 mins until the lentils have softened.
Remove the lid and let the mix reduce through evaporation, until you have a soft, thick consistency.
Remove the stalk from the centre of the mushroom, chop and set aside. Brush the mushroom all over with oil.
Fill the mushroom with the chilli mix, topping it with pieces of the stalk, gently pressed down into the mix. Place on a metal tray and roast in the oven at 180C for 20 mins.
While the mushroom is roasting, chop and boil or steam the seasonal veg.
In a small bowl, mix the butter, lime zest and juice, sea salt and chilli flakes. Place in the fridge until serving.
Serve up the roasted mushroom with the veg on the side. Slice off a few slivers of the butter and let melt over the veg.
Customise it!
Lots of scope for going off piste here, while sticking to the fundamentals of a roasted portobello mushroom, a chilli filling and seasoned butter for the veg. Swap in other types of lentil or pulse, and use some drops of tomato passata if you wish along with the stock. Choose whichever veg you prefer to serve on the side, and prepare it as you like it. Garlic goes well in both the chilli mix, and especially in the butter.
I’ve given the measurements to make one portion here. However, I would quite often make a larger pot of the vegetable chilli and serve some of it on other occasions, in a different way (e.g. with rice) or freeze some of it for a later date. Similarly, the seasoned butter is great with other foods, such as sweetcorn and fish, so I sometimes make a larger batch of that as well.
In other words, don’t be afraid to gross up the amounts. Stick to the instructions above and you’ll have a nice meal for one. Go larger and who knows – you may have enough to feed a Seven Nation Army. Cue the White Stripes!
I’m pleased to announce that we have another guest post on A Different Kitchen! It is by my sister Pamela, an experienced and talented cook whose meals I have enjoyed on numerous occasions.
Hi. My featured meal is Turkey, Feta and Courgette Burgers. I have used this recipe many times. It’s healthy, tasty, easy and uses up some of the mint in our garden (you can see some of our mint bush in the photo). It is also useful if you have an abundant courgette (or zucchini) harvest, which some of you may be experiencing at this time of year.
Servings
Depending on your preferred size of burger, the recipe makes as many or as few burgers as you like!
Timings
10 mins prep, and 10 mins to grill.
You Will Need
500g turkey breast mince
1 large courgette, spiralised or cut into tiny cubes (I use a Kenwood mini chopper)
100g feta crumbled
2 crushed garlic cloves
half teaspoon chilli flakes
small bunch of mint, finely chopped
1 teaspoon sumac powder
zest of an unwaxed lemon
1 large egg beaten
Method
Mix all the ingredients together in a large bowl with your hand and shape into burgers.
Place these on a baking tray lined with tin foil and cover with cling film.
Put these in the fridge to firm – the smell is amazing.
At this stage you can also freeze the burgers – or some of them – for another day.
Put the tray under a hot grill and cook the burgers for 8-10 minutes, gently turning, until golden brown.
Enjoy with a fresh salad. No burger baps required!
Well done Pam and thanks for sharing this delicious looking recipe. The author of a guest post gets to choose a favourite track of theirs for adding to the ADK Playlist. Pam’s choice is Happy by Pharrell Williams. She saw him performing the song live and says it was brilliant!
Today I’m pleased to announce we have our first guest post on A Different Kitchen! It is by my son Jonny, a talented, fast-up-and-coming young cook. If you’re finding that work makes you too busy to prepare tasty and healthy meals, try Jonny’s suggestion below.
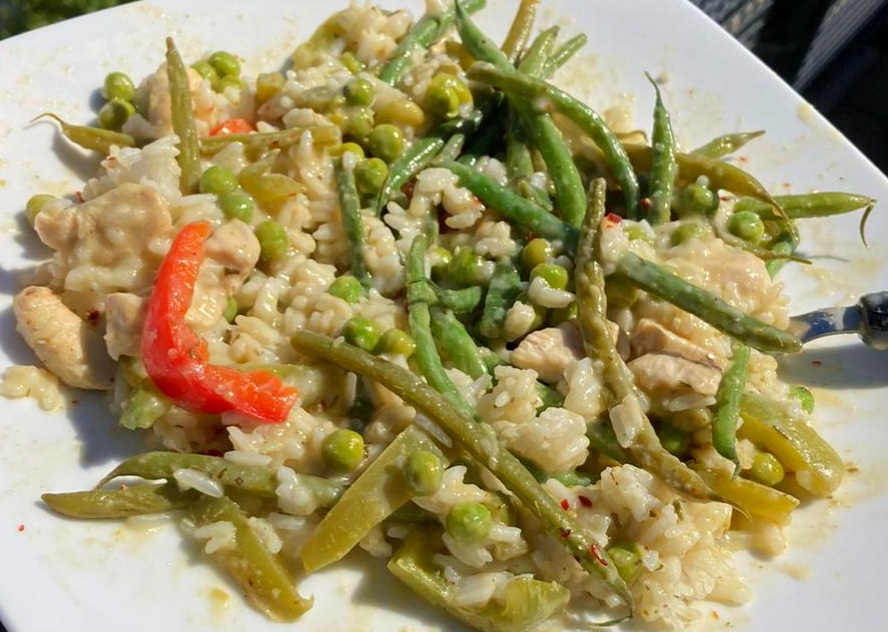
Hi. My featured meal is a Thai Green Curry with Jasmine Rice. I like this meal because it is fun to make, healthy and tasty, with a spicy kick. It also reminds me of when I ate it in Bangkok on my 22nd birthday.
I cook for myself, alongside having a busy full-time job. Quite often this means I have to spend time researching and preparing reports and presentations at short notice, with tight deadlines. It would be easy for me to fall back on convenience meals from the freezer and microwave, but I try to avoid this. I don’t think they are as tasty or healthy as meals made from fresh meat and vegetables. I don’t mind using some ready-made ingredients, as this speeds me up (for example, the recipe below uses a jar of curry sauce that I like).
Cooking is also good fun and gives me a break from my work.
Servings
This will make enough for three main meals. I usually make enough in advance to give me a main meal each day for three days. This saves me preparation time on subsequent days.
Timings
20 mins to prepare.
You Will Need
250g green beans
1 red pepper
100g garden peas
1 chicken breast
1 340g jar of Thai green curry sauce (I like Morrisons’ one, made with coconut, green chillies and lemongrass, but others are available)
Sprinkling of chilli flakes
200g jasmine rice
Method
Chop the chicken into chunks and fry in a wok, till they are turning nice and brown.
Chuck in the green beans and the red pepper, chopped. Give it all a good stir.
While it’s cooking, boil the kettle and add the water to the jasmine rice in a saucepan. Bring to the boil and simmer for about 10 – 12 mins.
Add the jar of sauce to the wok and stir it in so it is all heated through. Sprinkle over the chilli flakes.
Drain the rice and serve a third of it on a plate, along with a third of the curry.
Customise it!
You can add any other veg you like or have to hand. An onion would go well, or anything else green, like courgette or mange tout.
I serve this with a bottle of ice cold water! Earlier in the day I fill two thirds of a 2l plastic bottle with water and put it in the freezer till it’s frozen. Take it out of the freezer and it will slowly thaw, providing ice cold water all day. This helps me stay cool and hydrated in all the heat we’ve been having, and is a good accompaniment to the spicy curry.
Well done Jonny and thanks for sharing this delicious looking curry. Jon now has a repertoire of 10 recipes he’s mastered, each providing three days of main meals. All being well, he’ll share some more of these in future guest posts!
The author of a guest post gets to choose a favourite track of theirs for adding to the ADK Playlist. Jon’s choice is Electric Feel by MGMT.
Our weather this weekend was just ridiculous – 30+ degrees C every day – so cooking out of doors was definitely on the agenda.
Fish baked on the barbecue is an idea I first came across in a recipe book by legendary outdoor chef, Keith Floyd. For me, this was a different way to cook fish and I have done this several times since.
Servings
This is a meal for two.
Timings
5 mins prep, 15 mins to cook.
You Will Need
Tin foil
2 fillets of fish
handful of spring onions
juice of half a lemon
drizzle of olive oil
cherry tomatoes on the vine
sprinkling of herbes de provence
Method
Start by tearing off a large sheet of foil, and brush it lightly with oil.
Place a couple of fish fillets in the middle (I used cod loins, but other fish will do just as well)
Give the fish a topping. This can change depending on what’s in season and what you have to hand. I had a good crop of spring onions from the garden, so chopped these over the fish, adding the juice of half a lemon, a drizzle of olive oil, and a few twists of black pepper.
Then gather up the sides of the foil to form a parcel, crimping the edges together in a pasty-type shape.
Place the parcel on the griddle plate of the barbecue and close the lid. Leave it for about 10 – 15 mins.
We have a glut of cherry tomatoes in the garden at the moment, with all this hot weather, so I snipped off a vine and cooked this also on the griddle, alongside the fish parcel. I brushed the vine and tomatoes in olive oil and gave them a sprinkling of herbes de provence. They look great on the plate and provide a rich, squishy sauce to complement the fish.
Take care when opening the fish parcel as there will be a sudden escape of heat. The flesh of the fish should be in flakes, and some parts of the underside will be lightly charred (see the photo above, taken as the parcel was opened). This is a really nice part of the dish, as it gives it a taste and texture you will not normally get when cooking fish in a more conventional way, like in an oven or a pan. Don’t overdo it though, or the fish will burn!
Customise it
There’s lots of scope for playing around with the topping – parsley goes well if you have it, and also a few capers.
My BBQ-baked fish and tomatoes was served with a few new potatoes and lightly steamed summer green veg, washed down with a glass of chilled Sauvignon Blanc – dining al fresco, of course!
As for the musical accompaniment to this post, the last time I blogged about a barbecue meal I opted for The Doors’ Light My Fire. This great track by The Prodigy was in close contention, so here it is in its own right, now added to the ADK Playlist. It’s the song every barbecue chef should be humming as they warm up their grill, and guaranteed to get the party going:
It’s the season of outdoor cooking, so why not crack open a beer or soft drink and get some skewers roasting on the barbecue?
Mine shown in the photo are made from 5 marinaded chicken breasts cut into chunks, one red pepper and one courgette sliced. The marinade ingredients were a crushed clove of garlic, a finely sliced chilli, some chopped root ginger, a handful of fresh coriander leaves, juice of a lemon, a grind of seasalt, a twist of black pepper, a dollop of olive oil and a squidge of tomato puree to give it some colour. I left the marinading meat in the fridge for about 18 hours in a tight lidded casserole dish. Be warned that an impatient lifting of the lid will release an incredible aroma that will have you salivating and invoke an instant craving for hot food!
I threaded the meat and veg on to 8 wooden skewers about an hour before cooking. The skewers had been soaked in water for about an hour to stop the exposed ends from burning up in the heat. Use a basting brush to coat the slices of veg with the residue of the marinade so that they cook nicely rather than burn.
About 15 – 20 mins on the barbecue should do it, turning the skewers every so often so they cook evenly all over. Serve up with salads plus aforementioned soft drink or beer.
After exploring a few options for a track to add to the ADK Playlist with this post, I’ve settled on this classic from the Doors. To any fans of the Prodigy who may be following, all I’ll say is it was a close-run thing, and I guarantee there will be at least one more bbq-related post for you before the summer is out!